Sometimes Crafter

  • Home
  • About
  • Quilting
    • Price + Services
    • Designs
    • Gallery
    • Quilt Prep
    • Quilting Request
  • Blog
    • Tutorials
    • Quilting
    • All Categories
  • Contact
    • Errata
    • FAQ
  • Shop
    • Quilt Patterns
    • Bag Patterns
    • Sewing Patterns
    • My Account
    • Cart

Prepping Your Quilt Before Shipping

Please make sure of the following before sending your quilt:

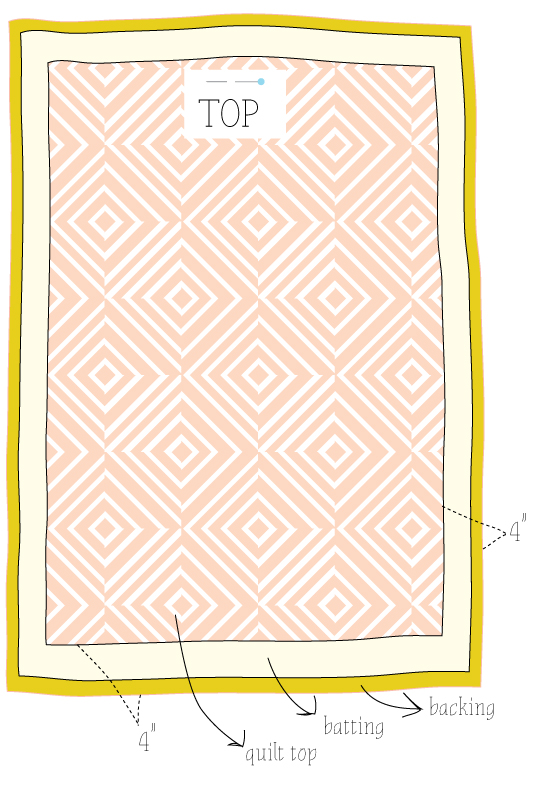
+ Your batting and backing need to be at least 8″ longer and 8″ wider than your quilt top. Larger is okay. (This is 4″ wider than the quilt top on all 4 sides)

+ Horizontal seams are strongly suggested, and the fewer seams the better.

+ Be sure your backing is square. Top and bottom edges at a minimum.

+ Label the top of your quilt top AND backing.

+ Press quilt top and backing well and trim loose threads. Be sure seams lay flat, especially at seam joins.

+ Do not pin or baste your layers together before sending. The top and backing will be loaded independently onto the frame.

+ Sheets are not usually considered suitable backing for quilts because of their high thread count. Send for use at your own risk. Sheets need to be out of their packaging with bulky seams removed. I strongly suggest washing and pressing before sending. Spray starch will be used on stubborn creases/wrinkles.

+ I do not quilt “double sided” quilts (i.e. quilt tops as backing).

+ I do not accept Minky, Cuddle, fleece, jersey (or similar stretchy materials) as quilt backings.

+ Backing with sharp creases or stubborn wrinkles will be lightly misted with water or spray starch when loaded on the frame. Please let me know if this is not okay.

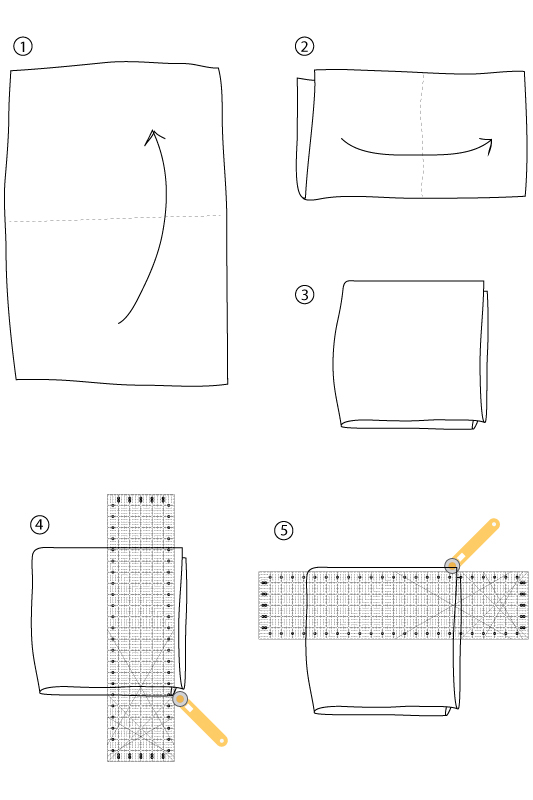
Squaring Your Quilt Backing

1. After you have pieced your backing as desired, fold the backing in half width-wise.

2. Fold your backing in half again, this time in the opposite direction from the first fold.

3. Your backing will now be folded into quarters. Two sides will have raw edges and two sides will have folds. Make sure the raw edges of the fabric line up as best as possible. They most likely will not line up exactly, and that is why we will be trimming in the next step.

4. With a rotary cutter and large enough ruler, I suggest a 6″ x 24″ ruler, lay the ruler along the length of one of the raw edge of your backing. Line up one of the measurement lines on your ruler along the fold of fabric. (For example, line up the 1″ line across the ruler with the folded edge of the fabric.) Make sure your ruler is very close to the raw edge, but far enough away to give you a clean, straight cut through all four layers. Trim the fabric along the raw edge. You should only be removing a small amount of fabric.

5.Rotate your ruler and repeat for the other raw edge. If you choose to rotate your fabric before this second cut, do so carefully so as not to disturb your first cut.

Because you used the folds of the fabric to line up your ruler before making your cuts, you backing fabric should now be square.

I noticed my feed was lacking vibrant color of lat I noticed my feed was lacking vibrant color of late, with the thick coating of snow in my recent photos, so today is a perfect day to share @mne_textiles colorful Lonestar quilt I quilted for her recently. It was such a lovely punch of color for this drab time of year, and it was so well done for all those bias edges and Y-seams. She did an amazing job on this! This was quilted with the pattern Celtic Sea and we used Poly Select batting with a light blue thread.  #sometimescrafterlongarmquilting #longarmquilting #gammillquilting #gammillstatlerstitcher #quiltersdreambatting
Day 4 - lots of ice! The ground looks like an ice Day 4 - lots of ice! The ground looks like an ice rink and the forest is full of breaking tree limbs and falling ice and snow. Its warming up pretty quickly, which is fine by me. I enjoyed the snow, but now I'm done.  #sometimescrafterfarm #pnw
Just so much snow! It's currently about 30 and rai Just so much snow! It's currently about 30 and raining, so we get to end with a nice coating of ice on 12"+ snow. Check out @elementaladventuring to see our buried cars. You can only see Aaron's car handles he has so much snow on and around his car. #sometimescrafterstudio
Day 3. So much snow. There's so much snow she can Day 3. So much snow. There's so much snow she can walk right over the patio fencing that's meant to keep the birds off.  #sometimescrafterfarm #charlotteandtheducklings #lucyandherducklings #chinesegoose
We're at about a foot of snow now, and just finall We're at about a foot of snow now, and just finally got a break from snow for a few hours. #sometimescrafterfarm #pnw #ridgefieldwa
The commute to work was a hard one. 😂 #sometime The commute to work was a hard one. 😂 #sometimescrafterstudio
I realized I haven't shared quilting photos in a l I realized I haven't shared quilting photos in a long time, and some of you are here for the actual quilting.  I'm currently working on a custom quilting for @duringquiettime so you'll see this one popping up in my Stories for the next few weeks. #sometimescrafterlongarmquilting #customquilting #gammillquilting #gammillstatlerstitcher
Daisy doesn't know what to think about the snow. S Daisy doesn't know what to think about the snow. She was happy to see us this morning and came right over and started doing her little goose talk, so I picked her up and she was happy. She started honking her alarm when we came back inside. She did not want us leaving her out there. The other birds are all hiding out in the barn, as they usually do. None of them care for snow days. They usually come out and wander around a bit, but we make sure their food and water is right next to the barn so they can hop out and eat, and hop right back in. While they are all hardy enough for snow, they do have to watch their feet as they can be prone to frostbite if they get too cold. #sometimescrafterfarm #charlotteandtheducklings #chinesegoose
Copyright © 2021 Sometimes Crafter
  • Privacy Policy
  • Disclaimer
Theme by SheShoppes