
Patchwork Diamond Tutorial
I really enjoyed making my Improv Diamond Quilt, especially because of how quickly the blocks went together. I’m so glad to be sharing with you today how I made them, and I hope you use them to create your own improv quilt. With this tutorial you will have the exact measurements and instructions for piecing the same blocks I used in my original quilt, however, the basic idea can be applied to any size block needed, it only takes your experimenting with sizes to get just the right size for your needs. A lot of my blocks in the quilt top were made with scraps of fabric left over from other projects, it doesn’t take much to create each block. I would just be sure to have enough background fabric on hand for the entirety of your project, but everything else can come from fat quarters, fat eighths or larger sized scraps.
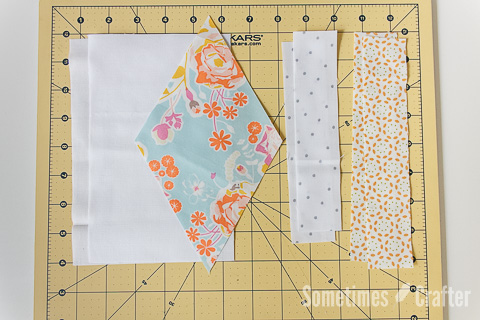
CUTTING INSTRUCTIONS
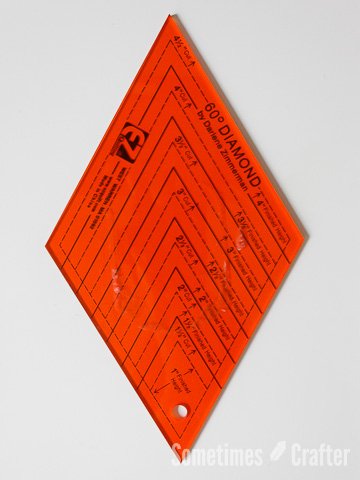
For each block you will need fabric for your main diamond, two “rounds” and a background fabric. To cut my main diamonds, I used the 60 Degree Diamond template by Darlene Zimmerman for EZ Quilting. I picked mine up at Joann’s years ago, and I believe they still carry them. For this block, I used the full template. If you don’t have one of these templates handy, you can easily use one of your straight rulers that has the degree lines already on it.

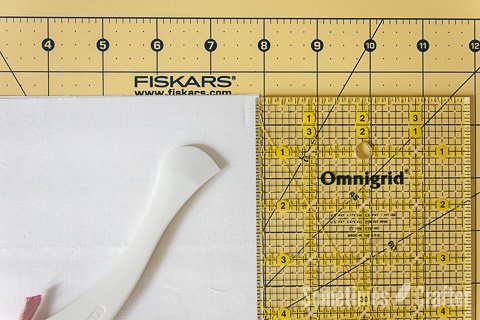
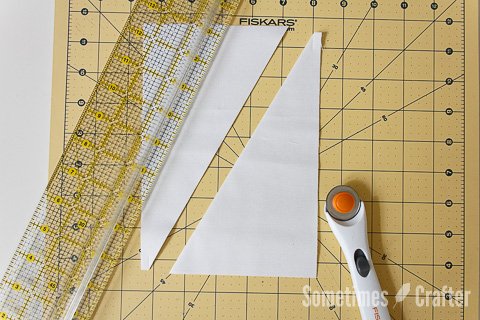
Simply cut a 4.5″ x 7.75″ rectangle from your fabric, and then align the 30 degree line on your ruler along the bottom edge of the block as shown.


Cut from the right corner along the ruler. Rotate the fabric and repeat for the opposite side to create your diamond.
Because this block is assembled similar to a log cabin block, I call each of the skinny strips, above the main diamond, “Rounds”. Round 1 is sewn to the diamond first, followed by Round 2.
Round 1: 1 strip, 1.5″ x 7″ and 1 strip, 1.5″ x 8″
Round 2: 1 strip, 1.5″ x 8″ and 1 strip, 1.5″ x 9″
Background: 2 rectangles, 8″ x 5″
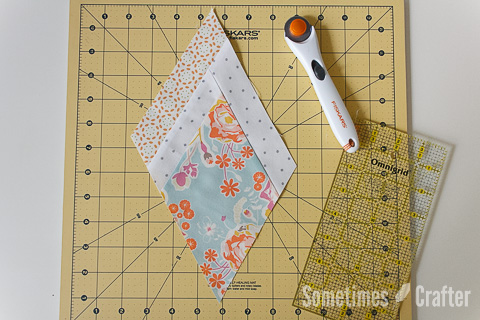
Now we will prepare the background pieces. Place one rectangle on top of the other, right sides together and edges aligned. Using a ruler and marking tool of choice (I used a Hera marker) make a mark 1/4″ in on the right top corner of the rectangle. Repeat for the lower left corner of the rectangle.

Using a long ruler, lay it so the edge you will cut on lines up on each of the marked lines at the top and bottom of the pieces, and cut along the edge of your ruler.
This is a 30-degree angle that is being cut and you will have a 1/4″ at each skinny end of the pieces being cut.
BLOCK ASSEMBLY

First you will sew Round 1 to the diamond. Sew the 1.5″ x 7″ Round 1 fabric strip to the right side of the diamond. When sewing this on, be sure to place the strip as shown in the photos. You want the strip to be just before the left side point with the excess of the strip extending beyond the top point of the diamond. The reason for this will become more obvious when trimming in the following steps.

Press your seam allowance in the direction desired (I liked it best when I pressed the seam allowance toward the diamond) and lay it on to your cutting mat. You will notice at this point that there is quite a bit of excess fabric along the diamonds left side. You could sew your next strip on to the right side now, but I think it is best to trim before going forward to make sure the strip you sewed on was long enough.

Lay your ruler along diamond edge as shown in the photo so that it matches the angle of the diamond. Trim the excess fabric strip at this angle along the top of the diamond. Repeat for the bottom.
If you find that you do not have fabric to trim away when you reach this step, you will most likely need to rip out your stitches and realign the strip, moving it up along the diamond edge. Trimming this now lets us know that there will be enough fabric in our seam allowance as we continue to sew, since the next strip will be sewn to both of these pieces.

Sew on the next Round 1 fabric strip (1.5″ x 8″) to the right side of the diamond, again being sure to have the strip extending up and beyond the top of the diamond. I like to align the bottom of the strip just beyond the side point of the diamond when placing for sewing.

Press your seam allowances in the same direction as the last strip sewn on. Trim the piece as with the first strip sewn on this round, laying your ruler along the edge of the diamond opposite the side sewn.

Round 1 has been sewn and you will not proceed to Round 2.

Using the same methods as in Round 1, sew the 1.5″ x 8″ strip of Round 2 fabric to the left side of the diamond. Press your seam allowance in the same direction as the previous round (again, I like to press it toward the main diamond).
Trim the excess strip away, lining your ruler up along the side of the diamond opposite the edge sewn. Trim the top and bottom of the strip.

Sew the last remaining strip of fabric (1.5″ x 9″) to the right side of the diamond.

Press the seam allowance in the same direction as the seams before, and trim the excess strip away, lining your ruler up along the opposite edge sewn.
Now you will sew the background pieces to the diamond to complete the block. Begin by laying out the pieces around the block as shown so that you have a good idea of where each piece will go. When you originally cut the background pieces, they were placed right sides together, so be aware of the right side and wrong side of the fabric when pulling these apart to lay around the piece.

Starting with opposite sides of the diamonds, pin the background pieces to the diamond as shown. You will want the skinnier ends to extend 1/4″ beyond the edge of the diamond. Because these will be bias edges, and therefore prone to stretching, I suggest pinning these in place before sewing.

Press your seam allowances towards the diamond. No matter how you pressed your other seam allowances, I suggest pressing these seam allowances towards the diamond, which will have it “popping” up from the background fabric, giving it a really nice look on the final block.

Sew the last two background pieces to the block. This time you should have a 1/4″ extending beyond the block on each end of the piece, as you can see in the photos. Once again, I recommend pinning these pieces in place before sewing.
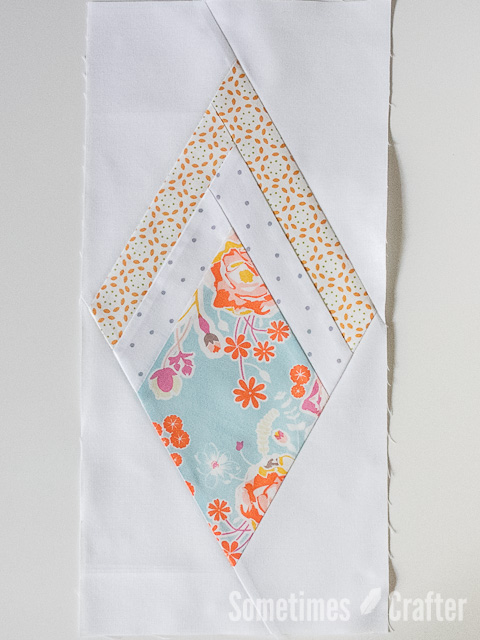
Press these seams towards the diamond and your block is finished. If you were careful with lining up the background pieces, everything should be square on the top, bottom and sides. If they aren’t, that’s okay, you should have enough room to square up the block a little. Just be sure to leave at least 1/4″ of background fabric beyond each point of the diamond so that you don’t cut off the points when sewing these to other pieces. The finished block will measure 7.25″ x 15″.
The key to keeping this block looking nice as you sew is to be consistent in the manner each piece is sewn on (to the left side of the diamond, then the right side of the diamond for each round), consistent in your pressing, and taking the time to pin the background pieces before sewing. I always suggest making a test block before going gung-ho into cutting fabric for lots of blocks for a quilt top. You might find you need to tweak things a little to work better for you. We all sew a little differently, and what works for some doesn’t work for others. If you want to have more background fabric around each of your diamonds, I recommend experimenting with rectangle sizes and where you place your marks on the background fabric before cutting. If I don’t like the way something looks, or I want it to be a little different, that’s exactly what I do – experiment!
No matter if you make these blocks exactly as laid out, our want to go about it a little different, I think this basic idea will work in getting you were you need to be. I hope to see lots of these diamonds popping up around social media. Tag me on Instagram, I just love seeing what has been made from my tutorials and patterns!