Paper Pieced Block
July’s block has got to be my favorite – both visually and for how it’s pieced. I am far from being an expert at paper piecing, but I’ve done it a few times and can at least get you started. I welcome all of you with more experience to please let us know your secrets and share some links. Because we girls can’t manage to get together in the summer months, this will be what I know to make sure Sarah and Liz can get their block put together. I have plans of doing more of this block in the future, so I’d love everyone’s insight into what makes for easier paper piecing…not that it’s hard. Don’t let anything deter you from trying this if you haven’t before. I know for years I talked about taking a class to learn house, but low-and-behold, there was no need to! It’s that simple! And once you start – you might be addicted. Paper piecing gives you beautiful, perfect points every time! Inspiration for this months block found here.
Directions
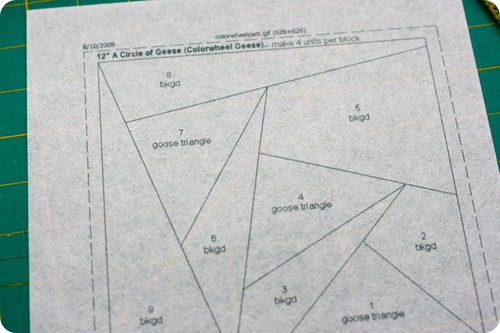
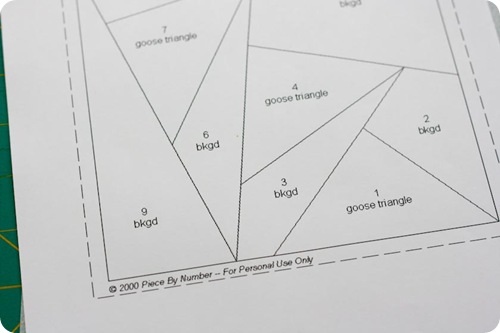
I think the first thing you want to do when working a foundation block is to take a long hard look at it and visualize where your fabric will go. In this case we want to notice that we have prints for our flying geese and solid white for the rest of the print.
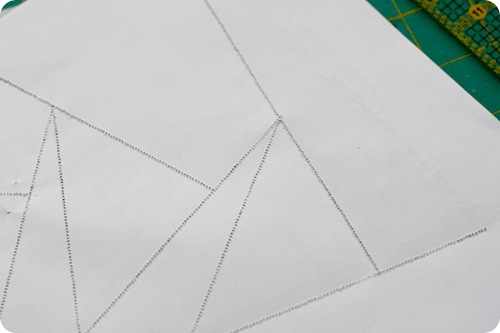
1. Print your template on either computer paper or foundation paper (I recommend foundation paper, it’s a thin newsprint). You will need to print four for this block. This block is a free pattern by Beth Maddocks at her website Piece By Number.
**Note** I made my first block using computer paper and the following three blocks using foundation paper by June Taylor, Inc. [Affiliate Link] It’s kind of like fabric softener sheets, but a little stiffer so it will go through your printer. Supposedly it’s suppose to tear off your fabric better at the end, but I found it just as difficult, if not more so than the printer paper. However, it was great being able to see through it to my fabric to make sure it was in the right spot.
2. If using printer paper, I suggest perforating your lines with your machine (minus the thread) before sewing. Set the stitch length to very small so that later it will tear away easily. Just remove your bobbin and thread from the needle and follow along the lines until they have all been punched. I would suggest doing this for foundation sheets as well.
![]() |
![]() |
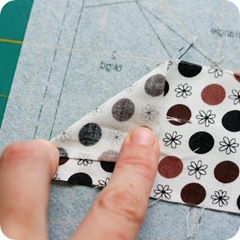
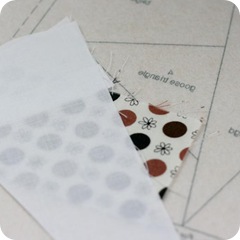
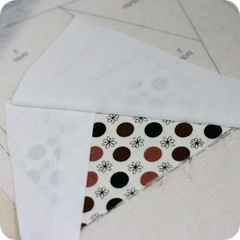
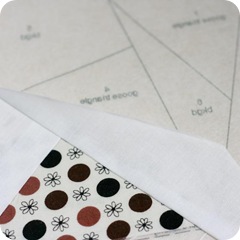
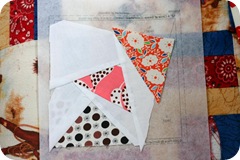
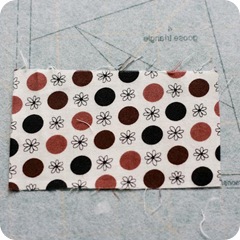
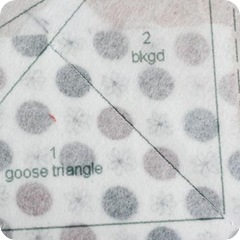
3. With the wrong side of your printed pattern facing up (you can already see where these foundation sheets come in handy) lay your first piece of fabric over the shape labeled “1 – Goose Triangle”. This is going to be your first print fabric. See how it not only covers all of spot one and down into the seam allowance below and beside it, but also into the next spaces (two and three) as well. You always want to make sure you have enough fabric to cover your desired space as well as a little for the seam allowance.
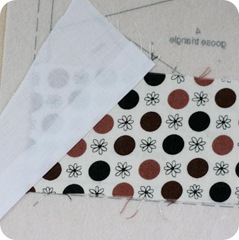
4. Next, grab a piece of your solid colored (in my case white) fabric big enough to cover space #2. Lay your fabric over the space to make sure you have enough to cover it and to give you some for the seam allowance.
![]() |
![]() |
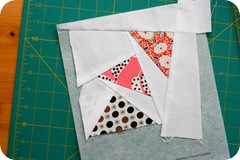
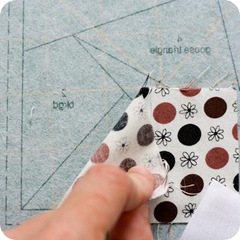
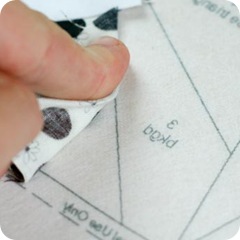
5. Now I like to prep my piece for sewing. I am going to be sewing on the line between space 1 and space 2, so I like to take my fabric and finger press it a 1/4” past the line.
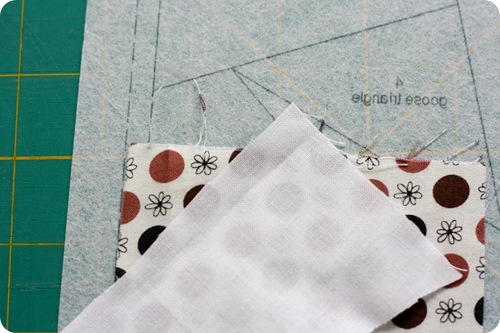
6. I then finger press a 1/4” in along the side of my white fabric where I will be sewing and nestle that into the finger pressed fold of fabric 1.
![]() |
![]() |
7. Flip fabric and foundation paper over carefully and stitch along the line between space 1 and space 2. I used a very short stitch length here, but that still didn’t help me pull this away later.
**Note** I recommend pinning in place the first time around. You may also choose to use a fabric glue stick to help hold the fabric in place. Make sure you use a fabric glue stick, as I have heard a regular glue stick will cause the fabric to turn brown. I suppose if you plan on washing this right away, that probably wouldn’t be a problem.
8. Flip back back over to fabric side a press fabric 2 back from fabric 1.
![]() |
![]() |
![]() |
![]() |
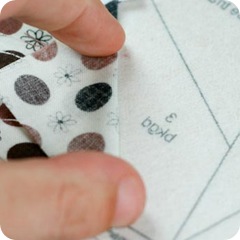
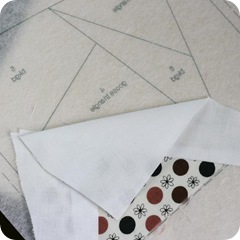
9. Repeat the same process for attaching fabric 3 to fabric 2. In these photos I’m pressing my fabric to match the fold, meaning I will want to make sure it continues 1/4” beyond that at least.
**Note** After I’ve sewn down a piece, I like to go back and trim the seam allowance back to a 1/4” so I don’t have a lot of overhang. When using a white fabric, a lot of what’s underneath will show through, so trimming back helps it to stay tidy.
![]() |
![]() |
Sometimes, I will trim a piece before I sew it down. I use this same method of folding back and finger pressing and then cut along my 1/4” line. Or, as in the four photos above in step 9, I will trim 1/4” past my fold line.
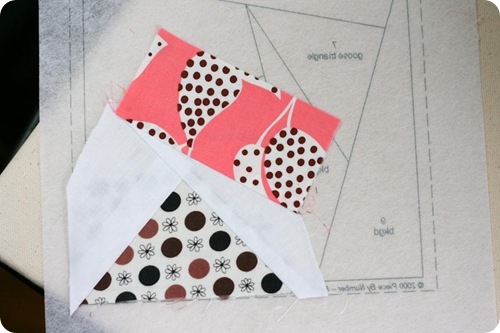
10. Attach fabric 4 to fabric 3, again sewing on the line between these two spaces.
![]() |
![]() |
![]() |
![]() |
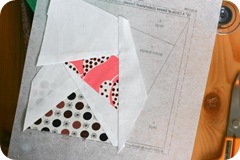
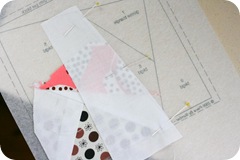
11. You get the point, keep attaching fabrics in numerical order, sewing on the line between your two fabrics, in numerical order: Fabric 1 + 2, Fabric 2 + 3, Fabric 3 + 4, etc… And ignore the fact that the first photo shows that I started to attach fabric 6 before fabric 5. I fixed it before I got sewing, luckily.
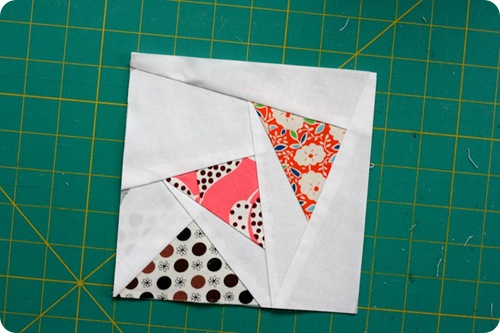
12. Trim your block, in this case, along the dashed line.
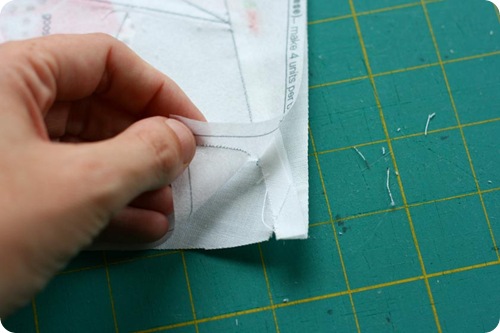
13. Flip over your piece and begin tearing away your paper. Pull gently. With this foundation paper (unperforated) it would pull at my seams and begin to pull fabric away from each other where I hadn’t backstitched.
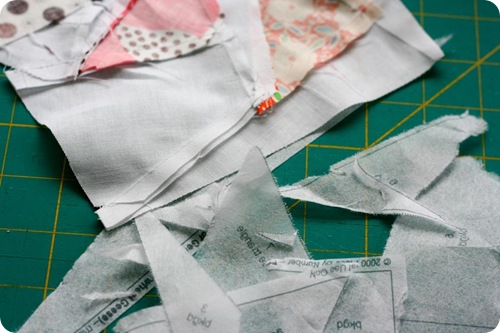
14. Pat your self on the back. You’re done with your first…now you have three more to make! But don’t worry – after the first it goes much faster!
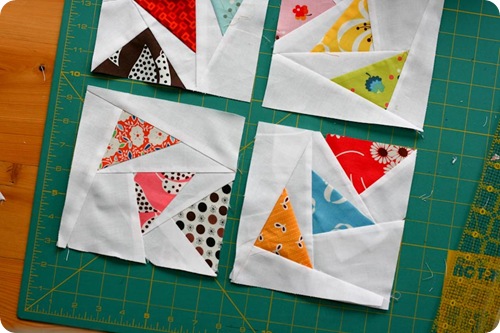
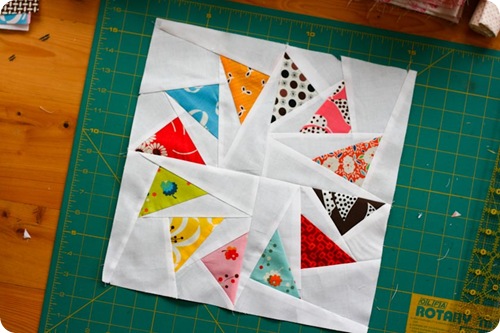
15. Once you have all four blocks made, trimmed and pressed, attach them to each other in the circular pattern.
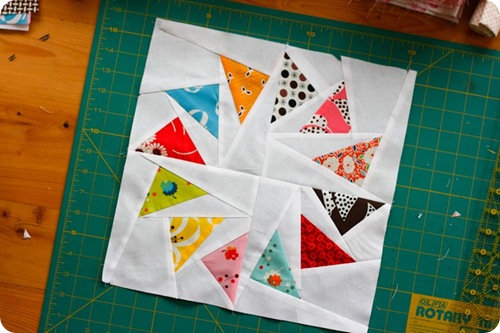
16. Trim your block to 12-1/2” square once that is complete. Hmmm…couldn’t you just see those white fabrics in the center being a different color from the white fabric along the edge? Wouldn’t that be striking!
Make sure to share your advice and links with everyone in the comments! And please, if your joining us, share your blocks in the Flickr pool so we can all enjoy!
Comments (83)
Jeni
August 14, 2009 at 12:40 am
I don’t quilt, but this is simply gorgeous! May be worth learning to piece just to make a nice tote with this on one side! I love the fabrics you choose, this would be such a great way to use up pretty scraps! :)
2ndAvenueStudio-Rachel
August 14, 2009 at 12:41 am
25 cents per sheet for the special paper or printer paper at way fewer pennies. I think printer paper may even be cheap enough for me to just print them all out if I figure out how to print black and white only!
you did it again Christine! what an inspiration you are!
I wanna pull your hair!
twin fibers
August 14, 2009 at 1:38 am
This is so cute! I think it’s a great way to showcase all those special fabrics!
sewtakeahike
August 14, 2009 at 3:38 am
I cannot begin to thank you enough for posting this!! As soon as I read it, I tried it following your awesome tutorial and I didn’t even know it, but I love paper piecing! This was my first time doing it and my block turned out fabulous!!
2ndAvenueStudio-Rachel
August 14, 2009 at 4:37 am
3.25 squares cut diagonally in half are perfect for the geese. to prevent waste, if your not using scraps. and best press makes it so nice.
What obsessed? me? gonna be! :)
how cute would this be in vintage sheets? or liberty?
SG
August 14, 2009 at 8:35 am
Great tutorial! Thank you!
andrea creates
August 14, 2009 at 11:31 am
This is something I’ve never tried but thanks to your tutorial-now I want to:)
The Quilt Buddy
August 14, 2009 at 2:07 pm
I love to do paper piecing. Thanks for sharing your technique. I also prefer the computer paper over the other stuff.
BTW-I have also heard that some people are using old telephone book pages (but I have never tried it).
Christine Thresh
August 14, 2009 at 6:41 pm
I did a paper pieced block-a-day in July. I posted free foundations for the 4-inch blocks. If you go to my blog, click on the month of July on the right hand sidebar. There are some free ones for August, too.
Melissa
August 14, 2009 at 9:16 pm
oh my goodness I love love love it!
Gerry
August 14, 2009 at 10:58 pm
Christina, thanks for the jump-start back to doing a bit of quilting.
I’ve had the knitting socks 2-at-a-time socks and crocheting bags bug for the past several months, HOWEVER, your blog post has kicked me back into a little quilting.
I am a new reader of your blog and will add it to my blog list.
Thanks for taking the time for the tutorial.
Gerry
Bethany
August 15, 2009 at 3:28 am
I love this block! Thank you for the tutorial. I am going to try it soon.
PegF
August 15, 2009 at 8:29 am
Hi Christina, Thanks for the lovely photos and tutorial. I discovered paper piecing a few years back and now I use it for nearly everything. Here are some tricks and hints I’ve picked up along the way:
~ Being basically cheap, er, thrifty, I trace my patterns onto superlight interfacing (like what is used to back embroidery patterns). I buy rolls of the stuff on sale at JoAnn’s and trace with a fine-point pencil NEVER pen!! (trust me on this).
~ I generally leave the interfacing on (unless it’s for a baby quilt or something that’s going to be handled a lot), if only to give the pieced block more stability. Don’t forget that there’s going to be a lot of bias edges in there. But if you use a small stitch length, the interfacing will tear off nicely if you do want to remove it — just wait until after you’ve sewn all the blocks together.
~ Linda at http://www.PaperPanache.com has a wonderful tutorial on what she calls “the Butterfly Fold,” to help you make sure your next piece will fit properly in the space it’s to go into.
~ She also has very nice patterns. I used the alphabet one an “I Spy” quilt for my grandson — it took months, but turned out really nice.
~ I second your suggestion to trim back the seam allowance, especially when it will end up under a light/white fabric.
~ All of Carol Doak’s books are fabulous and great for ideas.
~ Once you get the hang of it, you’ll find yourself using the technique for nearly every block. Things just match better with it…
I loved your block and look forward to making it!
Peg
Michelle
August 15, 2009 at 12:56 pm
Hello! What a great tutorial! I, too, love paper piecing and use it regularly. The foundation I like best is tracing paper. It tears off easily when you’re ready to remove it, can be fed through your printed, and is see through so you can see what you’re doing. I think is the best of all worlds! Thanks!!
supa
August 15, 2009 at 1:59 pm
I love this so much! I can’t wait to try it sometime.
Michele
August 15, 2009 at 8:29 pm
Thanks for the great link and awesome tutorial. I tried this block today. All of your stuff is so inspiring.
Gerry
August 16, 2009 at 11:55 am
It’s me, Gerry, again. I made my circle of geese block yesterday after reading your blog. I’ve post a pic to my blog.[And a link to your blog.]
I’ll make it into a small wallhanging using some free-motion quilting, though at this point I’m not certain how I’ll plan that out.
Lots of Fun, thanks for the jumpstart and tutorial.
Melissa
August 16, 2009 at 12:51 pm
Thank you so much for the pattern. It’s a really great block!
cdpquilter
August 19, 2009 at 4:12 pm
Carol Doak makes wonderful paper for paper piecing. I think it’s about $8.00 or so for 100 sheets. Also, sandwich wrap paper works beautifully, can be inserted into the printer when trimmed to 8 1/2″ x 11″. I bought it at a bulk grocery store (Smart & Final). Thanks for the tutorial.
sewhooked
August 19, 2009 at 8:56 pm
Hey there! I teach design paper pieced patterns and I teach beginning classes and I just wanted to tell you that you did a great job explaining! I’m all about getting new people involved in paper piecing…the more, the merrier!
Indigo Blue
August 20, 2009 at 1:34 pm
When I saw this design I thought wow I could never do that but yur clear tutoiral made it seem that maybe I could.
Many thanks this must have taken you ages to complete.
lucy.oh
August 23, 2009 at 1:22 am
QUIERO APRENDER ESTA CLASE DE PATCHWORK …..PERO ALGUIEN LO PUEDE TRADUCIR AL ESPAÑOL.
happy zombie
August 23, 2009 at 4:57 am
I found you via Craft:, I feel in love when I saw your block. I’ve paper pieced a couple of times, and I like it… I just forget how! Your tutorial is wonderful – and I’ve got it bookmarked as my go-to when I need to nudge my noggin into remembering how to PP. Thank you!
jaybird
August 27, 2009 at 1:43 am
i love paper piecing!! open it up to so many options!!
Hi! My name is erica. Would you be my friend?
August 27, 2009 at 6:36 pm
Neat! I’ve not seen that block before!
Larissa
August 31, 2009 at 1:19 am
this looks like a really great tutorial using my favorite fabric ever. I’d love to get into quilting, and i’m bookmarking this for later!
Bateau
August 31, 2009 at 3:07 pm
Thanks so much for making a tutorial on this. I am new to quilting, and it would be a lot easier to have a pattern drawn up for a block rather than bemoaning the gap between my ideas and the ruler math!
tinarae
September 9, 2009 at 6:38 pm
Hi, I’m going to try this when I’m at the cabin in a couple of weeks. Do you know how to accurately calculate the amount of fabric I will need for this? I’m thinking either a throw size or a Queen size.
Jeanette
February 14, 2010 at 4:52 pm
I am so glad to see this. I saw one that someone had made and absolutely loved it.
I am terrified at the idea of paper piecing, it seems so difficult to me, but for my love of this block, I may have to try it out.
ohthecuteness
February 18, 2010 at 8:08 pm
Wow, Thanks for the tutorial, I may have to give this a shot!
Marysia
March 23, 2010 at 10:05 am
Fantastic tutorial! I found the tip of perforating the base prior to starting the job very useful. Thanks!
Leslie
April 2, 2010 at 1:27 pm
I found that if you can get your hand on old onion skin paper, it works perfect to print out patterns, and tears easily. I have asked offices if they have old boxes…as they don’t use it anymore. It is hard to find.
quiltretreat namawsbuzyquiltn
April 16, 2010 at 2:04 pm
I paper-piece alot and go to Office Depot or a store like it and buy the 18 wt. paper, it works great and you can see thru perfectly. Its also very cheap.
If you have trouble tearing your paper off, simply spray lightly with water, wait a few seconds and it rolls right off.
Ruthie Um
April 19, 2010 at 9:23 pm
didnt know this could even be done…it’s AMAZING!!!…complicated, but AMAZING!!! :-D
http://www.craftyartyyummy.blogspot.com
backstitch
July 9, 2010 at 1:49 am
I can’t wait to try this with my Far Far Away fabrics!
MeganAnne
July 21, 2010 at 10:44 pm
Thanks for the great tutorial. Does this block really finish to 12″? When I printed off the pattern it only measures about 5 1/2″ which would make me think the block would finish to 10″.
Christina
July 21, 2010 at 11:29 pm
It does indeed come to 12.5″ squred when finished. Make sure when printing the template that your printer is not shrinking to fit the page, and also take the seam allowances on the side of the block into account. I remeasured my block just to be sure, and it is 12.5″.
VeeV
August 23, 2010 at 4:43 am
you could use a tracing wheel (it’s like a mini pizza cutter with teeth) to perforate the paper before piecing it.
love your tutorial!!
thanks
xo
eva
Kirie
December 3, 2010 at 6:27 pm
Thank you for the tute :)
I’m a new follower also.
Best regards
Kirie
nima
January 3, 2011 at 5:22 am
Thank you so much for sharing this beautiful tutorial. i’m going to try this
Jess
February 13, 2011 at 2:42 am
I’ve had this on my to do list FOREVER – but have been a bit intimidated. I’ve never paper pieced before – I have no idea what I was so scared of – it was so easy! Thanks SO much for the awesome step-by step tutorial!
[email protected]
February 18, 2011 at 10:33 pm
Yay! I am totally and utterly inspired! Going to try this tomorrow – I’ve read through the instructions about a gazillion times and I think I get it! Can’t wait … thank you so much :)
Cheri
February 28, 2011 at 2:37 pm
I saw right away that if the very last piece you add which becomes the center of the finished block were all in the same contrasting color they would form a star which might make another vaiation of the block. Just a thought.
Becky
April 3, 2011 at 4:59 pm
Okay, I’m late to this party! I love these blocks. Can’t wait to make some!
Janie
April 11, 2011 at 9:50 pm
Thanks for the excellent instructions!! I made one the blocks using Moda Origins and I love the way it turned out. This was the first time I have used paper piecing.
Karen
April 12, 2011 at 8:24 am
I’ve just found the link to your tute on Don’t Call Me Betsy’s blog, so glad to have found it! I keep seeing this block popping up and it’s so lovely! Thanks for sharing the tute :o)
Hanswife
April 23, 2011 at 9:43 pm
love your tut..I say a mug rug with these on and was thrilled when I stumbled here to find this. It was just the tool I needed to get me going on sewing, finish a bucket list project and use up some scraps. your a winner thanks so much for sharing your talent
Listen to your mother
May 19, 2011 at 3:41 am
Hi there. I have just made this block using the template however I used freezer paper. With freezer paper you iron on the first piece then instead of sewing through the paper you fold back the paper along the sewing lines(which I had previously transferred by sewing through the template paper with the unthreaded sewing machine) then sewed the next piece together along the edge and then iron the new joined piece flat and so on. Hard to describe but its easy accurate and you can just peel off the foundation paper at the end and use it again
elenor
May 30, 2011 at 3:20 pm
many, many thanks for your great tutorial! i always wondered, how this pretty block is made. Now i know and can try it myself!
greetings from austria!
elenor
Madame Samm
July 2, 2011 at 12:17 am
Oh my oh dear…finally someone who has done a paper piecing tut that I actually understood..kudos my dear…if ever you would like to repeat this performance for a few thousand eager paper piecing enthusiasts…please let me know lol
L&M Creations
July 22, 2011 at 2:12 pm
I tried to print out the template, but am having difficulty. Is there a trick to getting it to work?
Christina
July 22, 2011 at 2:24 pm
L&M Creations – everything seems to be working okay, so give it a try again. If you’re still having trouble, try restarting your printer and your computer. Sometimes they just need a reboot!
L&M Creations
July 23, 2011 at 1:31 pm
Thank you. I was able to print it, but it’s not to scale. It fits onto a normal sheet of paper.
Pamela Nees
July 25, 2011 at 6:22 pm
This is a great tut! I plan on doing this before the summer is over! Thanks for sharing!
Cathy
July 26, 2011 at 5:00 pm
That is a great block and I love to paper piece. I printed the pattern and will give it a try.
thanks
cathy
Elena
August 22, 2011 at 11:38 am
Great tute! I used it yesterday to teach myself to make Farmer’s Wife blocks.
Question: when do you sew into the seam allowances, and when don’t you? I noticed that at certain points during piecing, sewing into the seam allowance doesn’t allow you to trim properly, but then other times you need to sew into the allowance to make sure it’s all sewn down to the edge. Make sense?
Natasha
September 5, 2011 at 3:23 pm
Saw this yesterday and completed the block this afternoon. Love the way it turned out. I used black for the background fabric and two different “white and black” fabrics for the triangles. I’ve never tried using my sewing machine for patchwork, have always done the traditional English paper piecing by hand but this tuuorial inspired me.
Thank you for showing me how simple foundation piecing is, I doubt I will use a different method from now on!
Natasha
September 5, 2011 at 3:30 pm
Just thought I would add that I printed out 5 copies of the design and cut one of them up so I could use it as templates for the fabric. I put the template on the fabric and cut slightly bigger around it for the seam allowance. Found that this method ensures that the fabric is the perfect size and is less wasteful than judging by eye.
Digadirt
February 15, 2013 at 11:08 pm
Yes! Simplifies the piecing!
Connie
September 10, 2011 at 1:30 am
What a beautiful pattern! THIS makes me want to learn paper piecing!
Quilting by the River
Lisa C. in GA
November 16, 2011 at 3:51 am
I printed a LOT of these out, and then did one as a trial block, to make sure it wasn’t going to make me crazy doing a bunch of them for a quilt – it was SO easy!!! And rewarding :) I just used plain old printer paper, ran over the lines once with an empty needle first, and shortened my stitch length up a bit. The paper came off like a breeze, and I’m in love with the finished block. I’m looking for a nice tote bag tutorial where i can use that first block as the front for a Christmas gift (I got the blues and greens out of order on that one, wasn’t thinking), then will go on to make many more for a quilt. Thanks so much for the great directions!
JoEllen
September 21, 2012 at 11:53 pm
Love your site! Just subscribed! Paper piecing patterns are hard to find
Bearpawquilter
December 7, 2012 at 7:58 pm
Very pretty block which I am bookmarking to make some day. I hope I outlive my list. I took a Judy Niemeyer class/retreat and two things I learned that I would suggest are: use an add-a-quarter ruler and use a thin straight edge to fold back. The ruler has a lip that snugs right up against the fold. They come in 6,12, and 18″ lengths. The straight edge can be the edge of a file folder, template plastic, etc. Use it to fold what you don’t want to cut out of the way, then use the ruler to cut the seam allowance an even 1/4″. Speeds things up and looks neat. If you ever get a chance to take a Judy Niemeyer workshop, do it. She is an excellent teacher. Her patterns look intimidating, but she takes you step by step and demonstrates everything. N
milainoa
February 5, 2013 at 9:07 pm
Gracias por compartir, le explicación esta muy bien.
un abrazo…
Digadirt
February 15, 2013 at 11:06 pm
Use newsprint – 500 sheets for about 9 bucks. Print using your computer printer. Sew using a smaller stitch length so that the paper tears off easily. Don’t remove paper until all seams have been sewn.
Elizabeth
August 6, 2013 at 5:36 am
I see that in the pdf there is a clockwise and a counter-clockwise pattern – Do I choose which way I want to go, or do you need two of each kind to make one block or??? I have stared at the finished block and it seems to me that all the pieces are identical? So – use EITHER the clockwise or the counter-clockwise, yes??
Christina Lane | The Sometimes Crafter
August 6, 2013 at 2:34 pm
Yes, exactly. Pick which one you want and then do all of them that same direction.
Zapomniana Pracownia
August 24, 2013 at 4:08 pm
Thanks so much for this tutorial!
helen
January 3, 2014 at 7:59 pm
lots great and will try this soon thanks for the pattern
22 Favorite Quilt Blocks | Sew Mama Sew |
April 2, 2014 at 5:16 am
[…] Circle of Geese by Christina of Sometimes Crafter […]
Qlt812
May 15, 2014 at 1:47 am
Thanks for the directions of how to! I haven’t done any paper piecing but your instructions has encouraged me :)…
What We’re Making! Feathers In The Wind by The Sometimes Crafter | Pink Chalk Studio
June 3, 2014 at 4:01 am
[…] The Sometimes Crafter Very Kerry Berry Sew Mama Sew […]
Ila
April 23, 2015 at 1:19 pm
Hi Christina;
Just wanted to tell you thanks so much for this wonderful post and tutorial!
On my blog today,
http://scrap-happyquilter.blogspot.com/2015/04/throwback-thursday-memories-of-circle.html
I referenced you, your post and tutorial, thanks for having it available for me to find when I needed a tutorial for making this block!
I made this block five years ago while participating in an online swap group, it was both fun and turned out cute. Your directions in the tutorial, were spot on for the one’s I used five years ago, when I made mine. And gave me the opportunity to electronically find the directions again without having to go search my paper archives :)
Christina
April 23, 2015 at 1:42 pm
I’m so glad it helped you!
On The Go Quilting » Friday Finds, June 5
June 4, 2015 at 9:52 pm
[…] a great tutorial and the Circle of Geese block is one of my favorite Geese blocks. I found this HERE at Sometimes Crafter. Follow this and I really think you will love paper-piecing. Thank you, […]
Susan
October 20, 2015 at 5:19 pm
The link you have for the foundation sheets doesn’t work any more, but this one does: junetailor.com Thanks for the tutorial. I may try this, even though I’m not fond of paper-piecing. This looks like one I could tolerate, and I do love the circle of geese!
Joyce
February 21, 2017 at 4:50 am
Thank you for the tutorial, I am wanting to start paper piecing and with your help I think I can do it! Thank you.
Julie
February 22, 2017 at 9:08 am
Can I print on a lightweight cotton and leave the extra layer? That wsy I csn sew without having to rip paper off? Thanks
Christina
February 23, 2017 at 3:16 pm
Yes, I think that would work just fine. It might be a bit more fiddly to work with, but I don’t see why it wouldn’t work. You would just want to make sure the ink you print on your fabric doesn’t bleed on to your other fabric and that it wouldn’t show through your fabric (ie if you had lighter colored fabric for the quilt).
https://gilmoregarb.tumblr.com/
March 21, 2017 at 8:42 am
Porém, quando conhecem curso se surpreendem ao perceber que possui a qualidade que apresenta.
Liddy
July 14, 2017 at 4:49 am
Looks lovely. I must try this
Rita
November 15, 2018 at 4:13 pm
Love the pattern and colors.
Christine Neale
October 18, 2019 at 10:18 am
Awesome tutorial and I love the idea about pre-punching the computer paper!!! Could probably do 3-4 sheets at a time. Great colour choices, too; THANKS!!