Hourglass Blocks Tutorial

ChristinaFebruary 2, 2009

IMG_9608

My last hourglass quilt I thought to myself: There has to be a better way! Last time I cut my square into quarters on the diagonal and sewed all those tiny triangles together. Tedious! So this time I went to my scrap basket and figured out a better way to piece hourglass blocks. I hope you’ll find the following helpful.

IMG_9589 IMG_9591

1. Cut out your print and solid blocks. Mine are 6 1/2” square.

2. Layer one print and one solid, right sides together.

3. You can do one of two things:

a) Using a ruler, mark a line on either side of a center diagonal 1/4”, as above.

b) Fold and finger press your fabric on the diagonal and follow the fold with your presser foot, sewing 1/4” on each side of that fold line. (I did this method)

IMG_9598IMG_9600

4. Cut block on the diagonal centered between your two sewn lines. This gives you a 1/4” seam allowance.

5. Open out your blocks and press seam allowance to one side (toward darker block). You should have two half triangle blocks now.

IMG_9601IMG_9603

6. Layer your two blocks, right sides together, with solid triangle halves matched with printed triangle halves. Match center seams well.

7. Repeat Step 3 on the unsewn diagonal, either marking with a ruler and pencil, or finger pressing in half.

IMG_9605IMG_9606

8. Sew 1/4” on either side of center diagonal.

9. Cut between two sewn lines, leaving you 1/4” seam allowances.

IMG_9607 IMG_9608

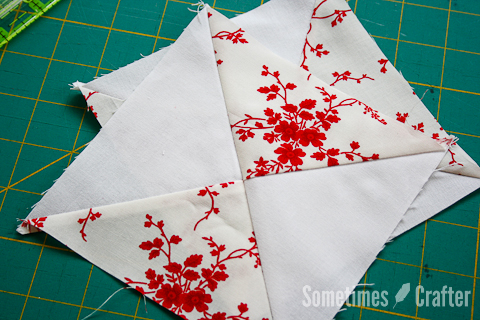
10. Open out your block and press seam allowance to one side.

11. Square up your block – it should about 5 1/2″.

And there you go, perfect, less frustrating, hourglass blocks! I hope this helps you out and you find it saves you time and frustration. I looked all over the internet for something to make hourglass blocks easier, and haven’t seen anything like this yet. I did not square up my blocks after pressing in step 5, and still had beautiful blocks at the end. Let me know if anything is unclear or you need additional help. Good luck!

**Updated Information**

While this tutorial was just meant to instruct you on how to make the block, I have received many emails asking for a little more information to “replicate” my hourglass quilt.  Here is the basic information on my quilt to get you started.

The Basics:

* I cut my squares of white and print to be 6-1/2”.
* After my hourglass block is made, I square it up to 5-1/2”.
* My hourglass quilts are 7 hourglass blocks across, by 9 blocks down.
* My borders are 3-3/4” wide once sewn on (I cut my strips to be 4”).
* The finished quilt is approximately 40” x 50” (before washing).

Comments (12)

  • LaDonna

    February 2, 2009 at 4:32 am

    That just looks like so much work. Very pretty.

  • mariarrosa

    February 2, 2009 at 8:28 am

    I like this method. I’ll try next time I make an hourglass quilt. Thank you very much for sharing.

  • Sarah

    February 2, 2009 at 3:48 pm

    It looks so pretty… I am thinking about trying to make a pink and green quilt.. maybe i’ll try this

  • Cami

    February 2, 2009 at 4:18 pm

    Wow, this is great, and it does seem like it would save a lot of time. I’m definitly going to give this a try. Thanks. What size do your finshed blocks turn out to be when you cut them that size (6 1/2)?

  • Fred-Betty

    February 2, 2009 at 4:20 pm

    Cristina, I don’t know what an hourglass quilt is, but the one you have in your heading is very pretty. You have some skilled talent that’s for sure.

  • amandajean

    February 2, 2009 at 6:32 pm

    that DOES look easier. thanks for the tutorial! i love the quilt in your banner!!! it’s just gorgeous.

  • Darci

    February 4, 2009 at 4:23 am

    Oh those look so cute, I love the colors. I will have to try this out.

  • erica

    February 4, 2009 at 3:25 pm

    I started a zig-zag quilt this way. Great Tutorial!

  • jacquie

    February 4, 2009 at 5:00 pm

    this is how i made mine too…can’t remember who taught me how. great that you shared it!

  • Goddess in Progress

    July 17, 2009 at 1:40 pm

    Ooh, this is an excellent tutorial! I was intimidated by hourglass blocks before, but now I’m quite tempted to try them out…

    (stopped by via ginabean handmade)

    Liz @ teeny tiny quilts

  • Ale

    September 4, 2010 at 3:17 pm

    I does looks easy, my question is (and bare in mind I might be taking more than I can chew but I love the way they look!) what size should I cut the first squares if I want my quilt to have 6″x 6″ squares in the end? should I go for 7 or 7 1/2?

  • Christina

    September 4, 2010 at 3:42 pm

    Ale – I find that I need to cut my initial squares before sewing 1″ bigger than I want the final product. So if you want your squares to be 6″ with seam allowances, then I would cut the initial squares to be 7″. But, if you want to play it safe, and have enough fabric, go with 7.5″ so that you can square up your blocks without running short.

Leave a comment

Your email address will not be published. Required fields are marked *

Prev Post

Crochet Hook Case

Next Post

Hot Pads Tutorial