Sometimes Crafter

  • Home
  • About
  • Quilting
    • Price + Services
    • Designs
    • Gallery
    • Quilt Prep
    • Quilting Request
  • Blog
    • Tutorials
    • Quilting
    • All Categories
  • Contact
    • Errata
    • FAQ
  • Shop
    • Quilt Patterns
    • Bag Patterns
    • Sewing Patterns
    • My Account
    • Cart
Tutorials

Somerset Ornament Tutorial

December 15, 2010

This post originally appeared on Say Yes! to Hoboken.

SS_Tutorial-Main

I am always blown away at how quickly Christmas arrives after Thanksgiving.  It seems like the wait is endless, and then after Thanksgiving I feel so rush and like there is no time for everything that has to be done.  Thankfully, this little ornament works up pretty quickly, and can provide some much needed down time on a busy day, as well as be a pretty addition to a package that does double duty as a tree ornament!  Of course, you could always make a few for yourself, too!

SS_Tutorial-1

First things first, you are going to need to gather some supplies and make some fabric cuts.  I suggest choosing two dark fabrics (for round 1 and 3) and one light (Round 2).

4 – 2.5” squares for your center (round 1)

8 – 2.5” squares for round 2, and round 3

1 – 4.5” square backing fabric

1 – 4.5” square of lightweight fusible interfacing

1 – 5” cut of ribbon for hanging your ornament

2 – 15” lengths of lace (or 1 – 18” length of bias binding)

SS_Tutorial-1-2

1. First you will need to fold all of your squares into points.  Start by folding your square in half and pressing it with an iron.  Then, working with the fold at the bottom, fold one side of your rectangle up to the open side and press.  Fold the other side in the same manor until you have a point, as shown in the picture.  Press these really well with lots of steam to help them lay flat, as they tend to want to open back up before you have a chance to sew them down.  Repeat this same process for all of your 2.5” squares.

SS_Tutorial-2t

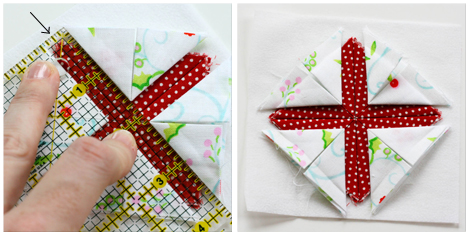
2. Grab your square of interfacing and find the center.  Place your four center points together and iron in place.  I have a small applique iron and this worked perfect, but you can also carefully use the tip of your regular iron to press this.  As the fabric is quite bulky all folded up, you don’t really need to worry about your iron touching the interfacing if you place it directly on top of all the pieces at once, but I like to iron once piece down at a time to make sure all the fabric is touching without spaces.

Traditionally, this ornament is assembled by sewing each of your rounds down on the sewing machine, but I liked using fusible interfacing.  I felt I could be more accurate in my point spacing and I was less frustrated because the pieces were not shifting around under a machine foot.  Do what ever works best for you!

SS_Tutorial-4t

3. Now you will begin the next round by placing four of the points of your light fabric directly on top of the points from your first round.  Using a ruler, line up the 1/4” mark where two pieces from round 1 come together and then move your light fabric point until it’s aligned with the edge of the ruler and centered on the piece below (what that means is to make sure the point of your lighter fabric is on the center line of your point below).  Press in place.  Repeat for the other three points.

SS_Tutorial-6t

4. Placing the other four points of Round 2 works similar to Step 3, only this time you will line the 1/4” mark of your ruler up with the center of the points you placed in Step 3.

SS_Tutorial-8t

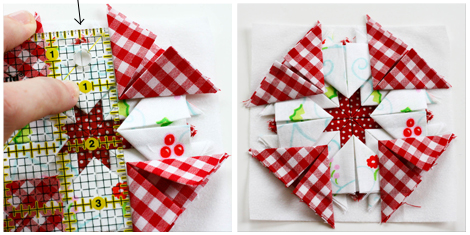
5. Round 3 is, again, worked in the same fashion as Round 2, only you will align your ruler on the 1/2” mark of your Round 2 points.

SS_Tutorial-10

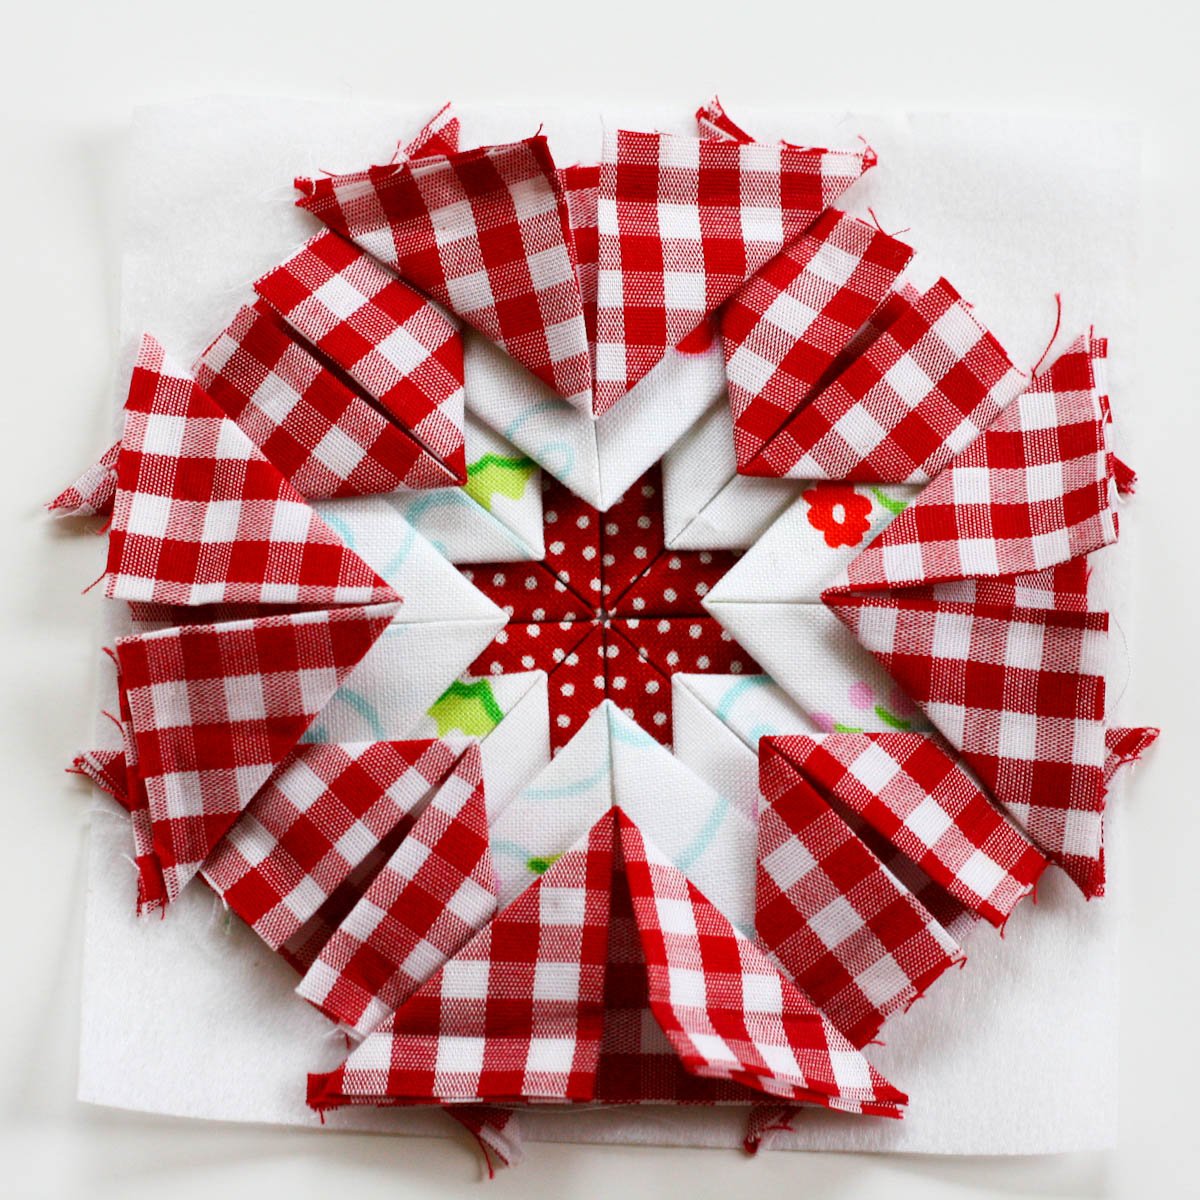
6.  Repeat Step 4, using the 1/2” mark on our ruler placed on the points below, similar to Step 5.  The basic constructions of your piece is now done.  Give it one final press to make sure it’s securely attached to the interfacing.  Then, give it a quick basting stitch, about 1/4” from the edge, on your sewing machine.

Of course the laying down of points could all be done arbitrarily, without the use of a ruler.  I’ve done this a few times and really like the “wonky” quality it gives the star.

SS_Tutorial-11

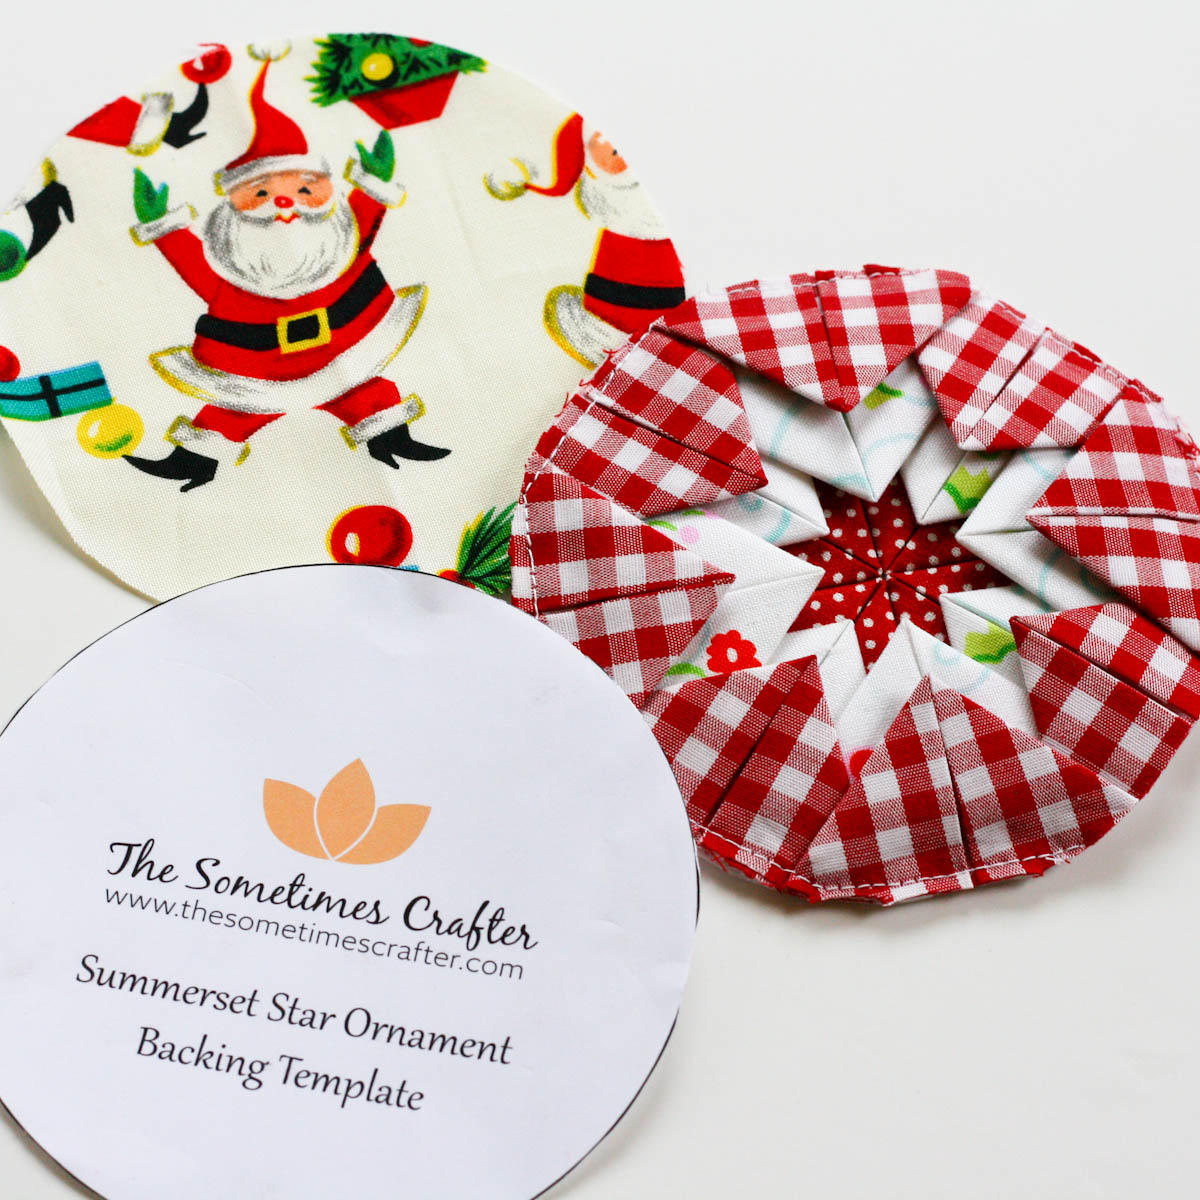
7. Trim your ornament with the template provided (link below – it’s a 4.25” circle) and also use this template to cut your backing fabric.

SS_Tutorial-12SS_Tutorial-13

8. Before you put it all together, you’re going to want to secure the points in place.  Using a thread that matches your fabric, stitch them down by bringing a stitch up from the backside just at the point and then back down just outside of the point of fabric.  Continue around for all the points.  I used red thread for Rounds 1 and 3 and white for Round 2.

9. Pin your ribbon loop in place and then your backing fabric, right side out.  Attach your lace first to the back of your ornament and then to the front, either by machine or hand, making sure raw edges of the ornament are concealed between the lace.  Don’t forget to fold the ends of your lace over on it self to give a clean start and finish.

If your not a fan of lace, you could always choose to use bias binding, first sewing it to the front of your ornament with a scant 1/4” seam allowance and then hand stitching it to the back.  I did one with binding here.

SS_Tutorial-20

And that’s all there is to it!  If you feel as though you might get a little lost in the laying of your points, don’t worry about it.  Just make your points and start laying them down and you’ll soon get a feel for it.  These go so quickly and would be adorable with any number of fabric combinations! The one at the top right was my inspiration and was originally made by my aunt for my mom back in the 80’s sometime.  It has always been one of my favorite ornaments on the tree and I’m so glad to be able to recreate it!

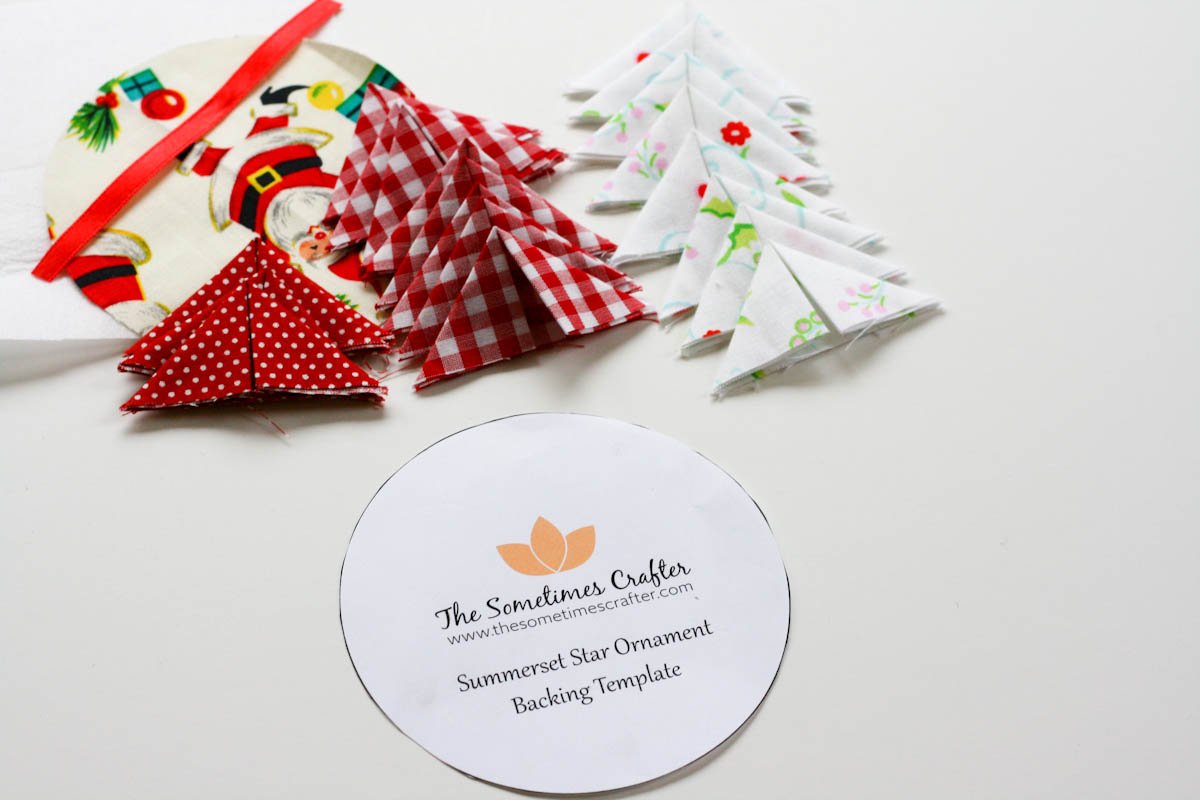
Somerset Ornament Template

16 Comments

Reader Interactions

Leave a Comment Cancel reply

Your email address will not be published. Required fields are marked *

Comments

  1. Kati says

    December 15, 2010 at 6:04 pm

    I’ve been waiting for this! Thanks for putting it together. So pretty!

    Reply
  2. Kitty says

    December 15, 2010 at 6:30 pm

    These are so cute! I love them!

    Reply
  3. Heather says

    December 15, 2010 at 7:29 pm

    Beautiful. Thank you for such a wonderful tutorial.

    Reply
  4. [email protected] And Daydreams says

    December 15, 2010 at 7:32 pm

    very cute!

    Reply
  5. SisterDG says

    December 15, 2010 at 9:03 pm

    Those are beautiful! I love the layers!

    Reply
  6. Heather says

    December 15, 2010 at 10:40 pm

    So cute Christina! Thank you :)

    Reply
  7. Mystica says

    December 15, 2010 at 10:53 pm

    Love them!

    I have a giveaway going on at my blog. A gift card sponsored by CSN Stores. please do come over and enter

    Reply
  8. msmcporkchop says

    December 16, 2010 at 5:19 am

    these are so so so awesome!!!!

    Reply
  9. CraftCrave says

    December 16, 2010 at 5:40 am

    Just a quick note to let you know that a link to this post will be placed on CraftCrave today [16 Dec 01:00am GMT]. Thanks, Maria

    Reply
  10. patchworkdelights says

    December 16, 2010 at 10:02 pm

    These are adorable!

    Reply
  11. VickiT says

    December 18, 2010 at 3:12 am

    GREAT tutorial. Thank you SO much. I was hoping you would do this one for us because that was such a gorgeous ornament you’d done before with the binding edges. SO pretty.
    Have a wonderful holiday season.

    Reply
  12. [email protected] says

    May 30, 2014 at 9:14 am

    I was thrilled when I saw these on Pinterest! I used to do folded star, in the 80’s! I still have three ornaments that go on our family traditions tree each year. Thanks for bringing these back into the limelight!

    Reply
  13. sanneta myrie says

    May 7, 2017 at 3:54 am

    First up is Christina from The Sometimes Crafter sharing with us this traditional Somerset Star, didn t we all have one of these on our tree growing up?

    Reply
  14. Judy says

    July 14, 2018 at 8:11 am

    Love this and easy.

    Reply
  15. Eduard says

    March 31, 2020 at 3:17 am

    Thank you for the instructions. I’m so glad I found this. This has inspired me.
    The instructions I found from other posts use a rectangle and then fold to the two triangles.,which creates two raw edges next to each other. Yours starts with a square … resulting in folded edges.

    Looking forward to start the Xmas projects.

    Kind regards
    Eduard

    Reply
  16. Joanne says

    December 14, 2020 at 8:29 am

    I make at least one ornament for my tree every year, and this year it will be a Somerset Star. Thank you very much. After I read the directions, I was sure I could do this.

    Reply
Previous Block Printing – The Basics
Next Bunny Ornament Tutorial

Related Posts

{Cheaters} 8 Point Star

Sampler Quilt Along

Stacked {Whatever} Block

Sampler Quilt Along

Organizing & Folding Fabric

Spaces

Cathedral Window Block

Sampler Quilt Along

Primary Sidebar

Shop

Binding 101

Categories

  • Books + Mags
  • Embroidery
  • Longarm Quilting
  • Patterns
  • Quilting
  • Sampler Quilt Along
  • Sewing
  • Spaces
  • Tutorials

Never miss a post

I noticed my feed was lacking vibrant color of lat I noticed my feed was lacking vibrant color of late, with the thick coating of snow in my recent photos, so today is a perfect day to share @mne_textiles colorful Lonestar quilt I quilted for her recently. It was such a lovely punch of color for this drab time of year, and it was so well done for all those bias edges and Y-seams. She did an amazing job on this! This was quilted with the pattern Celtic Sea and we used Poly Select batting with a light blue thread.  #sometimescrafterlongarmquilting #longarmquilting #gammillquilting #gammillstatlerstitcher #quiltersdreambatting
Day 4 - lots of ice! The ground looks like an ice Day 4 - lots of ice! The ground looks like an ice rink and the forest is full of breaking tree limbs and falling ice and snow. Its warming up pretty quickly, which is fine by me. I enjoyed the snow, but now I'm done.  #sometimescrafterfarm #pnw
Just so much snow! It's currently about 30 and rai Just so much snow! It's currently about 30 and raining, so we get to end with a nice coating of ice on 12"+ snow. Check out @elementaladventuring to see our buried cars. You can only see Aaron's car handles he has so much snow on and around his car. #sometimescrafterstudio
Day 3. So much snow. There's so much snow she can Day 3. So much snow. There's so much snow she can walk right over the patio fencing that's meant to keep the birds off.  #sometimescrafterfarm #charlotteandtheducklings #lucyandherducklings #chinesegoose
We're at about a foot of snow now, and just finall We're at about a foot of snow now, and just finally got a break from snow for a few hours. #sometimescrafterfarm #pnw #ridgefieldwa
The commute to work was a hard one. 😂 #sometime The commute to work was a hard one. 😂 #sometimescrafterstudio
I realized I haven't shared quilting photos in a l I realized I haven't shared quilting photos in a long time, and some of you are here for the actual quilting.  I'm currently working on a custom quilting for @duringquiettime so you'll see this one popping up in my Stories for the next few weeks. #sometimescrafterlongarmquilting #customquilting #gammillquilting #gammillstatlerstitcher
Daisy doesn't know what to think about the snow. S Daisy doesn't know what to think about the snow. She was happy to see us this morning and came right over and started doing her little goose talk, so I picked her up and she was happy. She started honking her alarm when we came back inside. She did not want us leaving her out there. The other birds are all hiding out in the barn, as they usually do. None of them care for snow days. They usually come out and wander around a bit, but we make sure their food and water is right next to the barn so they can hop out and eat, and hop right back in. While they are all hardy enough for snow, they do have to watch their feet as they can be prone to frostbite if they get too cold. #sometimescrafterfarm #charlotteandtheducklings #chinesegoose
Copyright © 2021 Sometimes Crafter
  • Privacy Policy
  • Disclaimer
Theme by SheShoppes