Cathedral Window Block

ChristinaOctober 27, 2009

9/19/2020 – Just a quick note since there has been so much traffic to this tutorial lately.  There is no pattern to download for this block, it is simply a photo tutorial to help you make the block you see in the photo.  

Here it is, Septembers block of the month. Finally.  The title of this post should really be “adventures in sewing”.  I have to say, I love how this block looks, but until I find yet another way to do this, I think this will be my only cathedral window for awhile, although I did find some short cuts that I haven’t seen discussed elsewhere.  In this tutorial I will give the measurements and instructions for making a cathedral window block for the quilt along.  At the end I will have a lot of links to different tutorials, all of which I read before doing this one to find what might work best.  I’ll also discuss my shortcuts in the hopes that it will help you.

Directions

First off you will need to choose a background fabric (in my case I chose white) and cut yourself 4 – 12 1/2” squares.  You will need to choose 4 prints for the “windows” and cut them about 4 1/8” square.

IMG_5024 IMG_5029

1.  Fold your fabric in half, right sides together, and sew down each side.  Clip the corners.
2.  Pull open your fabric and match the seams you have just sewn.  Pin along the edge and sew across, leaving an opening at the center to turn right side out.

IMG_5032 IMG_5041
IMG_5042 IMG_5043

3.  Turn right side out and iron.   Don’t worry about the hole left from turning, that doesn’t need to be closed.
4.  Fold in two opposite corners to the center of your square and press.
5.  Fold in the other two corners to the center and press.
6.  Flip over and leave to cool.  I find this helps to keep its shape.  Complete the other three in the same fashion.

**Note** No matter how hard I tried, I couldn’t get my points to match up perfectly in step 5.  I just did my best and fudged it later on.

IMG_5045 IMG_5047

7.  Placing two of these pieces on top of each other (backs together) sew along the crease line you pressed in the last step.  Complete for the other two pieces.
8.  In the same fashion, sew together your two pieces creating a block of four as shown above.  Your triangles are going to be what forms your window.

IMG_5054 IMG_5058
IMG_5073 IMG_5081

9.  Lay your prints inside of those triangles that you sewed together to attach your white squares.  In the photo above for step 8, you can see how the two triangles form a square on point with a seam down the center, this is where you will want to lay your print.  Pin in place.  Repeat for the other three prints.
10.  Roll over your edges of the triangles and pin.  I found pining at the ends and in the middle was best.  You will see a natural curve in the fabric as you pull it over and pin it.
11.  Machine stitch from one end to the next along the curve of the folded over fabric.
12.  Repeat step 11 for all sides and all prints.

IMG_5105

Now, you could stop at step 12 and leave your corners unrolled, or you can create the rolled edges on the corners as well.  You may decide to put fabric in the “half window” along the sides, or leave it white as I did here.

IMG_5051 IMG_5084

You may not find that you have this problem, but I found that when I sewed together my two sets of squares in step 8, I was left with a little hole in the center of my four white squares.  After I had completed my block, I simply went back and very discreetly closed the hole.  I did my best to run my needle and thread through the layers of fabric so as to hide any stitches.  You may not have this problem, but I suspect this had to do with my squares not being perfectly square at the start.

IMG_5063

So now for how I made it easier on myself.

1.  I used Steam-A-Seam on my prints and ironed them in place.  Now I didn’t need to worry about my fabric shifting as I was sewing those edges down.  The down side to this is it’s a little stiff.  I’m hoping after a good wash that this will soften up.  But I’m not sure that it will.  Because I did this, there is no poofing of the fabric, which can be kind of nice, but it saved my sanity.

2.  I used Elmer’s Glue to glue down the edges of my white fabric on the windows.  I pressed it with a hot iron to heat set it.  Because this is water soluble, it will wash out once my quilt is washed for the first time.  This made the process of holding the edges down and sewing them in place SO much easier.

IMG_5100

Update 9/19/2020 – A lot of these links are now expired, however, because they were originally used in reference to making this block I am leaving them in place to be sure everyone who originally created blocks is given acknowledgement. Links with a strikethrough no longer work.

And now to the links.  I referenced each of these tutorials before making this block myself.  Each was a little different and had some great things to offer.  If you are thinking about doing this block, I suggest visiting each of these sites.  Good luck and I hope you’ll share your experiences (and blocks) with me here and in the Flickr pool.

1.  Hyena In Petticoats – Cathedral Window Quilt Tutorial (perhaps the most popular);
2.  Angie’s Bits and Pieces – Cathedral Windows (she has a great chart for figuring out what size to cut your fabric for your desired square size);
3.  Treadleworks by Tammy – Cathedral Window (great run down from a class she took);
4.  Making Ends Meet – Cathedral Window Tutorial (great, basic instructions);
5.  Quilter By Design – Cathedral Window Quilt (gives fabric requirements);
6.  Heartland – Flower Cathedral Window Quilt (gives fabric requirements and instructions with a few tips);
7.  Kosher Nostra – Cathedral Window Quilt Pattern (a twist on the classic);
8.  Sunshine Creations – Mock Cathedral Window (get the look with out the work).  She also has a tutorial for the traditional block on her blog.

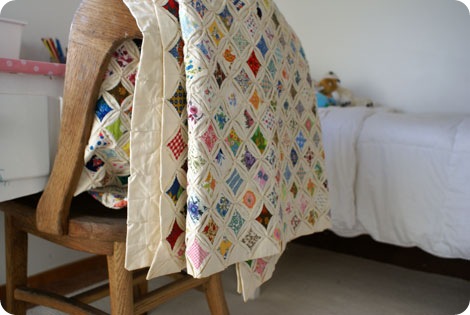
Fresh MD blogged almost a year ago about this cathedral window quilt (above), c.1950, that she picked up on Ebay. I absolutely love it and would love to have one like it some day.

Cathedral Window Quilt Inspiration

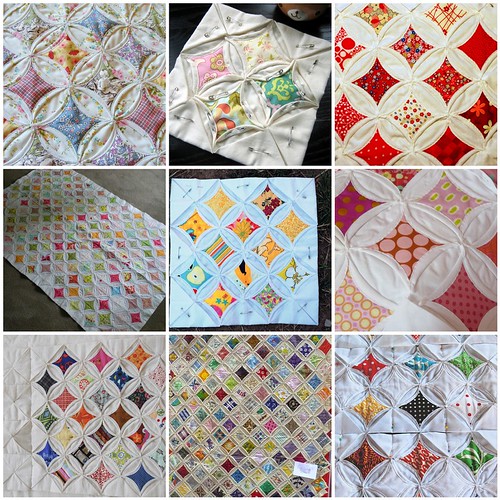
Finally, here is a mosaic to get you inspired to make your own (click on the photo to follow the link for more information on each photo).  I wish I had some more patients for this block, I’d like to make some pillows or even a quilt, but maybe after the holidays are over.  And of course we can’t forget our inspiration block by Rita, whose Flickr photostream is a constant source of inspiration for me.  The second photo is one of her beautiful blocks.

9/19/2020 – This is not a full quilt pattern, and there is nothing to download.  This is simply a tutorial to make a block.

Comments (45)

  • zarina

    October 27, 2009 at 9:08 am

    This one does not require batting right. It has always been part of my early progress in quilting when all the magazines mom bought ages ago showing this pattern. may be to add to my long list of quilts to do (since I have plenty of white solids but not much batting until I manage to get more cash)

  • why not sew?

    October 27, 2009 at 11:09 am

    I think it’s a beautiful block. Thanks for the tutorial and links.

  • Dee

    October 27, 2009 at 11:34 am

    Thank you for the mosaic and the tutorial and sharing your beautiful block. I know a friend who’s been wanting to try this…but we both don’t have time for a class! I’ll send her this way!

    Blessings.

  • Laura

    October 27, 2009 at 11:39 am

    Oh wow~ Christina, you are so talented! What a fantastic looking quilt~

  • Donna/Sara from Kindred Crafters

    October 27, 2009 at 11:49 am

    That block is gorgeous, but the work involved makes me think I’ll never try it myself!
    ~Sara

  • Kasey @ :-)

    October 27, 2009 at 12:10 pm

    Very nice!!

  • kristi

    October 27, 2009 at 12:46 pm

    wow wow wow! soooo pretty! i have dreamed of quilting forever and a day but am deathly afraid. seeing your tutorial almost makes me want to try it. maybe when my 2 yr old is in school and i finally have some time to myself. :)

    and it’s funny your suggested title of the post “adventures in sewing.” that’s how i see your blog anyway. very inspiring.

    xo

  • wishes, true and kind

    October 27, 2009 at 1:04 pm

    Oh my! You are really tempting me! I’ve always loved the cathedral windows block and wondered how it was made. I’m adding this to the list, but you don’t want to know how long that list is! Nice tutorial!

  • randi

    October 27, 2009 at 1:41 pm

    I just love cathedral windows quilts. The tutorial is great!

    Randi

    http://ihavetosay.typepad.com/

  • erica

    October 27, 2009 at 1:48 pm

    Gorgeous!

  • kclily

    October 27, 2009 at 3:40 pm

    I have started on my cathedral window at least 3 times and 2 days ago I set it in the living room to remind me to work on it. Perfect timing for this tutorial as I couldn’t even remember how to start. Thank you, thank you, <------------> this much for all the time and effort you put into this.

  • Giddy for Paisley

    October 27, 2009 at 3:44 pm

    It looks lovely! I am surprised you went with the machine stitching vs handstitching the windows down. I may have to try it, but then again my mahcine may get away from me :)I really need to work on my block.

  • megan

    October 27, 2009 at 3:55 pm

    Oh wow that is really gorgeous! I am going to have to put that project on the list!

  • Blue Is Bleu

    October 27, 2009 at 5:36 pm

    I love cathedral window quilts but they’re too fiddly for me to even attempt. Your block’s great though!

  • Isa

    October 27, 2009 at 7:58 pm

    Your block looks fab!!

  • KarrieLyne

    October 28, 2009 at 2:02 am

    I love love love the look of the cathedral window quilts but wowo are they a lot of work!! My grandma used to make pillows using this pattern and it always intrigued me. Wonderful tutorial!! Thanks for sharing :)

  • [email protected]

    October 29, 2009 at 5:02 pm

    This is my favorite block. My window quilt is on my bed right now. Thanks so much for a FABULOUS tutorial and all of the additional links, I love that! I’ll be linking.

  • V and Co.

    October 30, 2009 at 4:32 pm

    that is absolutely gorgeous. i think i may just try my hand at that soon. thanks for the beautiful pictures to get me excited about it!

  • Petit Debutant

    October 31, 2009 at 1:38 pm

    if you wanted to do away with the steam a seam, you could use plain old glue stick to hold your smaller squares in place.

  • yngla

    November 1, 2009 at 6:14 pm

    Thanks a lot. I´ve just finished a cushion for my grandmothers 100:th birthday using your tutorial.
    If you want to take a look it´s here:
    http://yngla.blogspot.com/2009/11/novemberutmaningens-forsta-alster.html

  • Petit Debutant

    March 23, 2010 at 1:11 am

    what size needle did you use? I’m working on making my own cathedral window and my machine does not want to go through all layers and I’m not even to the “window” part! (I’ve tried up to a size 16 needle)

  • Amy E.

    June 12, 2011 at 1:44 pm

    oh wow, i canNOT wait to try this!

    thank you so much!

  • mal from cessnock

    September 12, 2011 at 12:49 pm

    I’m so going to try this. It looks beautiful.

  • …julia…

    September 25, 2011 at 2:05 am

    Great tutorial! That is how I make mine too :)

  • Sue

    February 13, 2014 at 9:40 am

    So beautiful, wish I had the patience to do one of these quilts, Love it!!!!!!!

  • Tegan

    April 6, 2015 at 10:09 pm

    Have you seen the “cheats'” version of this block on the Missouri star YouTube channel? I haven’t tried it yet, but it looks so much easier!

  • Martha Simmons

    September 24, 2015 at 11:02 am

    Thank you for the tips. I have been working on mine for 7 yrs, along with many other quilts. The first one I made byhand in 1966

  • Letitia

    October 3, 2015 at 5:17 am

    In Step 2 above: if you leave your opening someplace other than the center, you’ll be happier with your results, because the hole won’t be in a place that will show. :-)

  • Anonymous

    January 8, 2016 at 2:35 am

    […] Cathedral Window Block | Sometimes Crafter […]

  • Janice Duerr

    July 9, 2016 at 6:24 am

    Thanks for the tutorial. It is always nice to hear about the problems and problem solving as well as the how to’s. Thanks also for the links. I made a small one (runner) quite a few years ago and could not remember the steps. Your method is how I remember putting it together. I have seen other methods too but I like your method best.

  • Phyllis J Blake

    May 25, 2017 at 2:35 pm

    Can these instructions be printexd out

    1. Christina

      July 2, 2017 at 12:13 pm

      You should be able to print the webpage, but I don’t have a PDF for printing if that’s what you’re asking.

  • Linda K.

    January 28, 2018 at 10:46 am

    Thank you sooooo much for having the “Free” cathedral window pattern. It was easy to use your site. you are great with easy to follow directions and the pictures look good! again THANK YOU,

  • Bonnie Coughlin

    February 20, 2018 at 6:49 am

    I just finished a Cathedral Window quilt as a gift using your method. I love(d) it and then washed it…it’s got that wrinkly look. I’ve pressed it and the wrinkles remain. Good Grief!!

  • Fran

    June 8, 2018 at 7:26 am

    This is just beautiful.

  • Lisa West

    September 12, 2018 at 12:31 am

    Simply Beautiful!
    Good question about quilting. Where are the quilting lines?
    Thanks,
    Lisa

    1. Christina

      October 18, 2018 at 5:16 pm

      This was just a block, so there aren’t any quilting lines in the traditional sense (since there isn’t batting) but if this was the finished quilt (no backing or batting being added) the quilting lines would be the are that stitches down the folded over background to the print.

  • Diane J. Rogers

    September 14, 2018 at 6:30 am

    I love this quilt. I started one years ago and so far only have the first segment finished. I did finish one for a friend that she needed to be finished and I must say it was beautiful. Large enough for a queen bed. I loved the part of sewing the windows by machine Think I will try that and make mine a bit bigger. Thank you for the instructions.

  • Ellen McCarter

    February 3, 2019 at 9:17 am

    Love the info! From Missouri. Quilter, Stained glass artist…gonna make a cathedral Window quilt. Thanks for the pattern!

  • Kimberly J Strong

    July 15, 2020 at 8:01 am

    Lovely square! Can you tell me what the finished block size is that you’ve created? I am trying to find one that finishes at 10 or 10.5 inches and has four “panes” of colors.

    thanks,
    Kimberly Strong

    1. Christina

      July 29, 2020 at 9:03 am

      I would need to go dig out (or remake) the block to know for sure, but I think it finishes around 12″. You’ll most likely have to do some test squares to get the size you want, but try cutting the initial background squares at 10.5″ and then follow the steps to sew the pieces together (through step 8) and then you should get an idea if this is the final size you need.

  • June

    October 9, 2020 at 12:25 pm

    This and Storm at Sea are the two patterns I have always wanted to make. It looks easy but do you just keep adding individual blocks to make it bigger? That probably sounds stupid – but ….

    1. Christina

      October 9, 2020 at 2:43 pm

      Yes, that’s exactly what you do. Just keep adding on. So my suggestion would be to make the block like the tutorial, and just make several of those to sew together. When those are sewn to each other you’ll add more prints to create new windows where they are joined, and you just keep going like that until it’s the size you want. I’d work in chunks, rather than continually adding more and more to the same section. So maybe do 4 large sections and then put those together to finish it off at the end. Might be a little easier to handle.

  • Karen T

    June 14, 2021 at 10:20 pm

    Started one of these about 20 years ago and had forgotten how. Thanks so much ❤️

  • Virginia Gerstenberg

    June 29, 2021 at 7:28 am

    Thank you so much for these great instructions. Our group is making a sampler quilt to auction off for scholarships for graduating high school seniors planning to go to college. I think a Cathedral window block would be acceptable. As for as the quilting of the block is concerned, I’ll have to think about it.

Leave a comment

Your email address will not be published. Required fields are marked *

Prev Post

Trick or Treat Tote + Pattern

Next Post

Hexagons Tutorial