Sometimes Crafter

  • Home
  • About
  • Quilting
    • Price + Services
    • Designs
    • Gallery
    • Quilt Prep
    • Quilting Request
  • Blog
    • Tutorials
    • Quilting
    • All Categories
  • Contact
    • Errata
    • FAQ
  • Shop
    • Quilt Patterns
    • Bag Patterns
    • Sewing Patterns
    • My Account
    • Cart
Sewing•Tutorials

Coasters Tutorial

March 12, 2009

IMG_3079

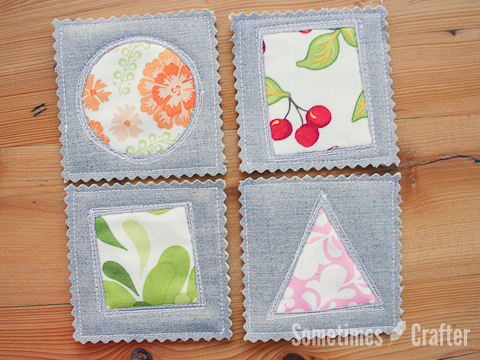
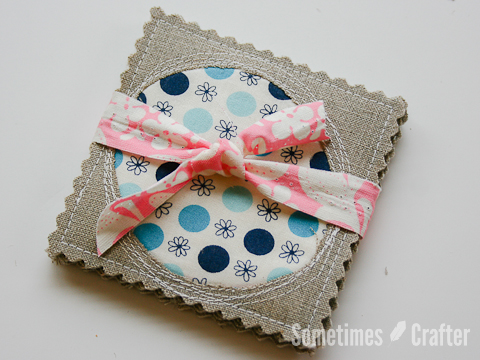
I made some of these for my friend for her birthday.  They are so quick and easy!

IMG_3000 IMG_3004
IMG_3005 IMG_3008
IMG_3016 IMG_3017
IMG_3025 IMG_3029

Directions

1.  Cut out your fabric for the top and bottom, and a piece of batting to sandwich between, 4” square.  Gather scraps, at least as big as the area you want to show through on top.  I cut my scraps to 4” square, also.

2. Draw your design, to be cut out after sewing, on the backside of the scrap fabric.

3. Place the right side of your scrap fabric to the wrong side of the top fabric.  Sew around your design 3 or 4 times.  Have fun – don’t be too accurate!

4.  Cut out your design from the top fabric, staying within the lines of your sewing.  I used my Gingher appliqué scissors.  (You’ve just done reverse machine appliqué!)

5.  Layer your pieces together as follows: bottom: wrong side up, batting, top: right side up.

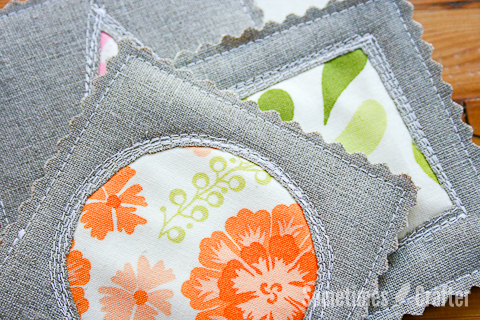
6.  Stitch once around design to secure pieces.  Stitch around edge of whole coaster, approximately 1/4” from the edge.

7.  Using pinking shears or a pinking rotary cutter, cut the edges of your coaster.

I lined up a ruler with the 1/8” mark on my edge stitching and cut with a rotary pinking blade.  Be sure to keep your coaster somewhat square during this process.

8.  Grab a glass and enjoy your new coaster!

IMG_3077

f2090568

44 Comments

Reader Interactions

Leave a Comment Cancel reply

Your email address will not be published. Required fields are marked *

Comments

  1. Terri says

    March 12, 2009 at 2:18 pm

    Wow Christina those turned out eautiful. Cann I add thi tutorial to my page?

    Reply
  2. julesinseach says

    March 12, 2009 at 3:14 pm

    These are so pretty.
    I don’t use coasters but I should….
    I have rings all over my tables, shame, shame, shame on me.

    Good morning Christina.
    Good morning

    Reply
  3. Momma Mary says

    March 12, 2009 at 3:34 pm

    What a great idea- and you could actually use those for learning shapes with your son. Cute, practical and learning- awesome!

    Reply
  4. Erika says

    March 12, 2009 at 3:59 pm

    Just lovely. I had to buy some aplique siscors!

    Reply
  5. Terri says

    March 12, 2009 at 5:08 pm

    I added this to my blog and linked it to ya. Thanks sew much!! :P

    Reply
  6. erica says

    March 13, 2009 at 4:16 pm

    I love these! When I get some free time I will surely make my own!

    Reply
  7. jennifer says

    March 18, 2009 at 1:46 am

    i am in love with these! what fun!

    Reply
  8. bookflutterby says

    April 15, 2009 at 12:19 pm

    Oh so CUTE! I have to try these…Thanks a bunch!
    Courtney

    Reply
  9. Aimee says

    May 27, 2009 at 7:00 pm

    Cute and easy! Thanks!

    Reply
  10. ajuills says

    June 6, 2009 at 12:30 pm

    Great coaster idea! I have to say I love the colors of the coasters in the pictures. Thanks for the write up on how to make these coasters myself!

    Reply
  11. Jeni says

    July 4, 2009 at 6:47 pm

    I got around to making some of these last week, what a great tutorial. thanks! They turned out great, shall definitely be making more soon! :)

    Reply
  12. Ingrid says

    July 11, 2009 at 1:18 pm

    Beautiful, easy and fast to make. What else do we want? Kisses from Venezuela

    Reply
  13. disa says

    August 19, 2009 at 3:00 am

    A片下載,成人影城,愛情公寓,情色貼圖,情色,色情網站,色情遊戲,色情小說,情色文學,色情,aio交友愛情館,色情影片,臺灣情色網,寄情築園小遊戲,情色論壇,嘟嘟情人色網,情色視訊,愛情小說,言情小說,一葉情貼圖片區,情趣用品,情趣,色情漫畫,情色網,情色a片,情色遊戲,85cc成人片,嘟嘟成人網,成人網站,18成人,成人影片,成人交友網,成人貼圖,成人圖片區,成人圖片,成人文章,成人小說,成人光碟,微風成人區,免費成人影片,成人漫畫,成人文學,成人遊戲,成人電影,成人論壇,成人,做愛,aio,情色小說,ut聊天室,ut聊天室,豆豆聊天室,聊天室,尋夢園聊天室,080視訊聊天室,免費視訊聊天,哈啦聊天室,視訊聊天,080聊天室,080苗栗人聊天室,6k聊天室,視訊聊天室,成人聊天室,中部人聊天室,免費視訊,視訊交友,視訊美女,視訊做愛,正妹牆,美女交友,玩美女人,美女,美女寫真,美女遊戲,hi5,hilive,hi5 tv,a383,微風論壇,微風

    Reply
  14. Angi B says

    March 3, 2010 at 4:42 am

    Thanks for the pattern, pics posted on my blog: http://www.angibusick.blogspot.com

    Reply
  15. Godzoned says

    May 31, 2010 at 9:36 am

    ooohhh this is great!
    this is going on my to do list!

    Reply
  16. angelina says

    May 31, 2010 at 11:02 am

    neat and beautiful and where’d youget those scissors!!

    Reply
  17. celebi74 says

    June 1, 2010 at 11:02 am

    it’s very gooodd

    Reply
  18. Kristie says

    July 8, 2010 at 12:48 pm

    Hi there! Just wanted to let you know I gave this tutorial a shout out on my little blog :-) I loved them, so easy and so pretty! Here is the link if you would like to check it out:

    http://ocd-obsessivecraftingdisorder.blogspot.com/2010/07/coasting.html

    Thanks for the great idea!

    Reply
  19. Jacqueline says

    March 29, 2011 at 7:57 pm

    Those scissors are perfect! Where did you get them.
    Way to give a procrastinator like me a new quick craft Idea.

    Reply
  20. Jess says

    July 23, 2011 at 11:37 pm

    This comment has been removed by the author.

    Reply
  21. Jess says

    July 23, 2011 at 11:38 pm

    Too cute! I just made one for as a thank you gift and bought a candle to sit on top of it. Thanks for the tutorial :)

    Reply
  22. Blissfullabyss says

    October 6, 2011 at 3:06 pm

    Ok so I stumbled on these looking for a quickie project that will make me feel like I accomplished something — I have been working on some very long invovled things lately. Anyway I am HOOKED! These are so adorable, they are being added into Christmas stocking this year even– only 12 more sets to go! I was thinking too, that larger sets of maybe 8, would make a nice hostess gift …………so much to sew and so little time………

    Reply
  23. Biżuteria z filcu says

    October 8, 2011 at 1:21 pm

    Great :)
    Thank You for tutorial!
    Hugs
    Agata

    Reply
  24. emmy says

    December 23, 2011 at 12:51 am

    I used this tutorial, which was awesome, and linked to it on my blog!

    Reply
  25. Kathy says

    May 23, 2012 at 10:48 pm

    These are so cute. I am definitely going to try these. You could make some for the holidays too with Christmasy material and colors. Love it, thanks!

    Reply
  26. http://www.artfire.com/users/auntiechrisquiltfabric says

    May 24, 2012 at 10:41 am

    Great tutorial.These would make wonderful Christmas gifts!

    Reply
  27. Libby says

    July 27, 2012 at 6:20 am

    I just made these – love them! I ended up turning it and putting the seams on the inside for a finished edge with a top stitch – love it!

    Reply
  28. Jali says

    April 2, 2013 at 8:56 am

    EPIC I have to try it!!!

    Reply
  29. Christine S says

    August 26, 2013 at 5:26 pm

    This is awesome, thanks!!

    Reply
  30. ruth says

    March 24, 2014 at 8:05 am

    perfect little gift. I have been wanting to make me a quilted table cloth that gave me a great idea thank you so much for sharing

    Reply
  31. Andreea says

    October 8, 2014 at 5:13 pm

    These are awesome – thanks for the tutorial :) – will let you know how they turn out if I make them – I really hope to give it a go, such a lovely idea!

    Reply
  32. Laura says

    October 14, 2014 at 10:21 am

    LOVE these!! Just wanted to let you know that I posted a piece inspired by these on my blog. Thanks so much for sharing – GREAT and easy idea :D http://theroadtocrazy.blogspot.com/2014/10/31-days-of-halloween-2014-day-13.html

    Reply
  33. Helen says

    October 21, 2016 at 8:33 am

    Why can’t I print the instructions? All that prints in Gingher applique scissors : o

    Reply
    • Christina says

      November 21, 2016 at 1:30 pm

      I don’t actually have printable instructions for this one, so if you are trying to just print the blog post I can’t say why that’s not working for you. I’m going to be posting a new post soon, so I will include some printable instructions as well. Maybe try printing from a different browser (i.e. Chrome or Firefox or Internet Explorer). That might solve the problem.

      Reply
  34. Ruth Vogt says

    November 26, 2019 at 7:10 pm

    Love these thanks so much for pattern

    Reply

Trackbacks

  1. 100+ Scrap Fabric Projects - The Sewing Loft says:
    January 16, 2015 at 3:18 am

    […] 26. Coasters 3 pictured […]

    Reply
  2. Fabric Coasters - Sewtorial says:
    February 15, 2015 at 4:58 am

    […] fabric coasters by Sometimes Crafter are super easy to make (great beginner’s project) and super […]

    Reply
  3. Aprovecha tus retales. Parte 1: cositas para el hogar | Baskiuts says:
    April 7, 2016 at 8:19 am

    […] de forma, aprovechando cualquier pequeño fragmento para hacerlos, o bien puedes hacer como en este otro tutorial, en el que una tela deja entrever la […]

    Reply
  4. 50 Creative Fabric Scraps Craft Ideas – dewmountain.science says:
    April 21, 2018 at 11:59 am

    […] if you start out making coaster by following the instructions at Sometimes Crafter , soon you’ll see how easy it is to make coasters and you’ll start designing them on […]

    Reply
  5. Creative Fabric Scrap Projects - Mine for the Making says:
    August 10, 2018 at 4:01 am

    […] Scrappy Coasters […]

    Reply
  6. Crafts: 33 Cool Projects To Make From Quilting Scraps – ByNotio.com says:
    May 11, 2019 at 7:08 pm

    […] sometimescrafter […]

    Reply
  7. MHCT&M: Creative Fabric Scrap Projects – A Glimpse Inside says:
    August 21, 2019 at 12:27 pm

    […] Scrappy Coasters  […]

    Reply
  8. 33 Projects Ideas To Make From Quilting Scraps says:
    October 11, 2019 at 8:28 am

    […] sometimescrafter […]

    Reply
  9. 17 Free Projects to Sew for Your Kitchen - Jacquelynne Steves says:
    April 25, 2020 at 10:31 am

    […] Coasters Tutorial […]

    Reply
Previous Hot Pads Tutorial
Next Zigzag Block Tutorial

Related Posts

Coffee Time Cross-Stitch

Embroidery

Hourglass Blocks Tutorial

Tutorials

The Interesting Point Quilt

Tutorials

Patchwork Bear Pillow Tutorial

Sewing

Primary Sidebar

Shop

Binding 101

Categories

  • Books + Mags
  • Embroidery
  • Longarm Quilting
  • Patterns
  • Quilting
  • Sampler Quilt Along
  • Sewing
  • Spaces
  • Tutorials

Never miss a post

Just stopping in for the yearly documenting-of-the Just stopping in for the yearly documenting-of-the-wrinkles. #41
Here we go...2000 is old enough to drink. Going be Here we go...2000 is old enough to drink. Going be a wild year!
2020: The year I turned 40, saw @tiesto live for m 2020: The year I turned 40, saw @tiesto live for my birthday, and then a bunch of other stuff happened that paled in comparison to both of those events. The end. #longlive2020
The yearly photo of my moms birthday "cake". My mo The yearly photo of my moms birthday "cake". My mom requested I make this Swedish Braided bread with apple pie filling for her birthday this year, instead of a cake. It smells delicious and I can't wait to dig in! #birthdaytreat #swedishbraidedbread
It took a ton of coats of glaze, but Brice's ornam It took a ton of coats of glaze, but Brice's ornament for this year is done. I decided to make his ornament this year, and while I set out to make a toilet paper roll ornament, he saw white clay and assumed goose, so I made him Lucy goose. He's quite happy, and so am I. He loves our Lucy goose.
.
I used oven-bake polymer clay (Michael's brand was what I had on hand), acrylic paint (just the craft variety...again, what I already had on hand), and a glossy glaze (Sculpey, which I don't recommend, its gotten very thin since I last used it, it took way too many coats to be the right thickness). The ornament is about 1.5"h x 1.5"w x 0.5"deep. It was really easy to make, so don't say you can't do it. You can. 
.
#goose #chinesegoose #lucyandherducklings #ornament #handmadeornaments #gooseornament #clayornaments #polymerclay #messwiththehonkyougetthebonk
Irish soda bread seemed like a holiday kind of bre Irish soda bread seemed like a holiday kind of bread to make, especially since it has currents, cranberries and sultanas inside! I don't think I've made one since I was about Brice's age! Its been too long. #holidaybread #irishsodabread
Taking advantage of my end of year time off from q Taking advantage of my end of year time off from quilting to do a little crafting. I made an ornament for Brice (which I'll share later when it's finished), and then painted these cute little canvases while my paint was out yesterday. You can see individual photos of each of them over on my other account  @christinalanecreates (grouped with the photo like this).
It gets so dark here this time of year, by afterno It gets so dark here this time of year, by afternoon I've lost all light for photos! This is another quilt quilted for @jenny.l.barrett I felt Sashy was the right amount of modern and traditional for this quilt top. I was having a hard time picking a design for this but kept coming back to this. It's a go-to design for me and I always love it on everything. I think it ended up being pretty perfect for this. #sometimescrafterlongarmquilting
Copyright © 2021 Sometimes Crafter
  • Privacy Policy
  • Disclaimer
Theme by SheShoppes