
Zigzag Block Tutorial
Well, here we go! For you experienced quilters, there will be a little more info than needed. For those of you somewhat new to the game, I hope to provide ample information. Never hesitate to email should you have a question. I’m always here to help.
 |  |
 |  |
1. Pick out 5 complimentary fabrics and cut the following:
- Fabric 1: two – 4 1/4” squares (this will be the top of the block)
- Fabric 2: four – 4 1/4” squares
- Fabric 3: four – 4 1/4” squares
- Fabric 4: four – 4 1/4” squares
- Fabric 5: two – 4 1/4” squares (this will be the bottom of the block)
2. Cut your squares in half on their diagonal as shown.
3. Lay out triangles in order they will appear in block to help with the following step.
 |  |
 |  |
4. Match up your fabrics as follows:
- 4 Fabric 1’s with 4 Fabric 2’s
- 4 Fabric 2’s with 4 Fabric 3’s
- 4 Fabric 3’s with 4 Fabric 4’s
- 4 Fabric 4’s with 4 Fabric 5’s
 |  |
5. Sew your all of your blocks together. Press seams to one side.
*IMPORTANT* For each set of blocks, press two blocks seams one direction (say to the left) and press the other two blocks seams to the opposite direction (to the right).
6. Square up all of your blocks to 3 1/2” square.
 |  |
** A note on squaring up your blocks**
i) Using a square ruler, align your diagonal line on ruler (should you have one) along the diagonal of your sewn block. Find the width of your block (mine was approx. 3 3/14”) and visually divide the difference between this number and your goal number (3 1/2” in this case) and cut away excess fabric on the right side and top of the block.
ii) Turn the block 180 degrees. Line up your ruler’s 3 1/2” lines on the left side and bottom of block. Your diagonal line on your ruler should be on the diagonal of your block automatically this time. Now trim away the side and top edges.
You now have a perfectly squared block! Continuing on…
 |  |
 |  |
7. Match up two of your Fabric 1 + Fabric 2 blocks with the Fabric 2 sides matching.
You want to make sure your seam allowances are pressed opposite directions and that the seams are matched before sewing. I recommend pinning them together after everything is matched so there is no shifting during sewing. Pictures 3 + 4 show a better view of aligning seams.
8. Sew them together. Press seam allowance to one side. Repeat for other pair.
 |  |
9. Sew together the two Fabric 1 + 2 pairs to each other along the fabric one sides.
You now have your first row of the zigzag.
|
| 
Fabric 2 + Fabric 3 |

Fabric 3 + Fabric 4 | 
Fabric 3 + Fabric 4 |

Fabric 4 + Fabric 5 | 
Fabric 4 + Fabric 5 |

10. Sew together the rest of your fabric pairs in the same manor.
 |  |  |
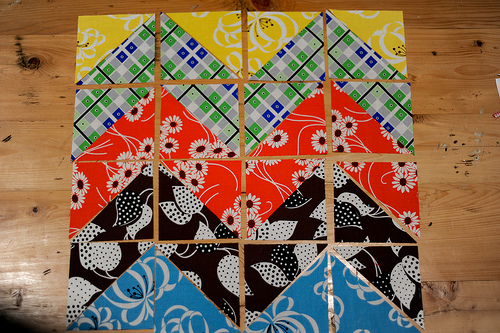
11. Sew together your rows to create your zigzags, matching like fabrics together.
12. Square it up to 12”…or save that for the end of the quilt-along.