
Drunkard’s Path Block
**I have since ‘misplaced’ the original template file for this block, but the directions still apply for any drunkards path piecing you do!**
First things first: you need to decide how many fabrics you want to use. You’ll want at least two fabrics, but no more than 8 for a block like this. (You’ll see why I say a “block like this” at the end.)
 |  |
 |  |
Directions
1. Choose your fabrics and cut to 7 1/2” square.
2. Stack all your fabrics, lining up all edges.
3. Lay your template on top of your fabric.
4. Cut around the curve.

We now have two pieces, I will refer to them as the curved piece (that the one in the bottom left of the picture) and the concave piece (the top right of the photo).
5. Take the top two fabrics from the concave section and move them to the bottom of that stack.
 |  |
 |  |
6. Lay your first curve and concave piece from the pile together. Repeat with your second, third and fourth pieces. You should have a combo similar to this. Your fabrics curve and concave pieces will be opposite each other in this placement.
 |  |
 |  |
7. Find the center of your first curved and concave pieces and pin together at centers.
8. Pin the edges of your concave piece to the straight edge of your curved piece.
9. Repeat for the other side.
10. Continue pining your curves together. The way I go about doing this is to center a pin between my end pin and center pin and I do another pin half way between that pin and my end pin and so on and so forth until my curve is totally pinned down.
Make sure your fabric lays flat in the seam allowance, so as to avoid any puckers/pleating when sewing. This is generally referred to as easing in.
 |  |
11. Sew your seam, going slow and “easing” the fabric as needed to avoid puckers.
12. Clip your curve and press. Flip over and press the top, too.
13. Square up your block to approx. 6 1/2”
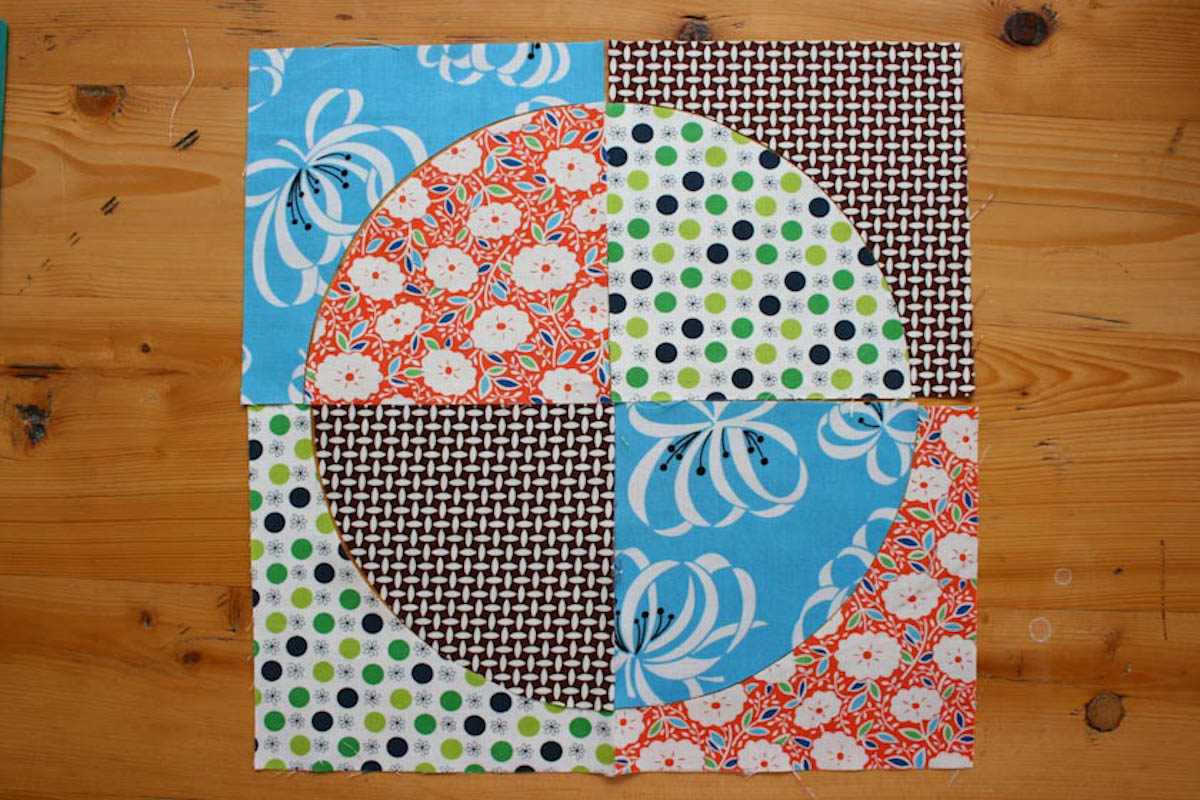
14. Gather all of your squared blocks and sew together in any random pattern you want. See yesterdays post for inspiration.

Okay, so as a quick alternative to sewing curves the way I described…remember how I mentioned that Liz goes at it her own way (much like myself)? Well, when she pined her curved piece to the concave piece she pinned at the center and worked outward, keeping it as straight as possible as she went (meaning, no bunching fabric). This resulted in having a little left over on the concave piece, as you can see here. In the end, after squaring up, her piece was the same as the rest of us. So do what works for you. Remember that there is no right or wrong way, just easier and maybe more efficient.
Here’s a good link on sewing curves. And here’s a great block that Prickly Pear Bloom did just this last week (why you may want more fabrics). I love it, and I’m going to make a block like this for my quilt. …cause apparently I’m making two quilts since I’m doing one block to show and then another block to finish taking decent pictures. All of these photos were again at night and so are not the best quality. You’ll forgive me, right?