[…] The Sometimes Crafter’s quick-and-easy Fabric Scrap Basket Tutorial along with a ton of other projects at Tip Nut’s Fat Quarter Fun: 35+ Project Ideas […]

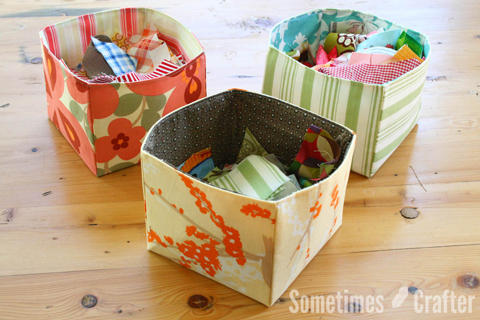
I thought I’d share with you how to make my fabric scrap “basket”. It’s VERY simple. I whipped out another two baskets in no time at all. Now I have all of my smaller scraps organized into small, medium and large groupings. Did I even mention I’m a Capricorn and like to be organized to a fault? No? Well if this doesn’t prove it, I don’t know what will. Go ahead, make yourself a few of these today. You’ll love it so much better than your Ziploc bags. I know I do!
Directions
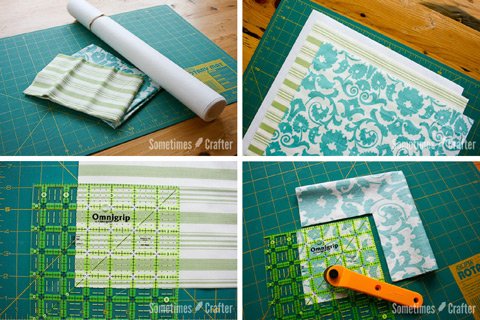
1. You will need to gather your supplies. I grabbed two fat quarters (one for the interior and one for the exterior) and my sew-in interfacing. I bought this a few years ago and have no idea of it’s name. It’s like a thick paper, not as thick as card stock, but thicker than printer paper. I think it’s something like this. You could also use a fusible interfacing, Timtex or batting. I found that I really like this interfacing for the boxes. It gives it a nice shape, but is easy to work with.
2. Cut out your pieces as follows:
Exterior: 1 – 15 x 15”
Interior: 1 – 14-7/8” x 14-7/8” **
Interfacing/batting: 1 – 15 x 15”
**I like my interior to fit and not be so rumpled from too much fabric, so this is why I cut my interior slightly smaller. You could of course cut it the same size as your other two pieces.
3. Cut 4-1/2” squares from each corner of your exterior and interfacing. I stack these two together and cut each corner. It should look like a giant plus-sign when you’re finished.
If you are using fusible interfacing I suggest fusing that to your fabric before cutting. If you are using a sew-in interfacing (as I did with my baskets) then you will want to baste the interfacing to the exterior fabric after both pieces are cut out. Baste the interfacing to the exterior fabric around all the sides of the plus-sign.
4. Take your interior piece and fold it in half one direction and then in half the other direction, resulting in a 7-1/2” square. Lining up on the corner with no folds, cut a 4-1/2” square. Again, you should have a giant plus-sign once opened out.
Note: You could also just cut a 4-1/2” squares individually out of each corner, it just goes a bit faster folding and cutting all at once. The reason I didn’t do this with the exterior + interfacing is because of the rigidity of the interfacing I used. If your working with a softer material, or fusible interfacing, you could do this for your exterior + interfacing (or batting) pieces. This is your call.
5. Fold opposite corners of the plus-sign to each other (as pictured) and pin along outer edges. Right sides of fabric together. Stitch with a 1/4” seam allowance. Open out and repeat for the opposite direction. (See photos below for more photo explanation.)
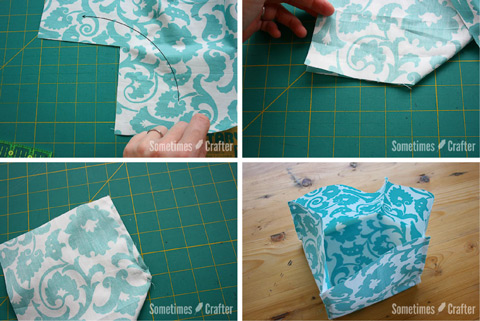
6. You will now sew your lining in the same manner. Essentially what you’re doing is sewing your sides together by sewing the sides that were created when you cut out that 4-1/2” square from Step 3.
7. With right sides together, nestle your exterior box inside of your interior.
Note: By “right sides together” I mean to have the fabric facing out on your exterior piece, and the fabric facing in on your interior piece.
8. Pin these two pieces together at the corner seams, making sure the seam allowances are facing opposite directions. This allows you to butt the seams together for a continuous seam from inside out. (See photo)
9. You’ll notice that there is a little gaping between your exterior and interior, this is because your two fabrics are slightly different in size. You will need to ease your fabrics together, but pulling slightly as you pin.
I suggest you start with a pin in the center, and then half way between that and your edge seam, as shown in the second picture above. Continue around the top until it’s all pinned. You can see I have LOTS of pins in that last picture.
10. Sew around your piece with a 1/4” seam allowance, leaving an opening on one side in the center to turn.
11. Pull your piece right side out.
12. Press along the top edge.
13. Edge stitch along top edge, approximately 1/8”.
And you’re done! So after writing all of that out, it seems like a lot of directions for something really easy…but sometimes explaining takes a bit of time. I hope you’ll give it a try and share your creations in my Flickr group.
**EDITED** See this post for info on pressing it to get a nice, crisp, boxy shape. Approximate box size is: 5.5″ x 5.5″ x 4.5″ deep.
~Michelle~ says
Awesome! Next time I need a box, I’m making one of these – so simple compared to some I’ve seen!
Fine Hand says
Thank you for this tutorial! I will have to make these fabric baskets to replace the big black garbage bag I now use!
Missie Krissie says
Ok, I need to have a go at this one, though things like this usually have me totally stumped! It looks really easy though so I’ll have to show you how it all goes! :)
bookflutterby says
Ooooh cute AND handy! Now that’s what I’m talkin about! Thanks for the tutorial, will definitely have a go at this one!
erica says
I am going to have a go at this. Thanks for the tutorial!
[email protected] says
These are WONDERFUL! Thanks so much for sharing, I’ll be linking.
Froggy says
These are awesome. I so wish I could sew things!
Sister Diane says
Beautiful! And what a great tutorial. Thanks so much!
kyouell says
I think I’m going to give this a whirl. Maybe some larger sizes/different shapes to replace those “magazine” baskets I didn’t bring when we moved? Very interesting. (btw, I found you thru @SisterDiane on Twitter)
Hadley says
I just want to know this…how did you know I use ziplock bags?!
seriously, I love this! I am going to try this!
Mary Corbet says
I love this! I really, really do – what a great idea for organization and for gift-giving!
Laura says
oooh! I need to make some of these. Right now my fabric is piled on my desk (and I am working on my bed) and is in serious need of some organization/storage help. I think I’ll try bigger ones too… way more stylish then plastic boxes or bags! (i.e. I can leave them out to inspire me!)
dailydoseofme says
You have a lovely blog here
I found you through How about orange and i love this tutorial, thank you so much for sharing this.
I will defintely have to make this its going to my to do list.
Chelsea Ling says
This is awesome!! But I would want to buy it and not make my own lol.. not that ambitious at sewing :)
elena says
Wow, what a great tutorial! Thanks so much: your boxes are beautiful!
Candied Fabrics says
Just came from How About Orange…Great tute! What an ingenious way of sewing a box together, the folding in half diagonally part. I will have to try this out…soon. Today, doing a big art festival though. hmm…Would this work for rectangles I wonder?
Kimmy G says
Wondering the same thing. Did you ever do one?
Molly says
I am adding this to my favorites! I surely need something cuter to put my scraps in than an old diaper box!
Mary says
I heart this basket. I will definately be making some!
theknittingcowgirl says
Hello! I love your blog and this is a great idea! thnk you for sharing it!
jordy says
Thanks for the great tutorial!
(how did you know i used ziplock bags for my scraps?)
erlthegirl says
Just like all the posters above, I am LOVING this. I have so many planned out in my head now…including one or two for gift giving. Better than wrapping paper!
carrie wahleithner miller says
That is so what I was thinking, i am going to try and make the boxes for most of my christmas gifts instead of wrappimg them i will put the gifts in boxes that will be made with each recipient in mind such as for my grandsons i purchased teenage ninja turtles and the avengers material
Sarah says
Thanks! These are amazing! Going to make one tomorrow!
Kindred Crafters says
I love these – I’m going to try them soon, I hope. I’m a bit concerned that the interfacting stuff I have is not stuff enough – it was the stiffest sew in stuff they had at the fabric store, so here’s hoping.
– Donna
Susie says
Hi, what a great blog, i have added to my fav blog list, im sure some of my readers will love these too, they are great, better than the plastic boxes im using now. A great idea.
maryblanca1618 says
How easy, and stylish too. I cannot guarantee I will forgo my love of Ziplock bags to keep my scraps since I forsee I will probably make some boxes and then store the Ziplock bags in them…
I am looking forward to checking out the rest of your blog, you have some neat ideas. Thanks!
I Love Baby Quilts! says
Great baskets! Love your blog. Check mine out sometime!
Jennifer says
So fun and EASY! I am not one who can follow patterns very well. Actually I can’t follow a pattern to save my life. Thank you for posting directions and not a pattern. I put a link up on blog linking your directions. I hope you end up inspiring a lot more people as you did me.
here’s the link:
http://randomvintagefinds.blogspot.com/2009/05/tuesday-tip-handmade-fabric-scrap-box.html
jennifer
http://www.randomvintagefinds.blogspot.com
kirstin & jordan says
This is fantastic… I feel like gorgeous storage options like these make re-organizing less daunting and more decorating. :)
I’ll be linking from my blog… http://www.kojodesigns.blogspot.com
BaileyGirl5 says
I just made one! It came out a little bit wonky because I had to keep analyzing the directions between each step and I didn’t cut the squares perfectly. I got a little confused with what to do with the interfacing but I had some iron on stabilizer here and i just ironed that to the back of my outside fabric. Worked out great! I love my little box!!!!
I can’t wait to make more. Thanks so much for posting this tutorial. Now that I’ve actually made one it makes absolutely perfect sense!
karin says
I made one today and it turned out great! Your instructions were very easy to understand. Here is the link to my blog post about it:
http://www.fromscratchbaby.blogspot.com/
I also mentioned the pattern for more sizes, which I am going to buy to make more! All of the ideas for things that need organizing in these lovely boxes is swirling in my head.
What a GREAT project you have come up with and even greater idea to sell a downloadable pattern, too.
jessica says
i love this. will definitely make it soon. thanks for the tutorial and inspiration.
Dianne says
Found your blog the other day. And I made my first box this morning, and I’m in love! Can’t wait to make more. THANK YOU!
Heckety says
These boxes are great! Thank you!
Bethany says
This is just lovely! I still haven’t found a good way to hold scraps – I will put this on my to-do list. Thanks for sharing! :)
Hello, I'm Sally. says
I love these! I have been looking for boxes to buy for my kids toys, but I would much rather make some. Could you tell me what their finished size is?
Christina says
This project is roughly 5.5″ x 5.5″ x 4.5″ (length x width x depth)
2ndAvenueStudio-Rachel says
Hello! These right here! OMG! do you have an etsy?
Debbie in Nashville says
I love these. Just posted about them on my blog and am so excited I found your great blog! Thanks for the great tutorial!
http://ontherefrigeratordoor.blogspot.com/2010/02/i-want-to-make-these.html
samsstuff says
Cute & very useful! I saw this on Debbie’s blog & stopped by to take a look. Thanks for posting these simple little boxes.
moramargaritaster says
Cute and very nice.Thakns for the great tutorial.Your boxes are awesome!!
Khris says
Thanks for the great tutorial. I have put a link to you on my freebies site…Khris
maltese7 says
Really love theseand I will try to do one in the future since I am organasing my sewing room. These are very useful. Thanks for the tutorial.
Lorraine
bekahdu says
This is so cool I’m going to box up everything. I’m trying (so hard) to be organised and this’ll help no end, thank you :)
Melted Crayons says
Thanks for sharing. I have made one for my daughter to keep her shells in. I just love how you can personalize them!
Tricia says
Thanks for the great tutorial! I made two of these last night and they were easy-peasey. Posted to my blog here: http://scrapquilt.blogspot.com/2010/03/fabric-boxes.html
Becky Yo says
I’m a very novice seamstress, but these I can make! In fact, I just did and it was so much fun! Can’t wait to try different sizes and colors, and maybe even get wild and crazy by adding a little handle?? Thanks for the tutorial
Samelia says
Love them. Am going to attempt to make one this morning.
Kristi says
I did it! It’s not as good, but I’m pretty proud. Thanks for the great tutorial!
http://tryingtogetstuffdone.blogspot.com/2010/03/fabric-basket.html
Alex says
Hey Christina this is such an excellent tutorial, just what I need to keep my fabric in order. Ive posted my attempt on my blog http://www.makedoandsend.squarespace.com with a link back here if you’re interested :)
Christine says
I was really looking for an easy way to sew such boxes! So finally I found yours – thank you for sharing this!
Cetatzeanul says
Now i wish to sew non stop cos of your blog. I won;t need to spend so much money at IKEA anymore. Thanks, you’re a fabric masters
GardenofDaisies says
I love this! I’d love to try to make a bigger one for toy storage.
Alisa says
Thanks so much for this great tutorial. I hope to use it very soon. I linked to it today if you would like to take a look. Thanks~
http://alisa-thesweetlife.blogspot.com/2011/02/to-do.html
Rosana Garcia Hess says
lovely tute!!! I´ll feature on my blog. hope you don´t mind.
hugs from Brazil
J A C Q U E L I N E says
I never knew it was this simple. Thank you so much for this tute!
April @ Sewing Novice says
Thanks for the tutorial. I wanted to let you know that I blogged about it on my site.
katie says
TOO CUTE!!! and how did you get the heart icon in your address bar??
I’m definitely making these!
katie says
OH and i’m a capricorn too and this totally explains my organizational freak attitude!!!!
Rachael says
This is JUST what I was looking for for some washable bathroom storage baskets for my man’s shaving stuff (which somehow is currently evenly distributed all over our shared vanity). Very helpful!
Cindy says
Thanks so much for such great and clear tutorial. I will get myself to make some one of these days. :)
Amy @ Ladybugs & Daisychains says
What a great idea, so clever and so many options for its use. I can see a few of these in my craft room soon. Thanks for sharing!
Emma S says
Thanks so much. I’ve been looking for a pattern for these! I’m going to make an easket basket for my daughter for next year and some for her bedroom!
Giselle says
Lindo e perfeito, parabens!!!
April Moffatt says
Great idea! Thank you so much for sharing. I’m going to give you a call on on my blog.
http://www.aprilmoffattdesign.com
Allie says
Great tutorial! I’ve tried making one of these as well as one from Amy Butler’s ‘Institches’ and I much prefer yours! Much easier.
Allie @ ducklyandjuicy.blogspot.com
Our Little Beehive says
Adorable! I’ve added these to my to-do-before-baby-arrives list.
Brandi says
Thanks for this! I am going to make some next weekend at our quilt retreat I think. :)
Raven Create says
I’m embarrassed to say I couldn’t figure out what sides to sew, mine didn’t work. I’m a sewing beginner though.
Wendy (aka Roo) says
Sew I’m guessing by the last comment, that this is not for beginners? I was just going to ask that ? when I saw the last comment. What size does the box actually turn out to be? Do you think it’s sturdy enough to hold things other than fabric?
Would you be able to e-mail me?
Thanks so much!
wendydot roos2boys @gmail dotcom
nancy says
I used my thick interfacing as its kind of thick sponge,or a heavy interfacing
little elm says
Just made one, bout to make lots more, will try and experiment with sizes x
Rebecca says
Thanks for the great tutorial! I just made one using Christmas fabric and I love it!
becky @ craftrules.blogspot.com
Karen Larson says
I just found this via pinterest. I made 6 of the little buggers today. I am not a scrap collector so now need uses for them. Thinking….square box of kleenex. Maybe as a baby gift filled with diapers. Any more ideas out there?
jannette says
fantastic now my first pressie is done i can make loads for myself yippee!!!!
cassandra says
I found this tutorial a few weeks ago and just made my first one. thank you! I topstitched to avoid hand-sewing and it looks great. I also pressed the side seams to help it keep its shape since I didn’t have any heavy-weight interfacing to use. love, love this. big thanks!
Carla's Inspirations says
I saw this on Pinterest and I am going to give it a try. Need something to keep my scraps organized.
Chandra says
I’m excited to dig in and try this. I do some reorganize things on my blog, and I would love to use some of these and link the directions back to here. I am a seasoned sew-er, but some things intimidate me still…like square things! This seems simple and super easy…I’m off to hunt through my stash!
Thanks for sharing this!
Chandra
http://www.judyjane.com
JuliaHaz says
on step 5 it would have helped to see contrasting thread…it’s hard to see where to sew….I can do this wrong….that’s why we have seam rippers… but that’s is not fun
Dorian and Monte says
If I increase the cut size to 18″, do I still cut 4 1/2″ corners?
Jody says
Someone mentioned this being better than gift wrapping. I think these would make excellent replacements for gift boxes. I’ve not made one yet, but maybe another box could be made just by adding 1/8-1/4 inch so that it would be just slightly larger than the other so you would end up with a lid. Slide the slightly larger box over the top of the other one and use ribbon to tie shut and decorate. Not only will the recipient get whatever gift is IN the box, they can use both the bottom and lid as storage. :)
Michelle Egan says
Great tutorial, I’m building shelves in my craft area just for things like this, and I’ll definitely be making a bunch of these! BTW, the interfacing used is +Lutradur®, a mix between fabric and paper, is a spun bonded polyester sew-in for crafting, sewing, quilting and fiber art. It can be manipulated in any way paper can but has the strength and permanence of a textile. Lutradur® can be printed, painted, dyed, stamped, foiled, burned and sewn.”. You can google the term to find where to buy it.
PJKnitter says
I have a question… When do you apply the interfacing or batting? I didn’t see that in the steps. Thanks!
Christina says
PJKnitter – I did not have an email address to reply to your comment, so i’m putting my answer here in the comments: If you’re using fusible interfacing I would fuse it on to your exterior fabric before cutting the corners away. If you’re using sew-in interfacing or batting, I would sew it to the exterior piece after you’ve cut away the corners.
orlasworld says
I can see myself making about 10 of these as soon as I get a chance – they’re lovely! Thanks for the tut! :)
Maris says
This looks great, and just what I need in order to organize my new sewing room! Thank you for the really great instructions and photos to help me along!
Goldogmom says
Thank you for posting and maintaining this tutorial. I have wanted to make some fabric boxes for some time, to keep scraps handy for test runs for tension, or how does a decorative stitch look? And a second box for small quilt sandwiches to warm up for fmq. I am hoping to figure out how to make your tuttorial a bit larger, approximately 6.5″ wide, 9″long and 4.5″ tall. I realize I need longer. I am guessing if I have fabric 18 x 16, that would be enough to get my desired dimensions. Can you confirm that I would still cut the 4.5 square out of each, outside corner? I’m excited to make some this weekend so I can return the plastic basket I just bought that don’t really fit my storage spot anyway ;-)
thank you for any help and again, for sharing your tutorial.
Michelle
grammas says
I’ve been having great fun making these! Your directions were easy to follow….okay, I confess to sewing the wrong seams, but still turned out awesome!
Maria Zehrung says
You just made another Capricorn’s heart explode with happiness!! :)
sunnyskies says
hi i was wondering if i could use fabrics from clothes?
sunnyskies says
my email is [email protected]
npfoto says
These are so cute & functional and could be used for so many things. Thanks for the easy tutorial.
Ceacy M says
I love these! So easy to make! Your instructions are so easy to follow for a novice like me! If I wanted to make a larger one, how could I do that using the same method?
donnaing says
Such easy to follow instructions. Thanks so much. Love this idea.
Ana Lopes says
Super cute! I’ll try make some of these! Thanks so much for sharing the great tutorial! Would love to have you visit me sometime.
Have a fabulous week!
Hugs from Portugal,
Ana Love Craft
http://www.lovecraft2012.blogspot.com
[email protected] says
I am NOT a seamstress and even I could follow these easy directions. Come see how my boxes turned out: http://organized31.blogspot.com/2013/03/repurposed-cloth-napkin-boxes.html
gedcarpizo says
Thank you so much for sharing this tutorial! ♥
I shared this article in one of my blog posts:
“Recycle Fabric Scraps: Easy Crafts”
–> http://gedcarpizo.com/recycle-fabric-scraps-easy-crafts/
Of course, I put a link back to your site. ^^
Thanks again! And have a beautifully creative day ahead!
Mary Beth says
Thanks for the tutorial! Here’s a link to my own tutorial for adding handles: http://fosterhouseblog.blogspot.com/2013/04/diy-fabric-basket-tutorial.html. I made these for my cousins to collect Easter eggs in!
ruthagraber says
LOVE, LOVE, LOVE it and all the possibilities using coordinating fabrics.
Lea Burg says
I’m a beginner sewer and things that look easy are not easy for me! I’m still learning how to use my machine. It works fine for a while then it stats bunching up thread on the back side! UUUUGGGG this looks like something I’d like to try, but I’m not sure my machine will cooperate
I may just learn what’s wrong and be able to make this!
Thanks for sharing
Christina Lane | The Sometimes Crafter says
That would be frustrating! But it sounds like an easy fix, I think your tension is off. So try adjusting your top tension, it sounds like it’s too loose.
karen says
You may have it threaded wrong…check that you have your thread above the last “arm” or threaded exactly as per machine instructions.
alittlebirdmademe.com says
Thank you for the tutorial. I have included it in my blog – http://alittlebirdmademe.com/2013/07/26/friday-finds-a-list-of-23-free-tutorials-for-fabric-baskets-and-buckets/
Please stop by and grab a button to show that you have been featured!
A Roper says
I taught my 9 year old daughter how to sew using this tutorial. It is easy, straightforward and versatile. I’ve made quite a few of various sizes and some with handles and will be making these for Christmas presents this year for sure. Thanks for your expertise.
Eva says
Hi, Wonderful tutorial, you are so neat and everything looks perfect!
Thank you for sharing, Can you please say what brand interfacing you used as I have not been able to find anything stiff enough.
sometimescrafter says
It is by Pellon, and is a sew-in interfacing. I think it’s their mid-weight, but I don’t have the paper from it anymore. It’s not quite as stiff as a piece of cardstock, but stiffer than a piece of printer paper. It’s pretty rigid. If you’re able to go to a store like Joann’s or Handcock, they always seem to have it and you’ll know when you see it that it will hold up nicely in these. I’m thinking it’s their 40-weight, but it could be their 50-weight.
Ann says
Hi! Can this basket be resized to 10″x10″ easily? I’m not sure how to do that — do you have measurements I could use?
Christina says
I sell a pattern with worksheets for resizing these baskets to desired size here: http://sometimescrafter.com/patterns/make-your-own-box/ A 10″ x 10″ would be a rather large box, but I offer two methods for piece, as shown in this tutorial (using a whole piece of fabric) or piecing the fabric (sides and bottom) to get the shape/size needed.
mary says
these are so awesome made a bunch of them in different sizes and added handles to the sides!!! thank you so much!
Sandy says
I made your Fabric Basket for week 6 of my “Craft Challenge 2014”. And I’m sure many will follow as they are so cute, easy to make and practical! Thanks for the tutorial!
http://kiwisandkrauts.blogspot.de/p/kreativ-challenge-2014-craft-challenge.html
Patti says
These would be great to make them a little larger and use to organize your undies, bras and such. Spray a little of your favorite perfume on the bottom.
Christina says
What a fantastic idea!
Ronda Marsh says
Thank you for this tutorial. Love it.
Bodysoluble says
Oh these are fabulous. I am going to bookmark and sew a dozen, much nicer to organise with these than with the cardboard boxes i’m using right now. Also will make a few for baby’s socks and singlets. Brilliant instructions, thank you.
Janet says
I love this basket. I have made several as gifts, always well received. They are quick to make. Instructions easy to follow.
Do you have a pattern for a bigger basket?
Lolo says
Thank you! I had made a mistake with some pinwheels (8.5″x8.5″ squares) and made a nice short sided ‘basket’ so no WASTE!!!
izosik says
Very useful and clear tutorial. I want to make own basket, so it is something for me now.
Jackie says
Looks so easy. I need to make one in each color for my applique scraps. Great way to organize my new sewing area. Thanks for the easy directions.
Margo says
These are fabulous.
Margo says
I really like the instructions. Thanks for taking your time to write it out in full detail. Thank you.
Rebecca says
Hello!!
I absolutely love this basket and have been attempting it. I;m stumped even before I start sewing. (I’m a super beginner) I have everything cut up, and the interfacing fused to my exterior fabric on the wrong side. and I folder the big ‘plus sign’ in half like in the picture… now which sides am I supposed to sew together? The long seam? and then unfold, refold it the opposite direction and sew the other long fold? sorry if I’m confusing with the question. I just really want to make this basket!!!!!
thank you in advance!
-R
Christina says
If i’m understanding you correctly, you do NOT want to sew on the fold. You will be sewing the raw edges of the fabric. Looking at the second photo, above step 5, you will want to sew along the far right side and the side that’s facing the bottom of the photo. If you look closely (I know it’s hard to see) there are pins on those sides holding the fabric together, so you will want to sew there. Then you will open it out and pin those opposite sides the same way. I hope this helps, let me know if you still need more guidance.
Rebecca says
Thank you so much for replying so quickly!!
So you mean to sew the 2 shorter sides that you get after folding the fabric in half?, and NOT the 1 long seam?
Going to attempt this tomorrow after some much needed sleep!
Thanks again for helping!!
-R
Rebecca says
OOOOH wait a minute! I get it now, I guess my brain just started working! The picture makes sense now. I tried just holding my fabric and “making” the basket without actually sewing. I’m a very visual/hands on learner. Thank you again for your help and awesome basket tutorial!!
-R
Christina says
Oh good i’m glad you got it! I made it so you could click on the photo I referred to in my first comment so you could see a it easier, too.
Anneliese says
Now that’s a wonderful tutorial. I made those boxes but it is always interesting how others do it Very, very nice.
Thank you
Lynda says
Thank you – I love storage ideas – I love being organised too – and I’m a capricorn too – so thank you very much.
SunRai says
I know this is being picky, but for the novice it might be important. I don’t see where you address adding the interfacing. I put it onto my exterior fabric prior to cutting out the corners. I suppose you could also put it onto the interior fabric if you wanted the exterior to be softer. I just though it might be something you would want to add to the tutorial. Otherwise, it’s great!
Kimberley says
Hi I love these fabric Scrap Baskets I Plan to make a few of these once I get the hang of making them. I like this Idea because I tend to keep my fabric scraps in plastic shopping bags & have a alot I used to keep other Craft Supplies or Projects In.My Few Queries Are; 1. Hi just wanted to know if yoû have to fold the big plus sign in the direction of the arrows in above photo, 2. After you make the big plus sign Sample I did a tester using paper & number each big square e.g:( 1,2,3,4); So would I Sew number 3 to no. 2, no. 2 to no. 1 & so on; let me know if I’m on the right track or not; I Appreciate appreciate very much thanks. Look Forward to your Response A.S.A.P & TAFS This Fantastic Tutorial With Online Viewers or Readers. I also apologize for the long comment post.
Christina says
1. Yes, you fold in the direction of the arrows, matching the corners where the arrows begin to the corners where the arrows end. 2. Not knowing which squares are labeled 1, 2, 3, and 4, i’m not sure if your thinking is correct for this question. In the tutorial, I have the photo with the arrows showing how you will fold it and the photo next to that shows it folded, ready to sew. Below that, the photos also show again, in different view, how to fold these in half and sew. Basically, you are folding this + in half on its diagonal. I hope this clarifies it for you.
kimberley says
Hi thanks for your response; I apprrciate it alot & I’ll try it using your advice given; One More Thing; how comes when you fold your + diagonally following the arrows from top to bottom when I look at your images for folding it’s forming what looks like a perfect square & with no cut out square when you fold it diagonally; did you flip yours upside down; just asking & mine’s forming a Rectang doinsomethinrong; just Asking; that’s it & i look foryo look forward to your response A.S.A.P. TAFS & The Advice Given & I Apologies for the lot of questions I’m Asking If you find them Annoying; just saying.
Christina says
I’m not really sure what you’re asking here, but I think the confusion is in sewing the box into a box shape…? After you fold to the arrows and sew on the sides (in the second photo is the straight part, with pins towards the bottom, and the side towards the right of the photo with pins) then you open it up and match the other opposite corners to sew the other two straight sides, at that point you will have a box. It’s on my to do list to redo this tutorial, so perhaps in the next post of this everything will be a little clearer. I’ll try to get that done in the next week or so. But no promises. :)
Kimberley says
Hi Christina Thanks For the information given in the last Response post above; I’ll give it a shot at it again,following the last post info’ above & see if it works this time around; if not I’ll be looking out for the Redo tutorial hopefully soon from now & thanks for giving me a head’s up on that; I Appreciate It; thanks & look forward to your response A.S.A.P!
Daniell Lewis says
Im just learning to sew in all honesty it took me 30 minutes to figure out how to turn on the quilting/sewing machine I purchased. I can finally sew straight lines! (Well almost straight) I have not completed a project yet but this will be my first project! I have everything I need I’m hoping to try it today. Oh by the way I LOVE your little sheep ♡♡♡
Daniell
Char says
Great directions. I am a visual learners and your written directions and pictures were very helpful. Thank you so much.
Jutta Stone says
Just found this posting. Love them! Haven’t tried these yet, but I will. Larger sizes might be good too & how about adding handles at the sides for carrying?
june Staab says
great! Thanks!. I have taught many classes……..this is the most simple. I know my I I year old daughter will love them…..to sew for her and her friends. And of course for her brother or maybe he will sew them.( camoflouge) of course.
Sewnut1 says
I made one this evening & it was real simple! So cute & I was surprised at how much it holds considering the size. I will b making many more of these as I have a hall pantry in desperate need of organising. Thank you so much for the easy instructions. You did a wonderful job!
Wanda Jewell says
In your directions you told us how to cut the interfacing, but not when to either iron it on or sew in or and where to do that.
Christina says
How funny that after 7 years no one has mentioned that. I will make not in the directions. If you are using a fusible interfacing I would iron that on before cutting the exterior piece so that you only have to cut that piece once (instead of exterior and then interfacing). If you are using a stiff sew-in interfacing (as I did) cut out your pieces and then baste it to the backside of the exterior fabric around all the edges (so all around the + sign). I hope that clears it up!
Tracy says
This is the best fabric box tutorial I’ve tried. I added a handle for my Midwife’s birth pool pump but other than that followed this to a “t”. I’ve done several other boxes but your instructions were very clear and the results are so nice and clean looking!! Thanks so much for sharing!!!
Laura says
Stunning! Will try out thank you
Kammy says
Thanks for this! I had great success with the first one I made and now I will make an even better one next time. :)
Ann says
How does the box stand, what’s firm in it, can I use an old cardboard box?
Christina says
The interfacing I used is slightly stiff. I wouldn’t recommend cardboard for this, as the assembly would make it difficult, but i’m sure you could figure a way around that, like stitching the lining and exterior together at the top after you’ve put the cardboard in. But really you just need a sturdy interfacing. The one I used here was about the thickness of a sheet of printer paper and they hold up beautifully for me.
unni lindemark says
Take you very much for this tutorial :) I will try to make it :)
Xylia says
Lovely idea, must try this
Sobana Sundar says
I loved the way mine turned out! And I decided to use those 4.5 inch cut outs and make them into matching coasters! Thank you so much!
MN says
I’d take it a step further and determine what size scraps I wanted in each basket. Then I’d cut a contrasting (plain or figured) piece of fabric a little larger than what I wanted it to be in the end. Turn in 1/2 inch or so hems & iron. Then attach it to the side of the box which will face out on your shelf and sew it down. Now you have an easy way to “see” which box your scrap should go into if it is close to the size in 2 of the boxes.
Jo Goudie says
Thank you so much for a great tutorial. Made two boxes today and was so pleased with how well they turned out. Great fun and useful too. ?
Louise bouwman says
Could you please send me a template to make patch work basket
Christina says
There isn’t a template. You just cute to the sizing indicated in the post.
kathi says
I know this is an old post,but it’s new to some of us who are just seeing it.Perfect timing too,as i was thinking today i need to make my own baskets like this.You see i keep a basket on top of the fridge to hide those bags of chips/pretzels etc that i have no room in the cabinet for.Well today i went to take one down to add stuff to it and my finger went rigt thru ith,so i decided then and there that i would make my own.The one i had up there was a cheapie from the dollar store,but i have a ton of fabric here,so i’ll make my own.
Shirley says
Great and useful way to use up fabric in my stash. Think I will make some for our church tea sale. Thanks!
Sue Kay says
I love the look of these going to make some. Thanks for sharing.
Nancy VanWyck says
These are on my to do list for my new sewing room. I will have open shelves at one end of the room, and I wanted to make storage bins to fit each shelf, that can hold fabric and patterns and keep them dust free. I already painted the shelves and am installing them. Have already chosen the fabric to use. BUT — I had not the slightest idea how to construct the boxes! Thank you so much. They say timing is everything.
janice says
Thank you, it would be great to have a print option. I love the ones with handles on
Janice
Christina says
I will add it to my list of things to do. I actually have been wanting to update this post with some more current fabric. :)
Christine says
Super cute and my fat quarters fit in it perfectly! I need a liner that’s more firm, but I happy with it. Super easy and cute. Thank you!
Kim M says
Many years later…
I found your basket and made one of my own by following your method. I needed to use different measurements, as I was using it for a hanging wooden box liner, but I like your method of using a “plus sign” and sewing the edges of the box.
Thank-you for this tutorial.
Jeanette hagedorn says
Can you use plastic canvas to make the sides stiffer
Christina says
I haven’t personally worked with that, but i’m going to say for this specific pattern that might not be the best option. The interfacing I use is sewn in, so i’m going to assume you wouldn’t be able to sew the plastic.