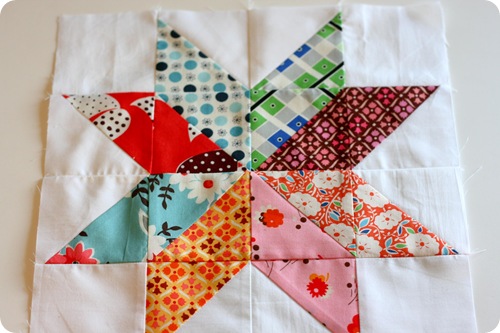
{Cheaters} 8 Point Star

ChristinaApril 16, 2010

IMG_4532

So, getting back to the Sampler Quilt-Along… I’m several blocks behind and it is my goal to get those done next.  See, I have some fabric waiting for another quilt pattern, but I’ve forbid myself to work on it until the last four blocks are done.  So here is “November’s” block.  Our inspiration block for this quilt was an 8 point star, which uses a 45 degree angle diamond and is usually paper pieced, but I felt like finding a lazy-quilters route to this block.  The basic idea behind the block is to have a traditional star block with a center pinwheel block…only we are using a different fabric for each of the 8 points and that corresponding fabric for the pinwheel points.  Snazzy, huh!  The tutorial is a little different than my usual step-by-step photo directions, instead I’ve created you a quick sheet with diagram, cutting and piecing directions.  Let me know if you have questions and I’d love to see your blocks!

{Cheaters} 8 Piece Star Tutorial (PDF)

Comments (20)

  • Mountain Home Quilts

    April 16, 2010 at 7:49 pm

    Can I say that I think that is my most favorite 8 point star ever?!!!
    Love it! :)

  • ~Michelle~

    April 16, 2010 at 8:47 pm

    I don’t think of it as a cheater, lol! This is funny, I’m actually making a big version of this block for a quilt right now – it should finish @ 50″ square.

  • Giddy for Paisley

    April 16, 2010 at 9:18 pm

    Maybe I should bring my block stuff to work on tonight instead of the zig-zag quilt. I am so far behind. lol

  • CraftCrave

    April 16, 2010 at 9:35 pm

    Just a quick note to let you know that a link to this post will be placed on CraftCrave today [16 Apr 02:00pm GMT]. Thanks, Maria

  • Sue

    April 17, 2010 at 3:56 am

    Great block! I’m so excited that you added a new one. Don’t worry about being behind- we all have “those projects” that take longer than we expected. We’re just happy to get this wonderful star. Love it- thanks!

  • erica

    April 17, 2010 at 4:08 am

    Really, really pretty. Another project to add to my list!

  • Walden

    April 17, 2010 at 6:22 am

    Very nice. I like how have the shape as two different triangles opens up the possibilities. One could change directions of the fabric/stripes. I will definitely use this in the future, thank you! :)

  • kimberj

    April 17, 2010 at 3:19 pm

    If “cheating” gives peeps like me the courage to try one then, THANK YOU VERY MUCH!!!

  • Lisa-Marie

    April 17, 2010 at 7:47 pm

    How cute is that star! I have just begun quilting, i think I might have to make a quilt of stars!

  • Hannah

    April 18, 2010 at 10:52 pm

    Gorgeous star! I Love the colours!
    I’ll have to add it to my never ending list of things to try.

  • Amy

    April 21, 2010 at 6:55 pm

    Thank-you!! As a new quilter I’ve been looking for a very simple star block & instructions… Now I can get started!!!
    Mucho gracias!!!!

  • Kim

    January 3, 2013 at 12:09 am

    Beautiful! I’m curious to know, how big is the finished star?

    1. Christina

      January 3, 2013 at 12:19 am

      This finishes at 12.5″ square.

  • Karen Ann

    February 6, 2014 at 2:24 pm

    Thanks for sharing…and I adore your book!

    1. Christina

      February 6, 2014 at 10:15 pm

      Thank you!! I always LOVE to hear that!

  • maddy

    February 13, 2014 at 7:50 pm

    would love to have the pattern for the 6 1/2 inch block.

    1. Christina

      February 14, 2014 at 11:25 am

      For a 6.5″ block, cut your 3.5″ squares to 1.5″ and your 4.5″ squares to 2.5″. Square your half square triangle (HST) blocks to 1.5″ x 1.5″ and then sew it all together. The block is 4 squares across by 4 squares down, which means each square needs to be 1.5″. Once sewn together you’ll have a 6.5″ block!

  • Mary Reigel

    February 20, 2019 at 11:53 am

    Just wanted to let you know that your link is not working.

    1. Christina

      February 26, 2019 at 3:38 pm

      Thank you, it’s been updated!

Leave a comment

Your email address will not be published. Required fields are marked *

Prev Post

Organizing & Folding Fabric

Next Post

Stacked {Whatever} Block