Half Square Triangles

ChristinaMarch 17, 2011

This post originally appeared on Whip-Up.net.

   _MG_0754
Hello Whip-Up readers!  It’s so nice to be back in this space posting while Kathreen is away.  Today I wanted to share a really great way of making half square triangles (HST) that I recently found online and give you some measurements to help you with making them just the size you need for your own projects.  Ahead of me I have a quilt full of half square triangles, and I was not looking forward to the prospect of making all of them in the way i’m use to.  Then I remembered having seen this video by The Missouri Star Quilt Company.
HST_Assembly
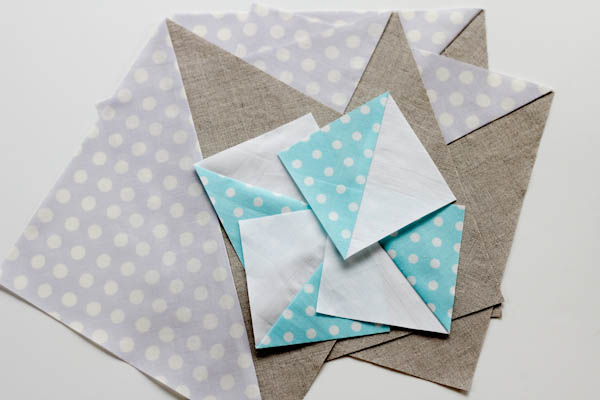
Her ingenious method of assembling HST for a pinwheel block are perfect for most HST projects I can think of.  You simply take your two squares of fabric (usually a print and a solid), place them right sides together and sew around all four edges with a 1/4″ seam allowance.  Then you cut the square on both diagonals and you end up with four pieces.
_MG_0752
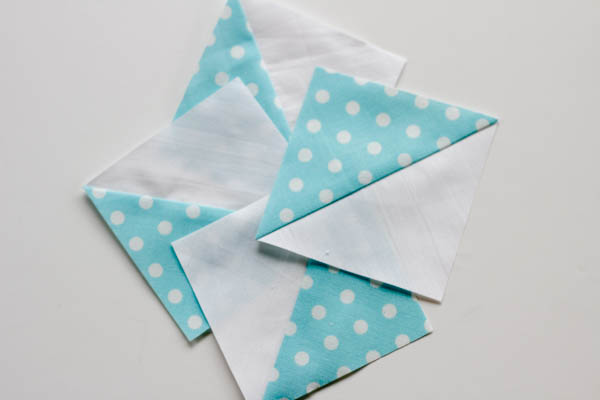
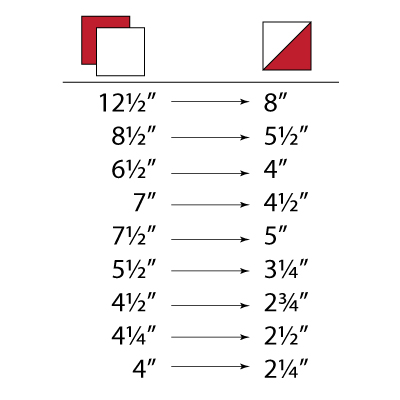
When you open out and iron them you get perfect half square triangles!  It’s amazing every time.  I recently made a bunch of these in different sizes just to get a feel for the math. I have some of the sizes figured out to get you started, but the basic math is a HST that is roughly 64% of the size of your original square.  So your math would be this:
Beginning Square Size x 0.64 = HST size.
If you knew the size you needed your HST to be, but wanted to find out how big to cut your beginning squares, you would use this equation instead:
HST / 0.64 = Beginning Square Size.
Of course it’s always a good idea to make a test square before beginning a project, as all of our sewing and cutting varies.  Not every size is exactly 64%, but it’s a good place to start without getting too involved in the math.  Below is a table that gives you the starting square size and the final HST size for sizes that I’ve actually tested.  You may find as you make these that you can get 1/8″ to 1/4″ more from each size, but I like to play it safe.  So many times when I’ve made HST in the past I find that I don’t have enough to trim away and get the size stated in the pattern, so i’d rather play it safe.  Good luck and have fun creating!
HST_Chart

Comments (22)

  • Jeni

    March 17, 2011 at 9:38 pm

    :) I was SO happy this morning to wake up and find it was finally your turn over on whipup! I have really been looking forward to this post and it did not disappoint! Can’t wait to try out this method on my next HST project!

  • Live a Colorful Life

    March 17, 2011 at 11:02 pm

    My only question is whether you worry about the bias edges? Do these get very stretchy?

    1. Jane McKay

      May 4, 2014 at 12:27 pm

      You don’t have to worry about the bias edges if you starch your fabric BEFORE you cut the first squares. This is a terrific method, and I’m so glad to get a chart for different sizes.

  • Little Bluebell (Adrianne)

    March 17, 2011 at 11:38 pm

    LOVE the size chart! I’m printing that puppy out and laminating it. Now if only it had a cute heart or bunny on it… ; )

  • Poppyprint

    March 18, 2011 at 2:48 am

    The bias edges can be tricky if you’re making an entire quilt from 1/2 square triangles made this way, but a hit of MaryEllen’s Best Press helps!

  • Christina

    March 18, 2011 at 3:02 am

    I didn’t notice any difference in working with HSTs made this way vs. other traditional methods. I just finished a quilt with various sized HSTs made this way (300 HST’s in total!) and I had no trouble with bias. I don’t use starch or anything like that either. I think as long as you don’t stretch and pull and make sure to accurately square your blocks before piecing them together you should have no trouble at all!

  • CraftCrave

    March 18, 2011 at 4:05 am

    Just a quick note to let you know that a link to this post will be placed on CraftCrave today [18 Mar 01:00am GMT]. Thanks, Maria

  • Tiffany

    March 18, 2011 at 6:33 pm

    Hmmmm …. you know hst’s are the worst for me! I’ll give it a try :)

  • Betty Crocker Ass

    March 19, 2011 at 4:06 am

    Awesome! Makes want to try them again!

  • Estela

    March 21, 2011 at 1:11 am

    I just got done cutting a bunch of squares to make triangles for my nephews birthday quilt and this posting would have been great, had I not already started. I’m still WOW’d by it and will definately give it a try on my next one. Thanks again for posting it!

  • Sarah

    March 21, 2011 at 6:45 pm

    GENIUS! Thank you so much for posting that. It’ll be forever in my ‘favorites’.

  • Liz @ LivingMySweetLife

    March 22, 2011 at 12:52 pm

    I have been itching to try hsts!! I could never find a tutorial i liked. For such a simple looking block people seem to have so many ways to cut it! I am so excited by this tutorial that I am making some today, Thanks!!

  • DKB

    March 23, 2011 at 12:59 pm

    can you pls tell me what the linen-y looking solid isin your HST?
    thanks

  • Dear Spring Green

    March 26, 2011 at 5:05 am

    Yay! That is great- I am going to save that little list and print it out!

  • Lori McKay

    June 27, 2014 at 12:35 pm

    Thank you for doing the math on this method.

  • Linda Smith

    March 29, 2017 at 8:53 pm

    Thanks so much for this useful chart! I will be using this method on my next project that calls for HSTs.

  • Becky Collum

    October 11, 2017 at 6:19 am

    Thanks !!!!

  • Patricia Johnson

    October 11, 2017 at 8:42 am

    Very informative, since math is not my forte and I’m a beginner quilter. Hopefully this will help me. Thank You very much#

  • Carol

    October 11, 2017 at 1:45 pm

    Thank you for this info. I have a silly question. What is HAT.
    I do quilt. I have some experience but still learning.

    1. Christina

      November 12, 2017 at 6:02 pm

      HST is Half Square Triangle for short. :)

  • Ginny

    January 18, 2018 at 8:17 am

    Thank you!

  • Carrie Appel

    January 28, 2018 at 7:50 am

    Thanks for the HS triangle chart. Very helpful

Leave a comment

Your email address will not be published. Required fields are marked *

Prev Post

Bunny Ornament Tutorial

Next Post

Little Cottage Mug Rug