Halloween Quilt Tutorial

ChristinaOctober 2, 2014

{Tutorial found in the post below}

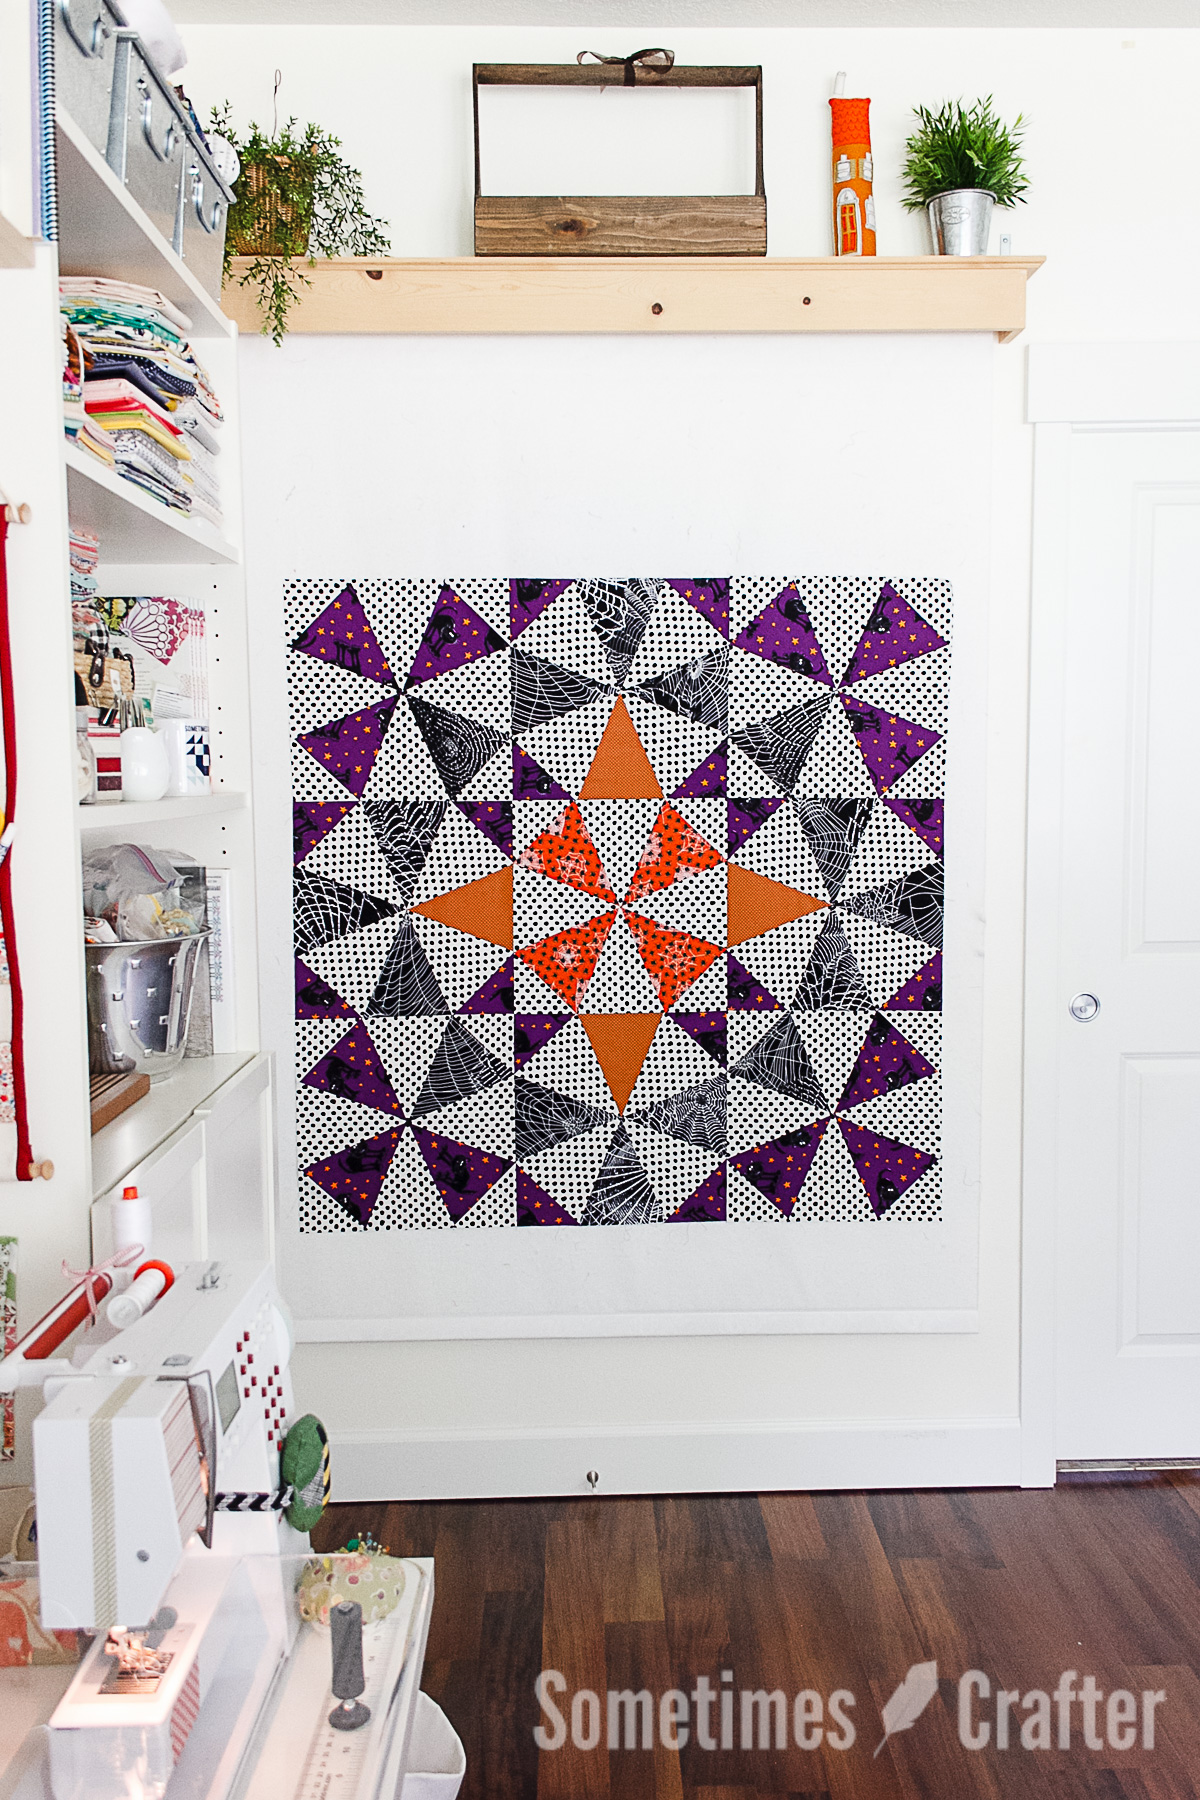
Today on the Benartex blog, Sew in Love {with Fabric}, I have a tutorial on how to make this fun Halloween Medallion Quilt. With the use of From Marti Michell’s Kaleido-Ruler, and a few fabulous prints from Benartex, the quilt came together very quickly and remedied my need for a Halloween quilt. With the many interruptions a mom can expect, I made this in two afternoons, but could have easily completed it in a day. I think this pattern was a great opportunity to use a low volume print for the background, instead of my standard choice of solid white. I haven’t been able to quilt it yet, but I like to take the weekends off from my longarm quilting business so I am hoping I can use that time to load this up. I’m thinking spider web quilting is in order. I’ll be sure to share photos as soon as that’s completed.

Black and Orange Kaleidoscope Quilt

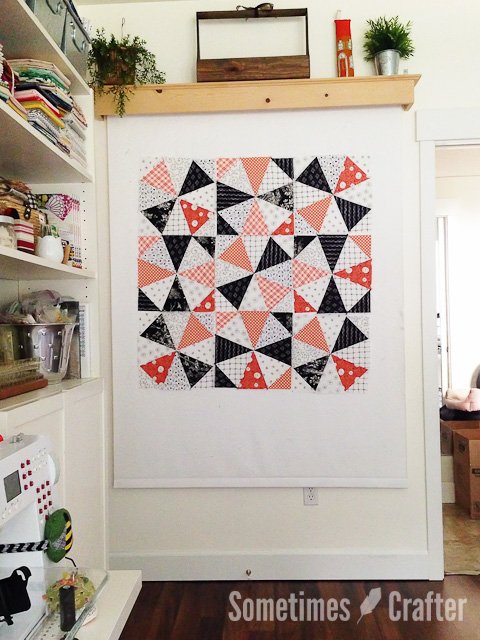
While I was waiting for the Halloween fabrics to arrive I pulled some black and orange fabrics from my stash to make a test quilt and am just as in love with this top as I am my Halloween version. While I will sadly pack away my Halloween quilt when after the holiday is over, I will gladly keep the orange and black version out until the Christmas season (and maybe even longer).

Halloween-Quilt-30

While you do need to purchase the Kaleido-Ruler to make this top, I think that you will be very happy to own it. I bought mine several years ago as an impulse purchase and have only just begun using it, but i’m glad that I did. Because fabric placement can change the whole look of a kaleidoscope quilt, I can see myself using this ruler many times over, especially because of how quickly the blocks go together. Take a peek at the tutorial and see for yourself how easy this quilt top is to make.

–        –         –        –         –        –         –        –         –        –         –        –         –        –

{Tutorial – Originally Posted on Benartex’s blog and used Benartex fabrics}

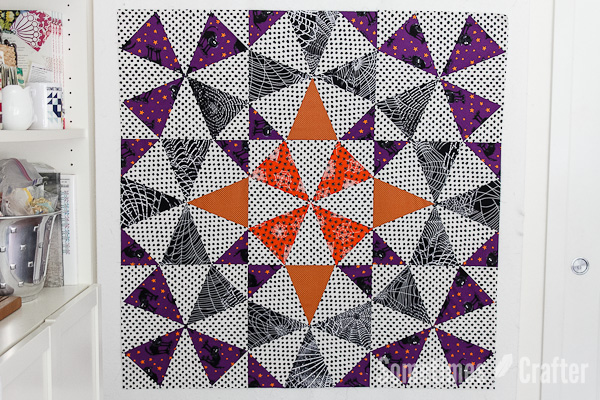
Halloween is one of my favorite holidays of the year. For me it means lots of decorating and crafting. I’m not sure how it happened, but I am without a Halloween quilt to grace my couch and I knew that needed to be remedied this year. I think this kaleidoscope quilt was the perfect way to display a few Halloween fabric favorites. The finished size of this quilt is approximately 48″ x 48″ – just the right size for curling up on the couch with a scary movie.
Kaleidoscope quilt blocks are quick and easy to make and give so many different results depending on your fabric placement. I especially love how the straight lines gives the illusion of curves when the blocks are placed together. For this quilt top you will be cutting and placing fabrics to create a center medallion encased within a “circle.” This quilt is a great time to use low volume, or small prints for your background, so be sure to choose a fun background print.

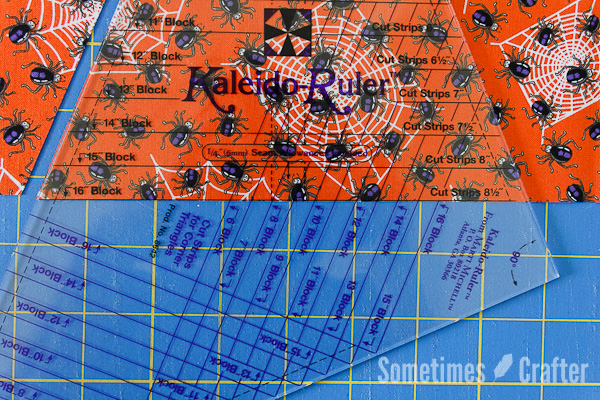
Kaleidoscope quilts are full of funny little measurements of 1/16th to 1/32nds of an inch, so for this tutorial I will be using From Marti Michell’s Kaleido-Ruler to make 16″ blocks. The ruler makes the task of cutting out pieces for a kaleidoscope quilt not only more accurate, but also faster. The Kaleido-Ruler I’ll be using makes blocks from 6″ to 16″. I was so glad for my impulse buy of this ruler so many years ago. Once you see how quickly these blocks and the quilt top go together, you’ll be glad you have this ruler to make even more kaleidoscope quilts.

To make this quilt you will need the following fabrics:

1/4 Yard (or 1 FQ) Spooky Spider Orange (Spooktacular collection)
1/4 Yard (or 1 FQ) Dot Orange (Harvest Song collection)
1/2 Yard Spider Web Black (Spooktacular collection)
5/8 Yard Fraidy Cat Purple (Spooktacular collection)
1-3/8 Yard Dot All Over Black (Palm Springs (contempo) collection)

Backing – 3 Yards (I suggest Creepshow Black/Orange from Spooktacular II)
Binding – 1/2 Yard (I suggest Dot Orange from Harvest Song)

Before we start, I want to talk about seams. ​For this quilt I pressed all of my seams open. I know that this is not generally considered a “proper” way of doing things, but you will be so much happier with your end result if you press your seams open. After all those triangles come together in the center of the block, it can get quite bulky when pressing seams to the side, which not only makes the block bump up considerably, but can also stall a machine when quilting over it. I plan on quilting this top with a moderate to slightly dense pattern, so I won’t be worried about seams coming open​, and today’s battings are so well made that I have never had trouble with bearding of my batting through the seams. Keep all of this in mind, and make the choice that is right for you.

Cutting Your Fabrics

Begin by pressing all of your fabrics with a hot steam iron to work out all the wrinkles. This step is important when working with the kaleidoscope ruler to ensure our cuts are as accurate as possible. Following this, I will give instructions for cutting your isosceles triangles (we will refer to them as Triangle A from here on out) and your right-angled triangles (we’ll call these Triangle B). After these step-by-step instructions you will then see a list of strips needed from each fabric, as well as the number of triangles that need to be subcut from those strips. To save time, you can stack your strips of fabric when cutting your triangles, just be sure to not stack more than two folded strips at a time (in other words, no more than four layers of fabric).

Triangle A (Isosceles) Cutting Instructions

Halloween-Quilt-1

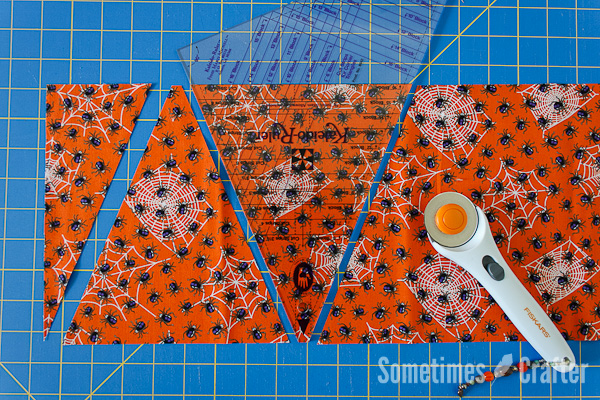
From each of the fabrics, cut the specified number of 8.5″ x width of fabric strips, being sure to square up the edge of the fabric before cutting the strips. (If you are using a fat quarter for this, your width of fabric will be the 22″ length.) Lay your cut strip in front of you so that the length runs parallel to you and the bottom edge of the cutting mat. Go ahead and leave your fabric folded when working from yardage. Using the Kaleido-Ruler, line up the black line on the isosceles triangle side for the 16″ block (this is the side with the Marti Michelle logo on it) with the bottom edge of the fabric strip, as far to the left as possible, and cut along both sides of the triangle. You will discard the piece on the left and set aside the triangle under your ruler.

Halloween-Quilt-3

This image shows you the 16″ Block line on the ruler lined up with the bottom edge of the fabric strip. That is the line you will use to make all of your Triangle A’s. You should also notice, when this line is on the bottom of your strip that the top, blunt point of the ruler is flush with the top of your strip.

Halloween-Quilt-2

Rotate your ruler so that the black line for the 16″ block is at the top of your strip. Line up the left edge of the ruler with the last cut you made on the fabric and cut along the right side of the ruler. Set aside the triangle under your ruler.

Halloween-Quilt-4

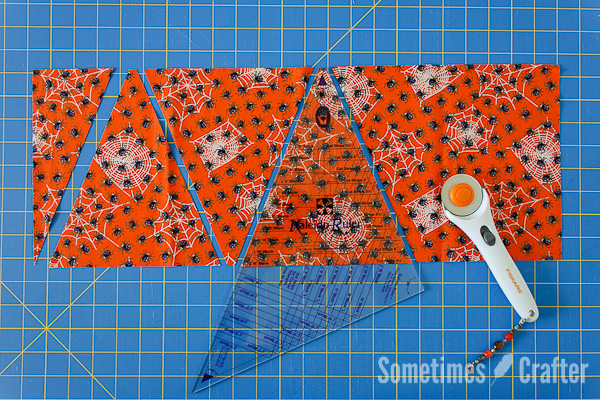
Rotate your ruler around again, so that the 16″ block line is on the bottom of your strip, and the left edge of the ruler is lined up with the edge of the fabric, and cut on the right of the ruler. Set aside the triangle under your ruler. Continue rotating your ruler until you have the right number of triangles. Each 8.5″ strip yields 9 triangles (for the 9th triangle you will need to unfold your strip)
You will repeat these sames steps to cut all of your equilateral triangles.

Fabric cuts for Triangle A pieces:
* Spooky Spider: 1 – 8.5″ x WOF strip; 4 Triangle A pieces.
* Dot Orange: 1 – 8.5″ x WOF strip; 4 Triangle A pieces.
* Spider Web Black: 2 – 8.5″ x WOF strips; 16 Triangle A pieces.
* Fraidy Cat Purple: 2 – 8.5″ X WOF strips; 12 Triangle A pieces.
* Dot All Over Black (Background): 4 – 8.5″ x WOF strips; 36 Triangle A pieces.

Triangle B (Right-Angled) Cutting Instructions

Halloween-Quilt-5

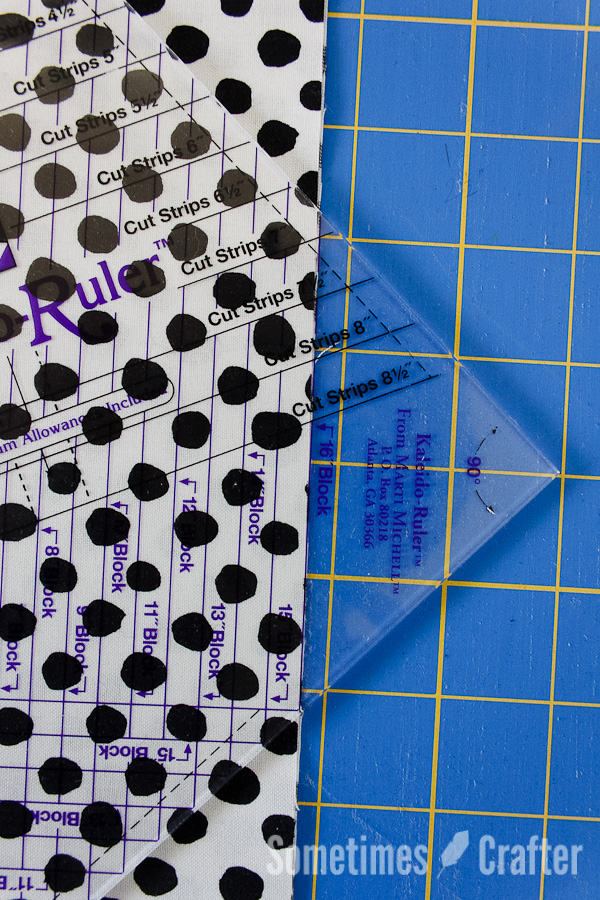
To cut your strips from the fabric yardage for these triangles, you will be using the Kaleido-Ruler to achieve the correct width of the strip. Orient the fabric with the selvage edges towards you and the bottom of your cutting mat, and the fold at the top. Square up the RIGHT edge of your fabric. Using the purple lines that run parallel to the long edge of the ruler (you will see “Cut Strips for Corner Triangles” on the ruler, with the lines for your block size you’re making above it), line up the purple line for the 16″ Block on the RIGHT edge of your fabric. The 90 degree point will be to the right of the fabric and the long edge will be on your fabric several inches in from squared edge.

Halloween-Quilt-6

Using a 24″ long ruler, and holding the Kaleido-Ruler in place firmly with your right hand, slide it up to the left side of the Kaleido-Ruler, flush to the long, straight edge.  Hold the 24″ ruler firmly in place and then slide the Kaleido-Ruler out of the way and cut along the right edge of the 24″ ruler. This strip, to the right of the ruler, is the strip you will use to cut your Triangle B’s.

Halloween-Quilt-7

To cut the triangles, lay the strip of fabric on the cutting mat so that the long edge is parallel to the top and bottom of the cutting mat. If you left your yardage folded, make sure the fold of the fabric is to your right. Using the 45-degree, pointed tip of the ruler, find the 16″ Block purple line and lay that onto the bottom edge of your strip. The point of the ruler should be flush with the top of your strip.

Halloween-Quilt-9

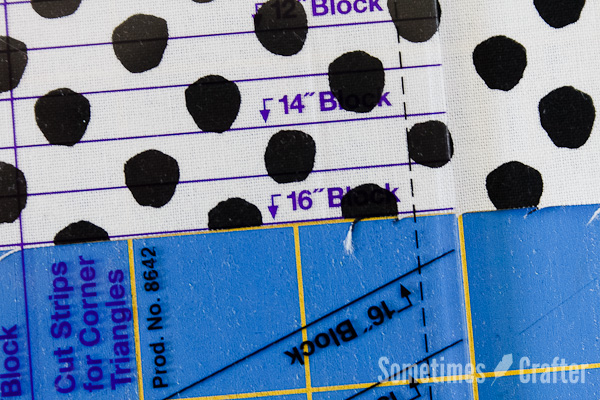
This photo shows the purple line for the 16″ Block flush with the bottom of the strip.

Halloween-Quilt-8

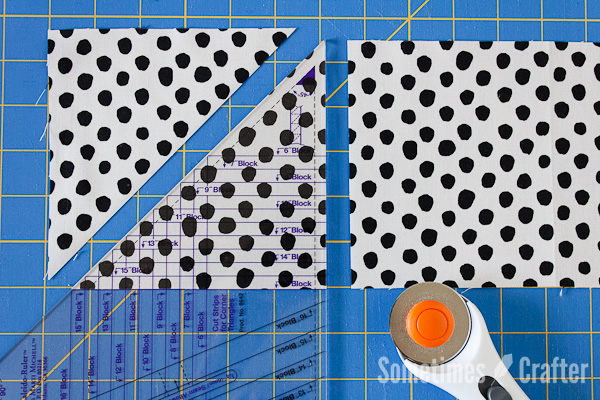
Using your rotary cutter, cut on both the right (straight) and left (diagonal) side of the ruler. This will give you two triangles (or four if your fabric was still folded in half). Repeat until you have the desired number of triangles. Each width of fabric strip will give you 14 triangles.

Fabric Cuts for Triangle B pieces:

* Fraidy Cat Purple: 2 – 1 – Kaleido-Ruler 16″ Block strip width and leftovers from Triangle A strip; 16 Triangle B pieces. (Each width of fabric strip will make 14 Triangle B pieces.)
* Dot All Over Black (background): 2 – Kaleido-Ruler 16″ Block strip width; 20 Triangle B pieces.

If you would like to see videos of how this ruler is used, this link has a 4 part series on using the Kaleido-Ruler (Cutting and Making the Kaleidoscope Block).

Quilt Block Assembly

Halloween-Quilt-13

Once all of your pieces are cut, I recommend placing them into 9 separate piles, one for each block.

Halloween-Quilt-14

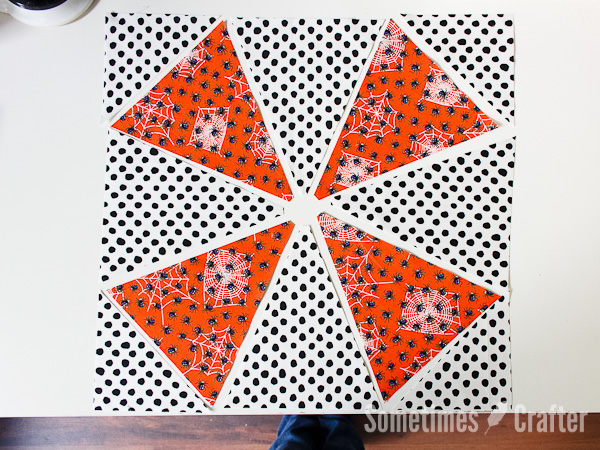
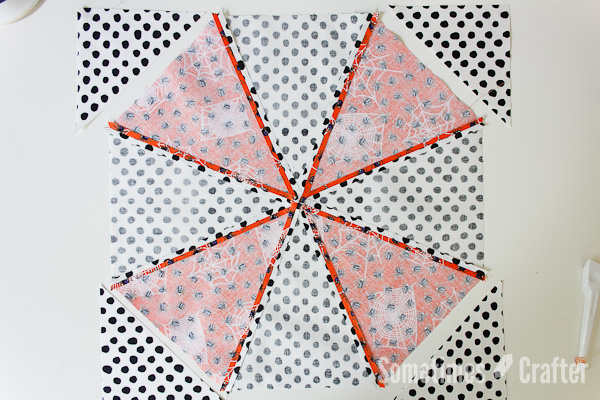
Working with one block at a time, I like to lay them out as they will be sewn together.

Halloween-Quilt-16

Begin by sewing the center Triangle A pieces together, sewing a print to a background piece, keeping with the pattern of the block. Repeat for all four pairs.

Halloween-Quilt-17

After these pairs are sewn together, I finger press the seams open at the points of the block, up about an inch or so.

Halloween-Quilt-18

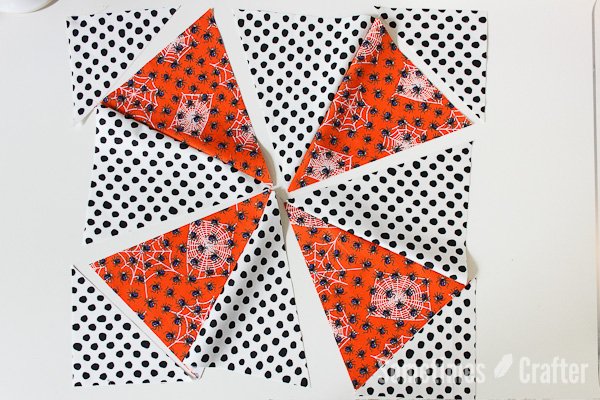
Matching two pairs together along their sides, sew together. Repeat for the other two sets.

Halloween-Quilt-19

At this point you will have two halves of an octagon sewn.

Halloween-Quilt-22

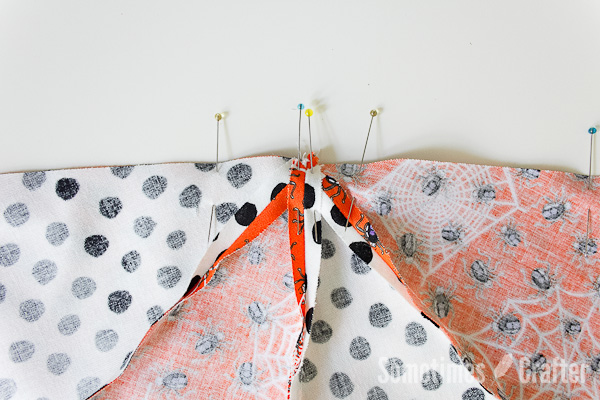
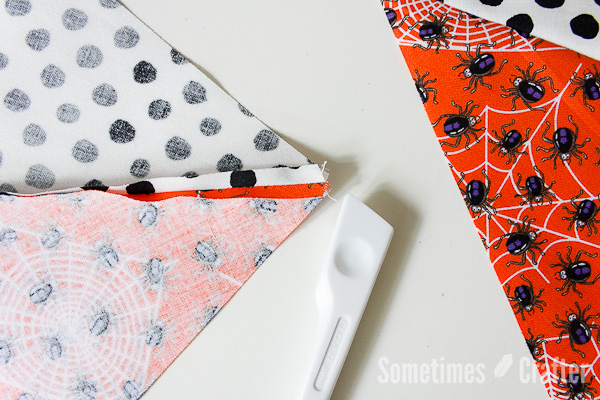
Finger press the seams open at the blunt points, up about an inch or so, and match the center seams on both halves to each other and pin in place along the seam allowance. I prefer to pin on each side of the seam allowance so there is no shifting when sewing.

Halloween-Quilt-23

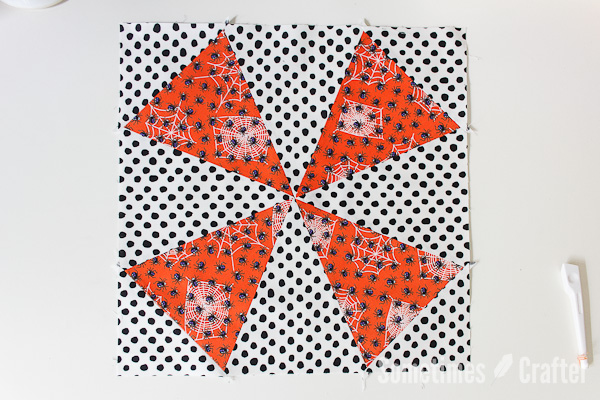
Sew the two halves together. You will now have a completed octagon that needs its seams pressed. This photo shows what the back of your block will look like.

Halloween-Quilt-25

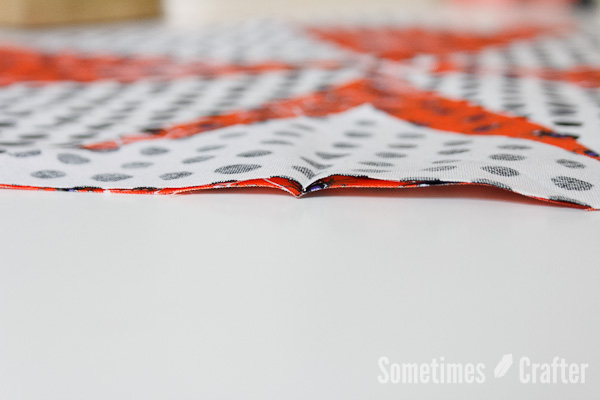
Press all of the seams open with a hot steam iron.

Halloween-Quilt-27

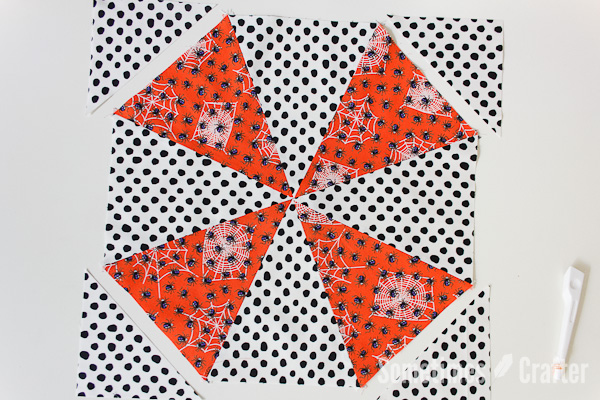
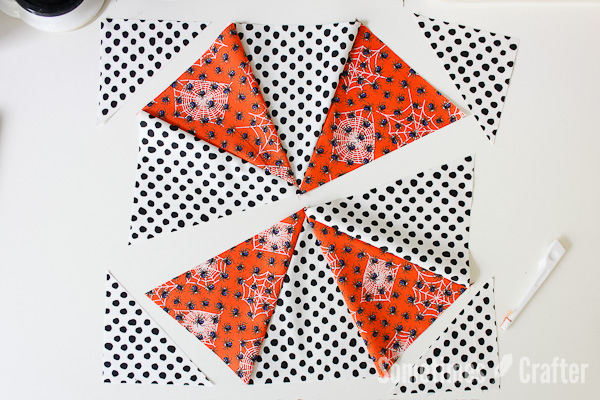
Finally, sew the four corner pieces to the octagon piece, matching the centers of the corner pieces with the center of the triangle it will be sewn to.

Halloween-Quilt-28

I find the easiest way to do this is to fold the pieces in half and finger press and then match the centers and pin.

Halloween-Quilt-30

After stitching all four sides, press your seam allowances open with a hot steam iron. You may find there is a small amount of wrinkling at the center of your piece. Simply spray with water and press with a hot steam iron until you are happy. I was able to get mine to lay flat without any wrinkling. Assemble all of your blocks in the same fashion, referring to the diagram below as you sew for proper fabric placement. Your block should measure 16.5″ square when finished.

Quilt Top Assembly

Halloween-Quilt-Diagram

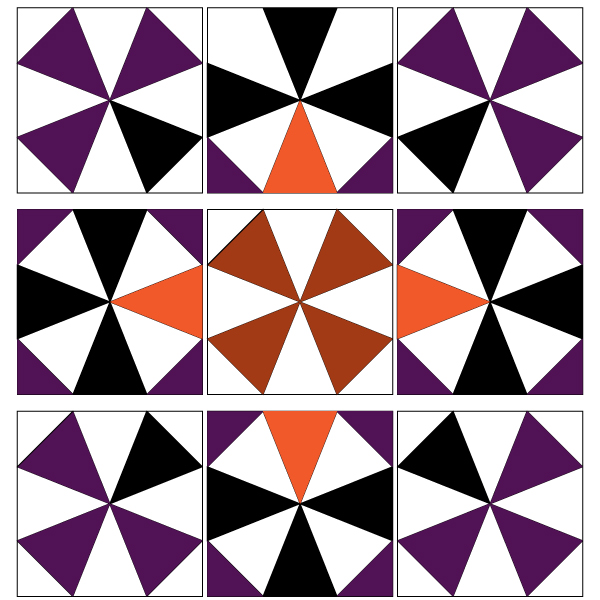
Once all of your blocks are assembled, lay them out in order, making sure blocks are turned appropriately, so there are no mistakes when sewing. Sew the blocks together in rows (top row, middle row, then bottom row) and press seam allowances open. Sew all three rows together, and press seam allowances open.

Quilt Backing

To create your backing, cut your backing fabric yardage in half so that you have two pieces measuring 54″ x width of fabric. Sew the pieces together along their 54″ length. Press your seam as desired. Your backing will measure 54″ x 88″. Trim if desired to 58″ x 58″, making the backing approximately 4″ wider on all four sides than the quilt top.

Quilt Binding

To bind this top you will need approximately 6 strips of fabric. I like to cut my fabric 2″ wide x width of fabric, but enough yardage is provided for wider binding widths.​ For a thorough tutorial on creating quilt binding, and sewing it to your quilt top, I suggest checking out my 3 part binding tutorial series.

Halloween-Quilt-33

I think you will be surprised just how quickly this quilt goes together. It can easily be cut and pieced in a day. I had hoped to have the quilt quilted by the time this tutorial went live, but as a professional longarm quilter, I can never seem to get my own quilts loaded and quilted. I do hope to have this quilted in the next week or two, so I hope you will keep an eye on my blog where I will share photos of the quilting. I’m thinking spider webs! I will also be sharing a photo of another quilt I made using black and orange fabrics from my stash in a slightly different layout, so please stop by and take a peek. Happy quilting!

Comments (76)

  • Kelly Wilson

    October 2, 2014 at 9:44 am

    I like both versions. I could see different fabric making a nice Xmas/Winter season quilt as well. Thanks for sharing.

  • Lori Morton

    October 2, 2014 at 10:23 am

    Love your Quilt!! & Love this pattern! Thanks for the Tutorial!! Can see I definitely neeeeeeed this Ruler! Sooo cool! Agree…would make an Awesome Christmas quilt too.

  • Diane H

    October 2, 2014 at 10:30 am

    What a fun quilt. Wonderful tutorial at Sew In Love with Fabric. Thank you, definitly going to look for these rulers.

  • Quilting Tangent

    October 2, 2014 at 10:38 am

    Nice quilts.

  • Chris

    October 2, 2014 at 10:59 am

    Great tutorial. I like both versions.

  • Susan the farm quilter

    October 2, 2014 at 11:28 am

    What a fabulous tutorial!! I have this ruler – impulse buy for me too, but I have never used it. Thanks to you, I will be using it soon!!!

  • Delaine

    October 2, 2014 at 11:34 am

    Wow – your quilt is beautiful! I am going to have to get one of those rulers. Thanks!

  • Joyce Carter

    October 2, 2014 at 11:42 am

    I love the quilt. Thanks for sharing the tutorial at the Sew in Love with Fabric blog.

  • Susan

    October 2, 2014 at 11:51 am

    I like both versions of your quilt. I like the illusion of circles. Also thanks for showing it in two different colorways/fabric placements. I can now picture it easily in other colors/fabrics. O will have to put the ruler on my wish list.

  • Sandra Timmons

    October 2, 2014 at 12:07 pm

    I just love your Halloween Quilt Tutorial. Thank you so much for sharing with all of us. These tutorials mean so much to us and you sure make it so easy to follow. Sometimes some of us just needs a little more help. I just love Benartex so much and really appreciate all of your time and devotion to helping us make quilts and other quilty goodies.

    Sandi Timmons
    [email protected]

  • JoyceLM

    October 2, 2014 at 12:12 pm

    Lovely quilt – thanks for the great tutorial.

  • Lizzie

    October 2, 2014 at 12:17 pm

    Both versions are awesome, and this would easily look fabulous with a Christmas palette, or even a sea glass palette. I made a mini years ago with a similar kaleidescope effect from quiltmaker, but with no template-I see now I definitely Need one! Thanks for the tire and links for the kaleidoscope-ruler.

    1. Lizzie

      October 2, 2014 at 12:18 pm

      Thanks for the *Tutorial*, not tire!

  • Gill

    October 2, 2014 at 12:58 pm

    I love this quilt Christina!
    I’m going to put the ruler on my Christmas list!!!

  • Lori H.

    October 2, 2014 at 1:46 pm

    Love the tutorial. Will definitely pick up the ruler now!

  • Vicki H

    October 2, 2014 at 1:54 pm

    Thanks for the tutorial. I like that the quilt has the illusion of having curves without sewing any curves.

  • Sandy K

    October 2, 2014 at 1:55 pm

    Beautiful quilt. Thanks for sharing the tutorial.

  • Martina

    October 2, 2014 at 2:04 pm

    I loove both versions very much. The black and orange is my favourite. I think I really have to get such a ruler.

  • melissa

    October 2, 2014 at 2:55 pm

    Very nice! I really like the sense of motion and look of curves when it’s all straight lines.

    1. Christina

      October 14, 2014 at 6:51 pm

      Congratulations, Melissa! It looks like Benartex (and random.org) picked your name for the win!

  • Angelia L.

    October 2, 2014 at 3:48 pm

    I love your quilt…. I really like how the pattern gives the illusion of curves. I think I need to put that ruler on my Christmas list. Spider web quilting would be awesome! Thank you!

  • Rina

    October 2, 2014 at 4:30 pm

    I like both versions but have to admit tht the first one is my favorite. This pattern would make up wonderfully in autumn colors. I think I may need to get the ruler as it looks like it could be used in many ways and I’m a ruler collector. Never met one I didn’t like.

  • Kathleen

    October 2, 2014 at 4:37 pm

    Your tutorial is awesome, as is the quilt! You really spent a lot of time writing up the tutorial.

  • Patty S

    October 2, 2014 at 4:56 pm

    Love your quilt, Halloween is my favorite holiday. Spiderweb quilting is definitely in order.

  • Janie

    October 2, 2014 at 5:33 pm

    Your quilts are stunning I love both colorways. Your studio is awesome as well, and organized I might add. Thanks for the tutorial and the chance at the giveaway.

  • Margaret Schindler

    October 2, 2014 at 5:52 pm

    I love your quilt. You really explained it so well. Thank you

  • Kathy h

    October 2, 2014 at 5:54 pm

    I like both versions. I love seeing one pattern made with different fabrics.

  • Cecilia

    October 2, 2014 at 6:28 pm

    Thanks for the great tutorial. Your quilts are beautiful. Thanks for the giveaway..

  • Nancy

    October 2, 2014 at 7:08 pm

    Beautiful quilt! Those fabrics really are great in it.

  • shawna

    October 2, 2014 at 7:26 pm

    This is a fabulous quilt. I have the ruler and had NO IDEA what to do with it! Thanks for blogging for Benartex!

  • Jackie Thompson

    October 2, 2014 at 8:21 pm

    I like how the fabric selections make a difference in both of these quilts as well as where the fabrics are placed. It looks awesome!

  • Whiskers

    October 2, 2014 at 8:37 pm

    Love this quilt. Kaleidoscope was one of the first blocks I learned to make. Love the way it moves. And your quilts are spook-tacular.

  • Betty Woodlee

    October 3, 2014 at 12:57 am

    Thanks for tutorial Must try this quilt, I liked it very much!

  • Amy DeCesare

    October 3, 2014 at 4:20 am

    This is such a clever quilt! The specialty ruler looks like fun to use. Lately I’ve been fascinated with tools like that one – I think I’ll have to check it out personally. I love both versions of the quilt that you shared!

  • Kaesey

    October 3, 2014 at 5:09 am

    Wow, I love this! I’m generally not one for Halloween fabrics but I think you’ve converted me. Turns out they just had to be balanced the right way. =) I could see this pattern used for most holidays, actually!

  • CraftCrave | DigiFree | CraftCrave

    October 3, 2014 at 6:17 am

    […] Halloween Quilt Tutorial – 1 freebie(s)? […]

  • Mary

    October 3, 2014 at 7:50 am

    I love that quilt. I really like the Halloween one with the orange in the center. Fabulous.

  • Cami

    October 3, 2014 at 7:50 am

    I really love both of these quilts. It really makes me want to make one, I guess I should go buy a ruler :-)

  • Michele T

    October 3, 2014 at 7:59 am

    I love this pattern and both colour versions look awesome!! I have to make this pattern one day soon… if I win… even sooner ;-)

  • Brenda Hulsey

    October 3, 2014 at 8:01 am

    Very nice! I see more rulers on my Christmas list!

  • Kathie M

    October 3, 2014 at 8:30 am

    I love that!!

  • Heidi

    October 3, 2014 at 8:51 am

    Thanks for the chance – i follow their blog on bloglovin.

  • Karen

    October 3, 2014 at 9:02 am

    Great tutorial. I like the first one with the orange in the center. Easily adaptable to other color combination.s

  • Debby E

    October 3, 2014 at 9:29 am

    Great quilt – I love it & will certainly head out to get a Kaleido-ruler! Thanks so much for the tutorial & the chance to win. :)
    Debby E
    [email protected]

  • Susan

    October 3, 2014 at 10:38 am

    Great tutorial! Thanks!

  • Sherry VF

    October 3, 2014 at 11:10 am

    Love your tutorial and options for making this quilt. I think any holiday or birthday print would work great. Thanks. svonfumetti at yahoo dot com

  • Maryellen

    October 3, 2014 at 11:36 am

    Great quilt! I love that you did it twice, in different color combos. I’ll need to find that ruler. Sounds fun.

  • sheri

    October 3, 2014 at 6:00 pm

    I had to come over from Sew in Love with Fabric to tell you thank you so much for your tutorial! I’ve been admiring this design for a year or more and now I can make it with your instructions. Thank you, thank you!!

  • Barb in MI

    October 3, 2014 at 6:33 pm

    Cool quilt – love the colors! I need to check into the MM ruler soon! Thank you!

  • kaholly

    October 5, 2014 at 5:57 am

    Now that’s a fun quilt, and an excellent tutorial!! Thanks so much for sharing with us.

  • VickiT

    October 5, 2014 at 8:55 am

    What a great looking quilt! I LOVE your color choices. I too have seen this ruler you’ve used but was afraid I wouldn’t find more uses for it other than the quilt I was viewing at that time using it. I feel a little better after reading your comment about the ruler. I might have to rethink purchasing it now. Thank you for such a great tutorial.

  • Nancy E

    October 5, 2014 at 9:02 am

    Your Halloween version is enough to make me want to buy the ruler and make my own version. Also great for fun kids quilts.

  • Gloria B

    October 5, 2014 at 9:58 am

    I believe i have that ruler but have never used it! I am prone to buying rulers I see at Shows and then never using them…

  • Kristi

    October 5, 2014 at 8:56 pm

    Love your quilts!

  • usairdoll

    October 6, 2014 at 12:44 am

    Such a beautiful quilt! Love this in the purple and black. Thanks for your tutorial as well. I’m going to add MM’s ruler on my wish-list and this quilt is going on my to-do list, hehe.

    Thank you and Sew in Love for a super giveaway and a chance to win.

    usairdoll(at)gmail(dot)com

  • Karen Ann

    October 6, 2014 at 5:15 am

    Sych a fun quilt and gorgeous colors! Feels Halloween-y, but in an elegant way. Thanks for sharing your tutorial, another quilt to add to my bucket list!

  • Donna Joy

    October 6, 2014 at 7:11 am

    Love your tutorial, the purple and black is stunning.
    I have saved blue fabric to make this quilt. Now I am inspired to get busy to make this quilt. Hope I have the ruler

  • Linda Webster

    October 6, 2014 at 2:05 pm

    Thank you so much for your great tutorial. The photos and instructions are so detailed. The quilt is beautiful!

  • Sally

    October 6, 2014 at 2:08 pm

    Lovely quilt. thanks for sharing. Love my Kaleidoscope ruler, very useful!

  • Debbie D.

    October 6, 2014 at 2:15 pm

    LOVE the way the colors flow on this one!

  • Daneen

    October 6, 2014 at 3:35 pm

    Hi,
    love the quilt but your design wall has really caught my eye can you tell me about it ?
    Thanks

    1. Christina

      October 6, 2014 at 9:08 pm

      It is called a Vanishing Design Wall – http://www.vanishingdesignwall.com It’s wonderful if you have to use it over a closet or a window in a room and need to roll it up when you’re not using it. I use to have it over the window in my other sewing room, but it just so happened to fit in this small wall space behind the door to the room, and next to the door to the bathroom, perfectly. I usually roll it up to hang completed quilts on the wall behind it for photographing.

  • Helen

    October 6, 2014 at 6:34 pm

    Gorgeous quilt! Thank you for hosting this giveaway.

  • Janice Svercek

    October 6, 2014 at 7:45 pm

    Great tutorial and thanks for the chance to win.

  • Linda Fleming

    October 6, 2014 at 9:45 pm

    Great tutorial.
    The quilts are beautiful. I love the kaleidoscope effect!

  • Arianna M.

    October 7, 2014 at 2:30 am

    I like the medallion design, and I really like the spooktacular fabrics, so I’d love to win some.

  • Colleen

    October 7, 2014 at 4:09 am

    Thank you for doing the blog hop you make it sound so easy to make this quilt. I really like this pattern the illusion of curves is fascinating

  • Piroska

    October 7, 2014 at 9:04 am

    Love your gorgeous quilt! Great colours!
    Thanks for the wonderful giveaway.

  • Elizabeth McDonald (catskill quilter)

    October 7, 2014 at 9:57 am

    I really like your Halloween quilt!

  • Cindy Dahlgren

    October 7, 2014 at 1:44 pm

    Absolutely adore your kaleidoscope quilt. I think I need this ruler. CDahlgren at live dot com

  • Kim

    October 8, 2014 at 5:47 am

    Amazing quilt…spider web quilting would be the icing on the cake! Thank you for the tute:)

  • Jacklynn Grimm

    October 8, 2014 at 7:41 am

    I looked through my collection of fabrics and found I have this ruler (my own impulse buy) for 8″ blocks, and I’ve never used it. Thanks for the inspiration, can’t wait to dig through my stash and make something!! Thanks for the give away! jacklynnsteven at netzero dot com

  • Jenelle Boxberger

    October 8, 2014 at 1:18 pm

    I like both of your quilts. This is a fun blog hop. I was out of town so I got a late start. Thanks.

  • Nicole Sender

    October 8, 2014 at 9:57 pm

    I think both your quilts are great! The background print is perfect.

  • Susan in OK

    October 11, 2014 at 1:17 am

    I love the quilt pattern. In the quilts, you certainly caught the versatility of the pattern for various fabrics. The tutorial makes me think I might be able to accomplish making a quilt using the ruler and your clear directions. Thanks for the great tutorial and the giveaway.

  • Karen Thurn

    October 11, 2014 at 8:43 am

    Very nice quilt. Thanks for the tutorial.

Leave a comment

Your email address will not be published. Required fields are marked *

Prev Post

Will You Teach Me To Sew?

Next Post

Inside My Quilting Studio