Sometimes Crafter

  • Home
  • About
  • Quilting
    • Price + Services
    • Designs
    • Gallery
    • Quilt Prep
    • Quilting Request
  • Blog
    • Tutorials
    • Quilting
    • All Categories
  • Contact
    • Errata
    • FAQ
  • Shop
    • Quilt Patterns
    • Bag Patterns
    • Sewing Patterns
    • My Account
    • Cart
Sampler Quilt Along•Tutorials

Hexagons Tutorial

October 28, 2009

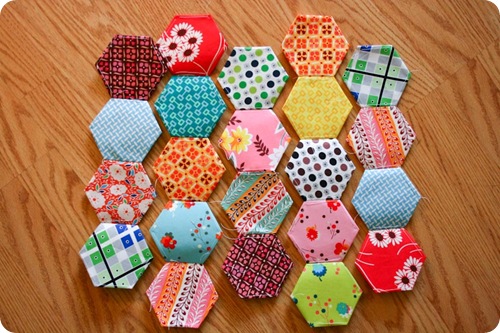
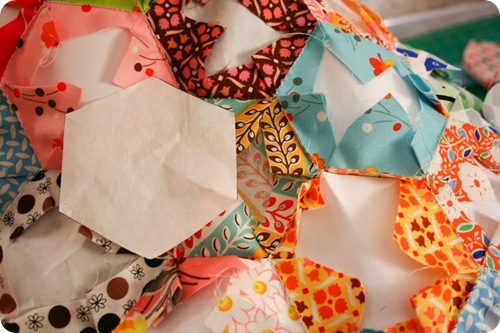
October’s block of the month is hexagons.  A warning: these things are addicting!  I’m going to give a quick run down of how to make the block here, but for a more informative discussion on hexagons and everything I tried, please see my separate post on “Adventures in Hexagons” next posting.  There are many ways to make your hexagons, but the purpose of this tutorial is to learn the English Paper Piecing method.

Preparation

1. Download the 2” Hexagon Template and print off three pages.  Cut out the hexagons.  OR purchase a set of 2” paper hexagons at a local fabric store.  You need a total of 22.
2.  Cut 22 – 4 1/2” squares from your fabrics.

Directions
IMG_4398 IMG_4399
IMG_4401 IMG_4407

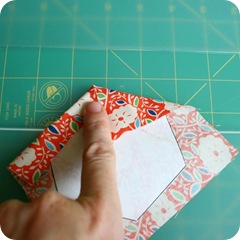
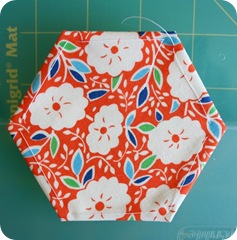
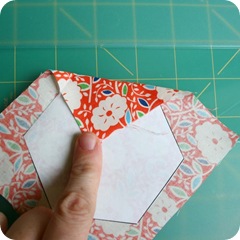
1.  Lay your hexagon paper onto your square of fabric and fold down one corner over the paper piece, flush against the straight edge.
2.  Fold over the side to the left of your first fold over the point of the hexagon, making sure the second fold is flush against the side of the hexagon paper.
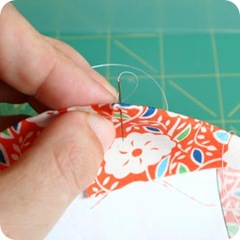
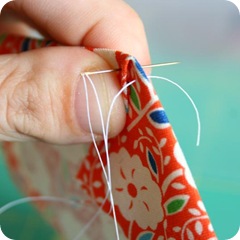
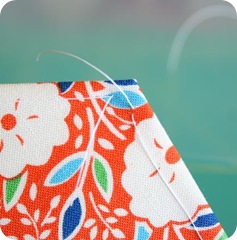
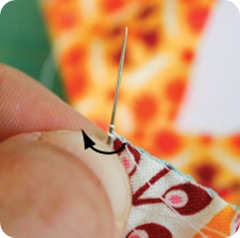
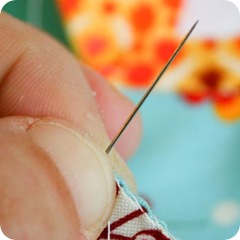
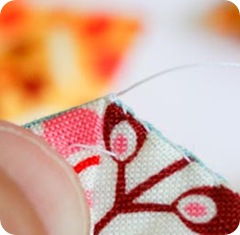
3.  Insert your needle and thread from the front of the fabric, through the paper piece and to the back side to the right of the fabric fold.  Pull thread through leaving a tail on the front side of the hexagon.  No need to knot it.
4.  Insert the needle from the back towards the front going through the fabric fold and paper back to the front of the hexagon.
IMG_4409 IMG_4424
IMG_4417 IMG_4418

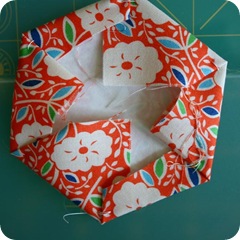
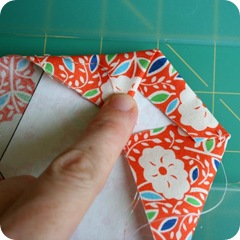
5.  Fold down the fabric to the left of the fold you just secured and repeat step 3 and 4 to secure it, keeping a running stitch from corner to corner.  Repeat this 4 more times until your hexagon is wrapped in the fabric.  Leave the tails of your thread long and don’t worry about knotting them.  If I was worried about my thread slipping out, I would go back in and out of the fabric where I first started securing the hexagon.

Do this for all 22 hexagons.
IMG_4462 IMG_4465

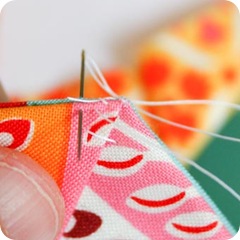
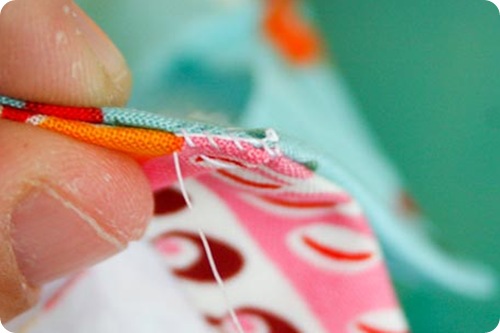
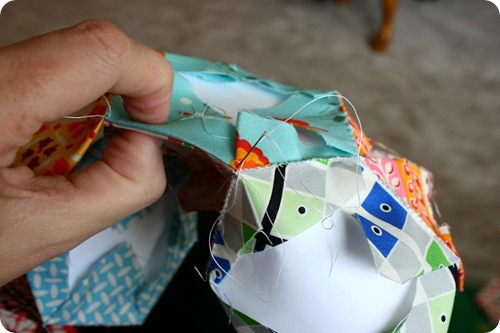
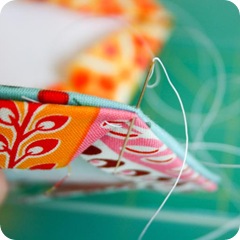
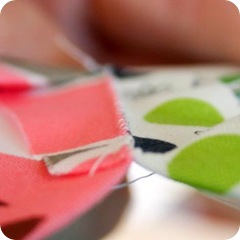
6.  Place two hexagons right sides together, mathcing the sides at the corners.  Insert your needle at the corners, grabbing just the fabric and not the paper hexagons.  Don’t worry about knotting your thread, just leave yourself a little tail.  Insert your needle again into the same hole from back to front.  This is called a whip stitch.
7.  Continue whip stitching down the length of your hexagon, keeping your stitches close together.  Catch the tail of your thread under your whip stitches as you go along to secure it.

IMG_4466

Your captured tail will look something like this under your stitches.
IMG_4488 IMG_4478

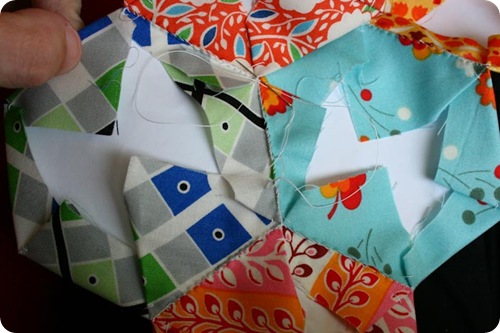
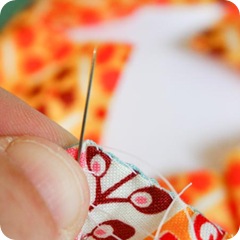
8.  Whip stitch to the end of your hexagon and again insert your needle into the corner twice, just as you did at the start.  I do place a tiny knot at the end to secure.  Open out your hexagon and you will see that the stitching has created a tiny ridge.  From the front you will see a seamless connection.

As an aside, here is how I quickly tie my knots (something that I just learned recently)
IMG_4472 IMG_4473-Edit
IMG_4474 IMG_4475

1.  I place my needle on top of my fabric to the immediate left of my thread.
2.  I wrap my thread around my needle twice, going from right to left.
3.  I pinch the wrapped thread under my thumb and pull the needle and thread up and through the two loops.
4.  I now have a perfect knot at the end of my work, holding it securely in place.

IMG_4550

Continue sewing your hexagons together creating 3 strips of 4 hexagons and 2 strips of 5 hexagons. Lay them out so that you have a good visual of how they will be sewn together and grab your first two strips.

IMG_4553

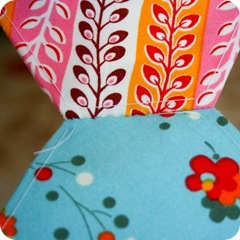
9.  Sew your strips together.  You will be sewing “Y” seams, which are really very easy to do.  You will just match up the sides of your hexagons and slightly bend the hexagons as needed to match the sides.  I like to start at the top and work my way down so that I am only having to knot my thread at the end instead of several times along the way.

IMG_4554

Here is what your seams will look like as you piece together the rows.  The piecing here shows how the blue/green check has been sewn to the pink vine and blue posy.  Next the orange flower will be sewn to the blue posy and then the orange tile.

IMG_5112

Continue in this fashion until your whole block is pieced.

IMG_5113

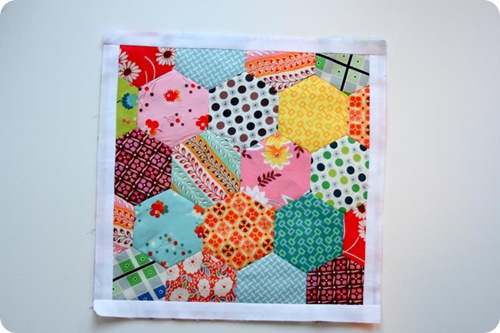
Cut some strips of fabric, whatever color or print that you choose.  I am using white as a filler piece in my blocks, so I continued that theme here.   Decide how much of your hexagons you want peeking through and draw pencil lines on the hexagons.  I drew mine so that I had a square (centered on my hexagons) of 11 1/2”.  I then cut strips of white fabric to be 1 1/2”, laid them on my block, rights sides of fabric together, and used my penciled lines as the guide for placement of my strips.  I then sewed them down with a 1/4” seam allowance.  Finally, I trimmed my block to 12 1/2” square.  If you had not already decided to remove your papers before sewing, do so now.  That is what I did for my block.  I just used a very short stitch length when sewing my boarder fabric on so as to make the tearing away of the fabric easier.  This way I knew that my hexagons would keep their shape as I sewed.

IMG_4591

I loved the effect of this block being boxed in by the white.  I feel as though I’m looking at a framed picture, or looking into a window.  Framing this block out just finished it off for me.  I hope you will give these a try, they are so much fun and easier to take with you where ever you may go.  Don’t forget to read the accompanying post on my “Adventures in Hexagons” .

Sampler Quilt-Along

41 Comments

Reader Interactions

Leave a Reply to andrea creates Cancel reply

Your email address will not be published. Required fields are marked *

Comments

  1. Andi says

    October 28, 2009 at 9:02 am

    Pretty hexes!!

    Reply
  2. andrea creates says

    October 28, 2009 at 12:37 pm

    great photos and tutorial-thanks :)

    Reply
  3. wishes, true and kind says

    October 28, 2009 at 1:27 pm

    Great tutorial! I think I will make a mini hexagon quilt at Christmas. I have been itching to try this type of piecing, and it would be great to have a take-along project.

    Reply
  4. Leslie says

    October 28, 2009 at 1:31 pm

    this is so beautiful….i love hexagons!!!

    Reply
  5. SisterDG says

    October 28, 2009 at 1:39 pm

    A gorgeous tutorial – you are so great at these! Thank you indeed – I’ve been wanting to do some hexes for a long time.

    Reply
  6. randi says

    October 28, 2009 at 1:48 pm

    This is lovely! And your photos are just great to look at–so colorful!

    randi

    http://ihavetosay.typepad.com/

    Reply
  7. Giddy for Paisley says

    October 28, 2009 at 3:51 pm

    Now I feel like a am really behind on my blocks. The hexagons look great!

    Reply
  8. iHanna says

    October 28, 2009 at 5:05 pm

    Such beautiful clear images, great tutorial! I love hexagons so much!

    Reply
  9. kristi says

    October 28, 2009 at 6:01 pm

    i LOVE every fabric you chose! wow.

    Reply
  10. You can just call me...dotty... says

    October 28, 2009 at 6:25 pm

    Wonderful tutorial, and such a pretty block…..a windowfull of hexy flowers !

    Reply
  11. Cristin says

    October 28, 2009 at 6:41 pm

    I will be coming back to use this tutorial, for sure! Great info in there!

    Reply
  12. Crafty Girls Workshop says

    October 28, 2009 at 11:13 pm

    THat’s a great tutorial! I have been working on some hexies and having problems with my stitches showing on the front when I stitch the hexies together. I’ve been told it’s because I need to use a different colored thread. Thanks for the tutorial again!

    Anna

    Reply
  13. Christina Lowry says

    October 29, 2009 at 4:16 am

    Ohhhh, love the block! I have been making hexes for a quilt I hope to do entirely by hand(!), but I never thought of having them in a block like this. You are right though, the white looks fantastic as a frame! :)

    Reply
  14. Blogless me says

    October 29, 2009 at 10:14 am

    Your hexies are so zingy and cheerful. The white really frames them well.

    I have just recently started to do pentagons and hexies, so I can only speak from the little experience that I have. I usually fussy cut, so I find it easier to follow the shape, though I am generous with the seam allowance.
    I also use little pegs to keep the fabric in shape and not slipping. As a matter of fact, I have discovered that when I peg a couple of hexies and only then start stitching they get pressed by the pegs as if they were ironed.
    I suppose that if I were to make a very big GMG I shall cut squares instead. I am a hand quilter, so I don’t know how the additional weight will influence the quilting, though.

    Reply
  15. [email protected] says

    October 29, 2009 at 4:59 pm

    Gorgeous and so crisp! I love blocks that bring in lots of fabric! Thanks so much for this, I’ll be linking.

    Reply
  16. Salihan says

    October 29, 2009 at 11:37 pm

    Thank you so much for the clear and easy to understand tutorial! I’ve been wanting to learn this for a while now and I think I can finally get started! :) http://salihan.com

    Reply
  17. Corrie says

    October 30, 2009 at 3:38 pm

    I like it! Just did some dresden plates paper piecing. Thanks for the tutorial.

    Reply
  18. Michele says

    October 31, 2009 at 10:47 pm

    You suckered me in…again! You write the best tutorials! Thanks for thinking of us in blogland. I stink at hand sewing, but this wasn’t too bad. I just did a flower, but I want to frame it! LOL!

    Reply
  19. Estela says

    November 7, 2009 at 8:05 pm

    Hexagons look fun! I’m going to give it a try and make a hexagon block! Thanks for the inspirations and tips.

    Reply
  20. Ginger says

    December 15, 2009 at 2:40 am

    Thanks for sharing your quilt-a-long with us. Was this the last block?

    Reply
  21. Kathleen Pitt says

    March 9, 2010 at 4:43 am

    thank you so much for this tutorial and the information, It looks so much easier than I thought it would be! I am going to give it a go , just a little strip to go across the back of a quilt and see how I like it :)

    Reply
  22. erica says

    April 6, 2010 at 11:56 pm

    I love this tutorial! Thanks Christina!

    Reply
  23. dalyax says

    December 21, 2010 at 3:02 am

    Thanks so much for this tutorial! Gorgeous pictures and wonderful instructions :) I love that you first started off with a square piece of fabric, nice and simple!
    Thanks again!

    Reply
  24. Coffeebean's Dailies says

    January 14, 2011 at 12:09 pm

    ah hexie love!!

    Reply
  25. jhenzel says

    January 19, 2011 at 3:32 am

    Hi – some of my stitches show from the front and I’m not sure how to correct it. Do you have any advice?

    Reply
  26. Kate says

    August 6, 2015 at 3:22 pm

    So… you don’t sew through the paper when adding hex to hex, and the papers come out intact at the end. BUT It looks like you DO sew through the paper to get the fabric to stay on the paper. How does that not tear the paper later? Your later pic of freed paper has no holes in it. How does that happen???

    Reply
    • Christina says

      August 11, 2015 at 9:13 pm

      Correct, I don’t sew through the paper when stitching the hexes together, but I do when I baste the fabric to the paper. Later, I remove the basting stitches and pull out the paper. If you click on the photo, once enlarged, you can shee the holes in the paper.

      Reply
  27. vandeborne says

    March 17, 2018 at 12:29 pm

    Patterns of hexagone plise, dank you

    Reply
    • Christina says

      March 17, 2018 at 7:01 pm

      Link has been updated. You should be able to download it now.

      Reply
  28. Msrilyn Roush says

    August 19, 2018 at 7:28 pm

    When do you pull out the white paper from the hexie?

    Reply
    • Christina says

      August 30, 2018 at 11:54 am

      After it is sewn to any other pieces it needs to be sewn to. Removing them at the end of piecing everything is a good time.

      Reply
  29. ana rama says

    February 1, 2019 at 4:18 pm

    Muito boa as explicacoes do
    paper pieving

    Reply
  30. Fredda says

    March 5, 2019 at 12:27 pm

    I have been looking for a good tutorial for making hexies and this one is perfect. Thank you so much

    Reply
  31. Victoria says

    May 14, 2019 at 3:59 am

    Cómo se saca el papel después

    Reply
    • Christina says

      June 8, 2019 at 9:11 am

      you pull out the basting stitch and slide the paper out from behind.

      Reply
  32. Zeita oliveira Pinto says

    July 7, 2019 at 4:24 pm

    Super lindos ?

    Reply
  33. Louise says

    November 16, 2019 at 5:08 pm

    Do you trim the fabric after you have sewn all your hexies together and have removed your paper?

    Reply
    • Christina says

      December 19, 2019 at 9:19 am

      Sorry for the delayed response! No, I don’t trim the fabric, I figure it just goes into the center and helps fill out the hexies a bit more. But you certainly could if you wanted to!

      Reply
  34. Alta says

    January 12, 2020 at 3:37 pm

    Great tutorial. Can’t wait to try as a beginner

    Reply
  35. Solange LeBLanc says

    February 4, 2020 at 9:55 am

    I finally found a tutorial that shows me how to cut my fabric larger ,I struggle for 2year on my first flower garden . Thanks

    Reply
  36. Selma Regina says

    March 23, 2020 at 3:02 pm

    Genial

    Reply
Previous Cathedral Window Block
Next Adventures In Hexagons

Related Posts

Drunkard’s Path Block

Sampler Quilt Along

Zigzag Block Tutorial

Sampler Quilt Along

Patchwork Diamond Tutorial

Tutorials

Fabric Scrap Basket Tutorial

Tutorials

Primary Sidebar

Shop

Binding 101

Categories

  • Books + Mags
  • Embroidery
  • Longarm Quilting
  • Patterns
  • Quilting
  • Sampler Quilt Along
  • Sewing
  • Spaces
  • Tutorials

Never miss a post

Just stopping in for the yearly documenting-of-the Just stopping in for the yearly documenting-of-the-wrinkles. #41
Here we go...2000 is old enough to drink. Going be Here we go...2000 is old enough to drink. Going be a wild year!
2020: The year I turned 40, saw @tiesto live for m 2020: The year I turned 40, saw @tiesto live for my birthday, and then a bunch of other stuff happened that paled in comparison to both of those events. The end. #longlive2020
The yearly photo of my moms birthday "cake". My mo The yearly photo of my moms birthday "cake". My mom requested I make this Swedish Braided bread with apple pie filling for her birthday this year, instead of a cake. It smells delicious and I can't wait to dig in! #birthdaytreat #swedishbraidedbread
It took a ton of coats of glaze, but Brice's ornam It took a ton of coats of glaze, but Brice's ornament for this year is done. I decided to make his ornament this year, and while I set out to make a toilet paper roll ornament, he saw white clay and assumed goose, so I made him Lucy goose. He's quite happy, and so am I. He loves our Lucy goose.
.
I used oven-bake polymer clay (Michael's brand was what I had on hand), acrylic paint (just the craft variety...again, what I already had on hand), and a glossy glaze (Sculpey, which I don't recommend, its gotten very thin since I last used it, it took way too many coats to be the right thickness). The ornament is about 1.5"h x 1.5"w x 0.5"deep. It was really easy to make, so don't say you can't do it. You can. 
.
#goose #chinesegoose #lucyandherducklings #ornament #handmadeornaments #gooseornament #clayornaments #polymerclay #messwiththehonkyougetthebonk
Irish soda bread seemed like a holiday kind of bre Irish soda bread seemed like a holiday kind of bread to make, especially since it has currents, cranberries and sultanas inside! I don't think I've made one since I was about Brice's age! Its been too long. #holidaybread #irishsodabread
Taking advantage of my end of year time off from q Taking advantage of my end of year time off from quilting to do a little crafting. I made an ornament for Brice (which I'll share later when it's finished), and then painted these cute little canvases while my paint was out yesterday. You can see individual photos of each of them over on my other account  @christinalanecreates (grouped with the photo like this).
It gets so dark here this time of year, by afterno It gets so dark here this time of year, by afternoon I've lost all light for photos! This is another quilt quilted for @jenny.l.barrett I felt Sashy was the right amount of modern and traditional for this quilt top. I was having a hard time picking a design for this but kept coming back to this. It's a go-to design for me and I always love it on everything. I think it ended up being pretty perfect for this. #sometimescrafterlongarmquilting
Copyright © 2021 Sometimes Crafter
  • Privacy Policy
  • Disclaimer
Theme by SheShoppes